Menu Close

Mostly Knitting Blog

Want to find the new stuff on Knitting-and.com, or read about my latest projects and discoveries? This is the place.

Rainbow Loom Angry Birds (Red)

Rainbow loom Red Angry Bird

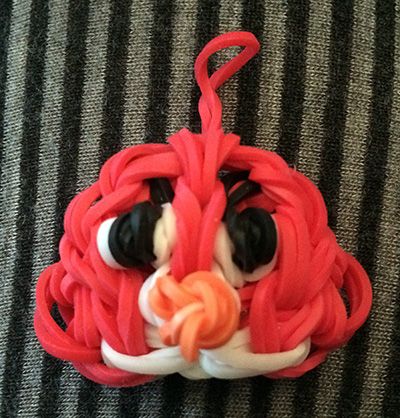
Charlie is a big Angry Birds fan, so I thought I’d have a go at he insisted I make him a Red Angry Bird charmon the rainbow loom. I think it turned out quite well, even though I didn’t have the right coloured bands for his belly.

I would rate this as a challenging project. Because of the amount of bands on some of the pegs, you have to pay very close attention to picking up the correct ones when moving them with the hook. You’ll also need good quality rubber bands as they are under a lot of strain during certain parts of the construction.

I used the following video by DIYMommy to make my bird. It’s very thorough but a little bit fast to keep up with. Judicious use of the pause button will solve that problem, though.

Anyone who has been following my rainbow Looming adventures so far may be wondering why I skipped straight from beginner projects to advanced ones. I’ve found that my past experience with French knitting and crochet have really helped me get a grasp of the Rainbow Loom in no time flat.

Now I’m off to search through the stash for a pony bead because my 20 year old daughter has put in a request for an Iron Man charm…

signature

Rainbow Loom Beaded Railway Track & How to Make Longer Bracelets on One Loom

Beaded ladder rainbow loom bracelet

As you can see, Charlie lost the “what are we going to make next” stakes and I made myself a beaded ladder bracelet 🙂

The ladder, or railway track bracelet is made in the same way as the triple single bracelets Charlie and I made in a previous post but, just to make sure, I checked out this video first.

I made mine with ladders on every second set of posts because my beads were too large to put them on every post, which meant I also needed to make it longer to get in a full rainbow. I worked out how to do it myself but this excellent video from Craft Life shows how to make a triple single bracelet longer even if you only have one loom. Variations of this technique work well with many different styles of bracelet. If you’re an adult, don’t be put off by the presenter’s young age, she’s an excellent teacher.

Now I guess I had better go and make that red Angry Bird charm or Charlie isn’t going to be very happy with me…

signature

The Island of Misfit Toys

Poor misfit dolly

I found this poor misfit hand puppet in K-Mart today. I desperately wanted to bring it home but I have no room!

Whilst I wonder how on earth it made it through quality control, I’m glad it did because my daughter and I had a great laugh playing with it before we decided we should act like the adults we are. Party poopers 😉

signature

Triple Single Bracelets on the Rainbow Loom

My rainbow loom arrived at last! Next time there’s a rainbow loom “drought” in Australia I’m just going to wait for shops to get stock in. Back ordering mine was a bit of a disaster since the shop didn’t keep customers up to date with the ever changing delivery times. But it’s here now (and Charlie has stopped asking how many sleeps until it arrives) and that’s all that counts.

Triple single rainbow loom bracelets

Charlie and I decided to start off with an easy style of bracelet since he likes stripes and I like to stop my brain from melting and leaking out my ears. We (and by “we” I mean “Charlie”) chose the triple single bracelet.

From left to right the photo above shows: a bracelet that Charlie (age 5) put on the loom himself. I finished it off for him but he really enjoys making the patterns with the bands on the loom. In the centre is a bracelet I made with two bands held together for the stripes,  and finally a bracelet with single bands in the stripes.

I used the following video, which takes you step by step through the process with clear and thorough instruction for both weaving the decorative part of the bracelet and making it longer for different sized wrists.

Charlie and I disagree with what to make next. I want to make myself a beaded bracelet but he wants me to make him a red Angry Bird charm. So I guess I’ll be doing both!

Don’t worry if you come here for free knitting patterns and other vintage crafts though. Knitting-and.com hasn’t turned into the all singing, all dancing rainbow loom show just yet. At the moment my partner is working on scanning book four of the Good Needlework Gift Book series, and I have some vintage knitting patterns ready to type up, which I’ll release one at a time over the next couple of, um, years (there are hundreds of them). I’m also still working on translating my vintage Latvian knitting book from 1956, which is going extremely well considering I don’t speak any Latvian!

signature

How to Sew Name Labels Into Knitting & Crochet That Stretches and Charlie’s New Hat

Charlie's Block Head hat

As promised, here is Charlie’s new hat! Not only is it proof that I can crochet, it’s also proof that sometimes I buy patterns that were written more recently than 1969 🙂

Here are the details, because this hat is so ridiculous that everyone should make one!

Pattern: Blockhead Man Hat by Darleen Hopkins – $4.50 US
Yarn: Cascade 220 (not superwash, just the regular kind)
Hook size: 5mm/US size H
Size: medium/large (Charlie likes his hats loose and long so he can pull them down over his ears but the smaller size really was going to be a bit tight)
Skill Level: Super easy but make sure to keep track of the end of your rounds!

Charlie insists he’s never going to take this hat off, so I had to sew a name label in it because of his school’s clothing policy (I.E. put a name label in all your kids clothes or we’ll look at you with the same expression we use on the 5 year olds when they’ve done something silly).

Of course, I could find neither the name label tape, nor the laundry marker that I bought for this purpose (It’s probably in my sewing box which is the only place I didn’t look), so I made a label with vintage seam tape and a Sharpie.

Fold the ends of the tape over and fasten the thread with a few stitches over the top of each other. Then over-sew to the hat, catching just the back of the stitches so it doesn’t show from the outside.

How to sew in a name label part 1

Make sure to leave a slight “bubble” in the label so that there is enough room for the crochet to stretch.

How to sew in a name label part 2

Here it is seen from the side.

How to sew in a name label part 3

I have my fingers crossed that Charlie doesn’t still manage to lose it. Whenever his Dad or I pick him up from school, he’s always managed to spread his belongings all over the classroom verandah so you never know!

Now I’m off to play with my our new Rainbow loom, which arrived during breakfast this morning!

signature