Menu Close

Tag: TAST challenge

Isolated Stitches – Beyond TAST Embroidery Challenge

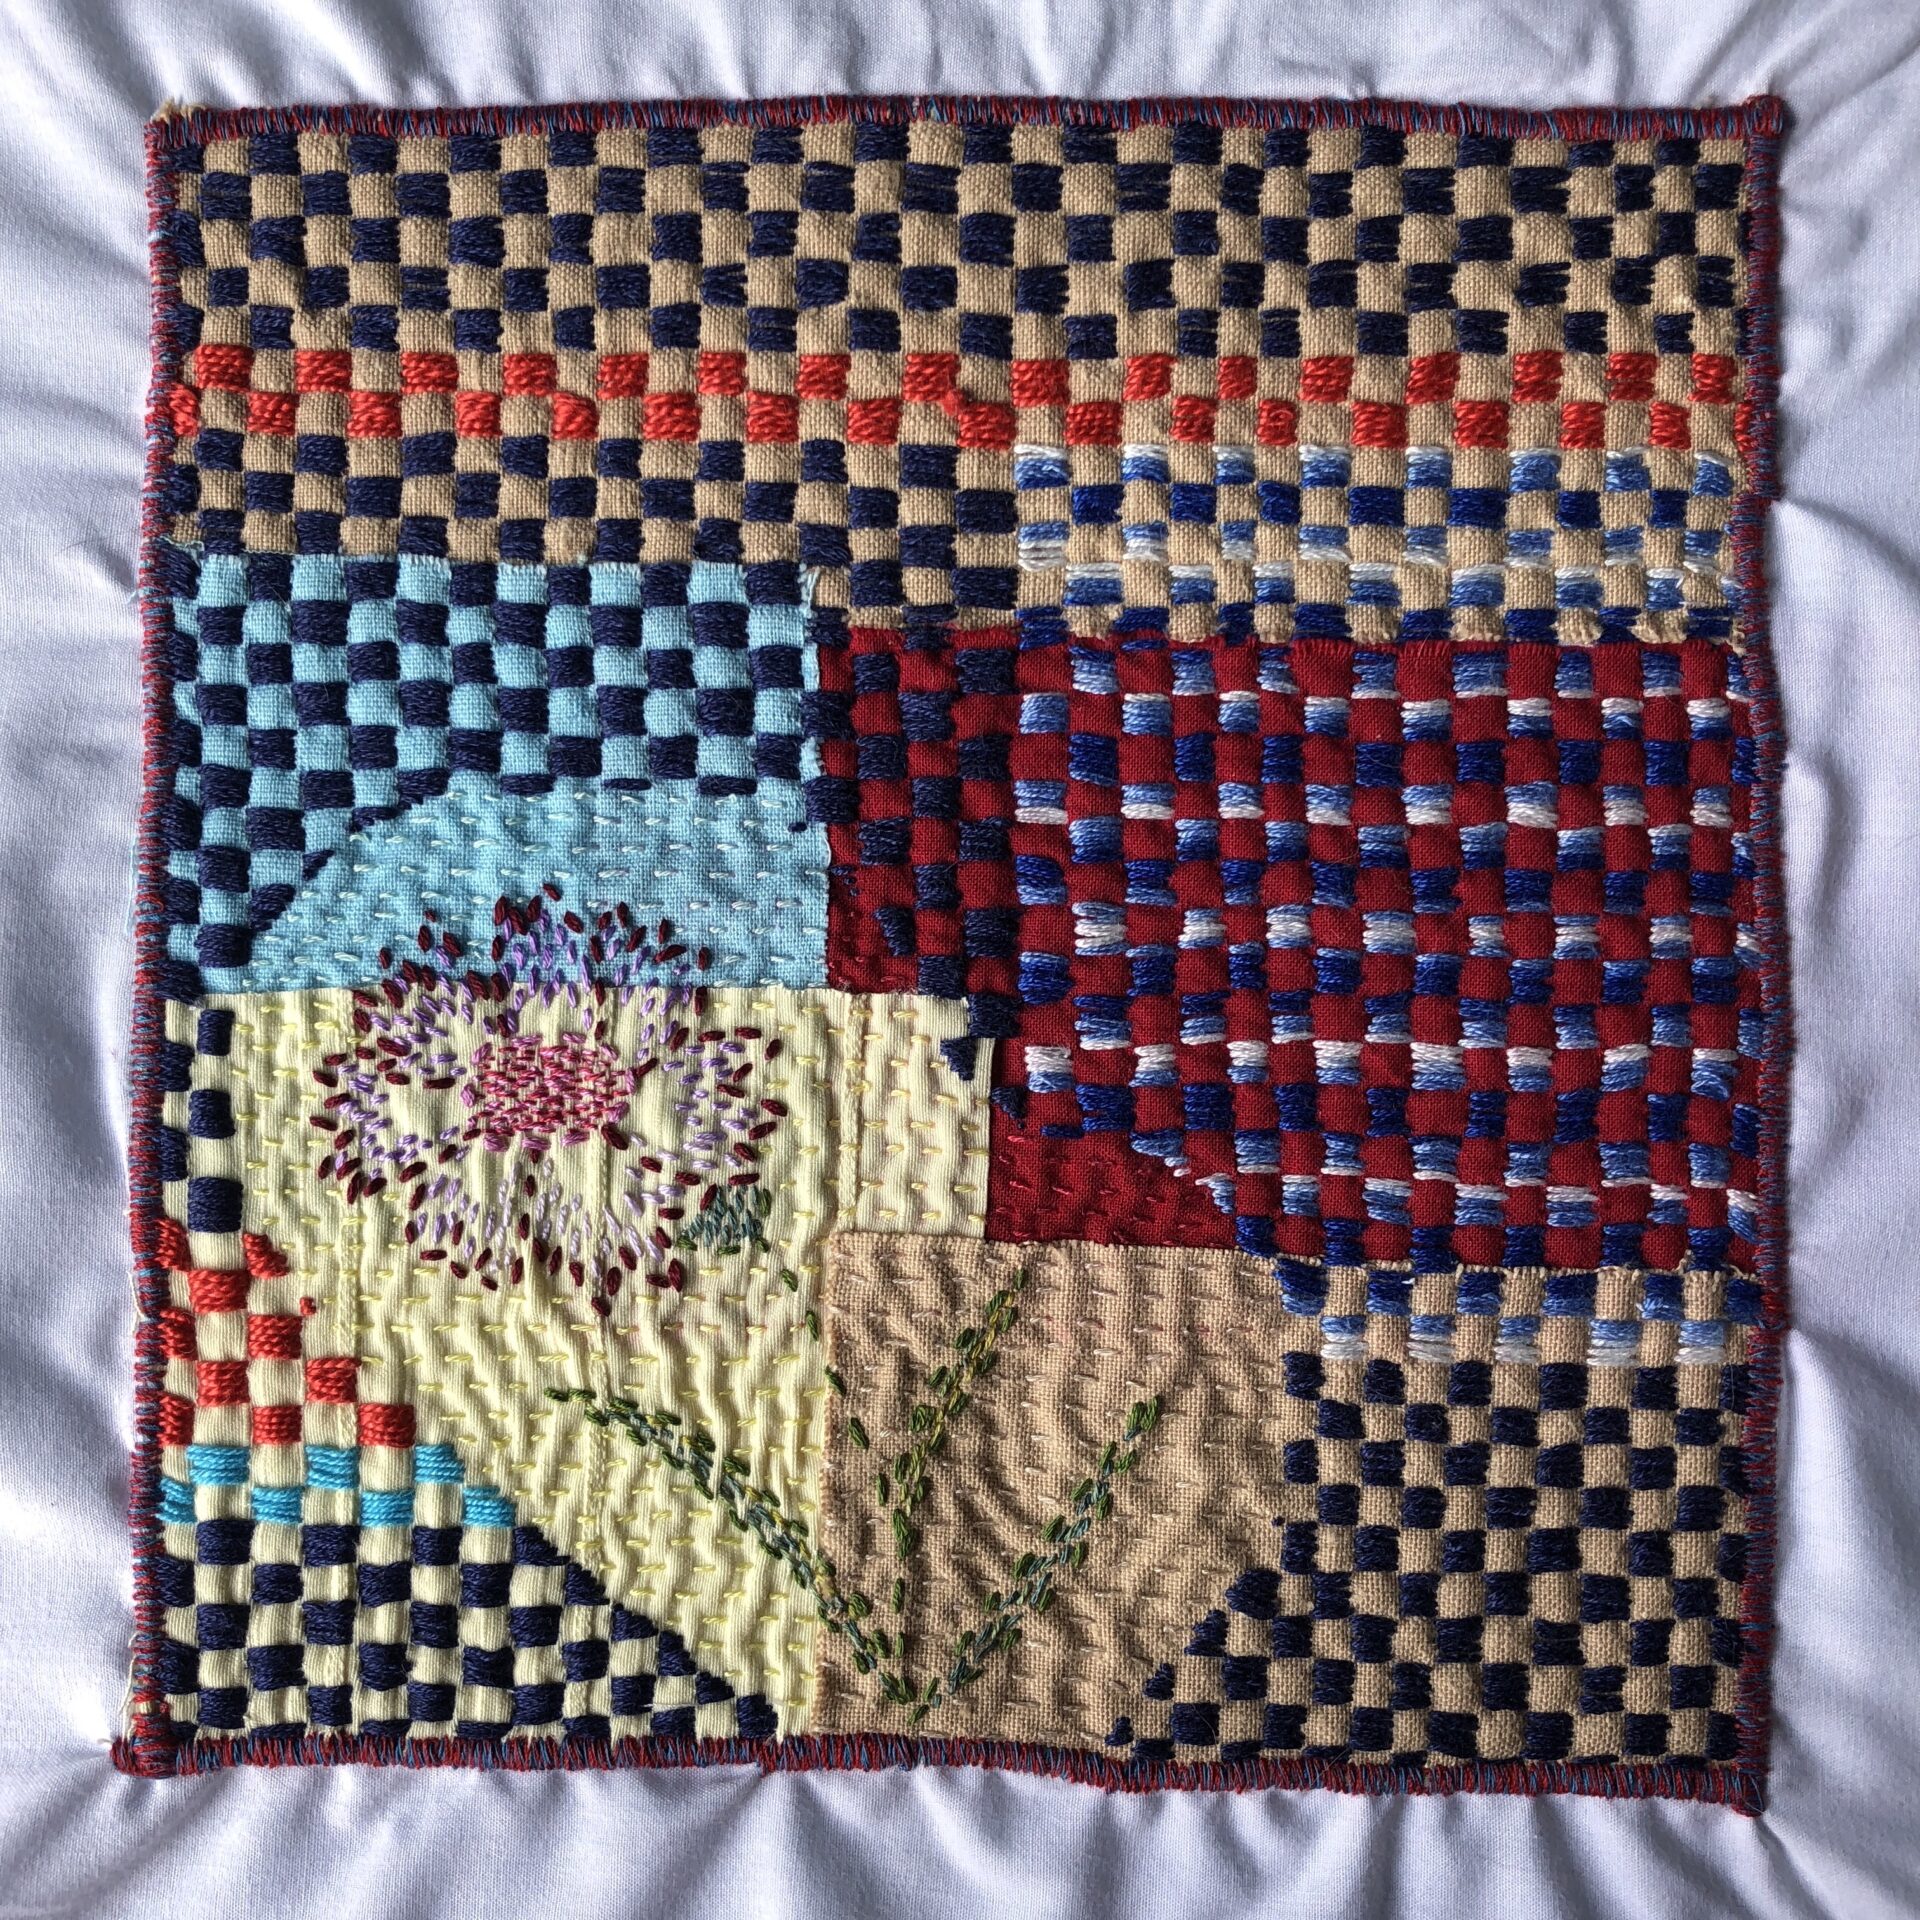
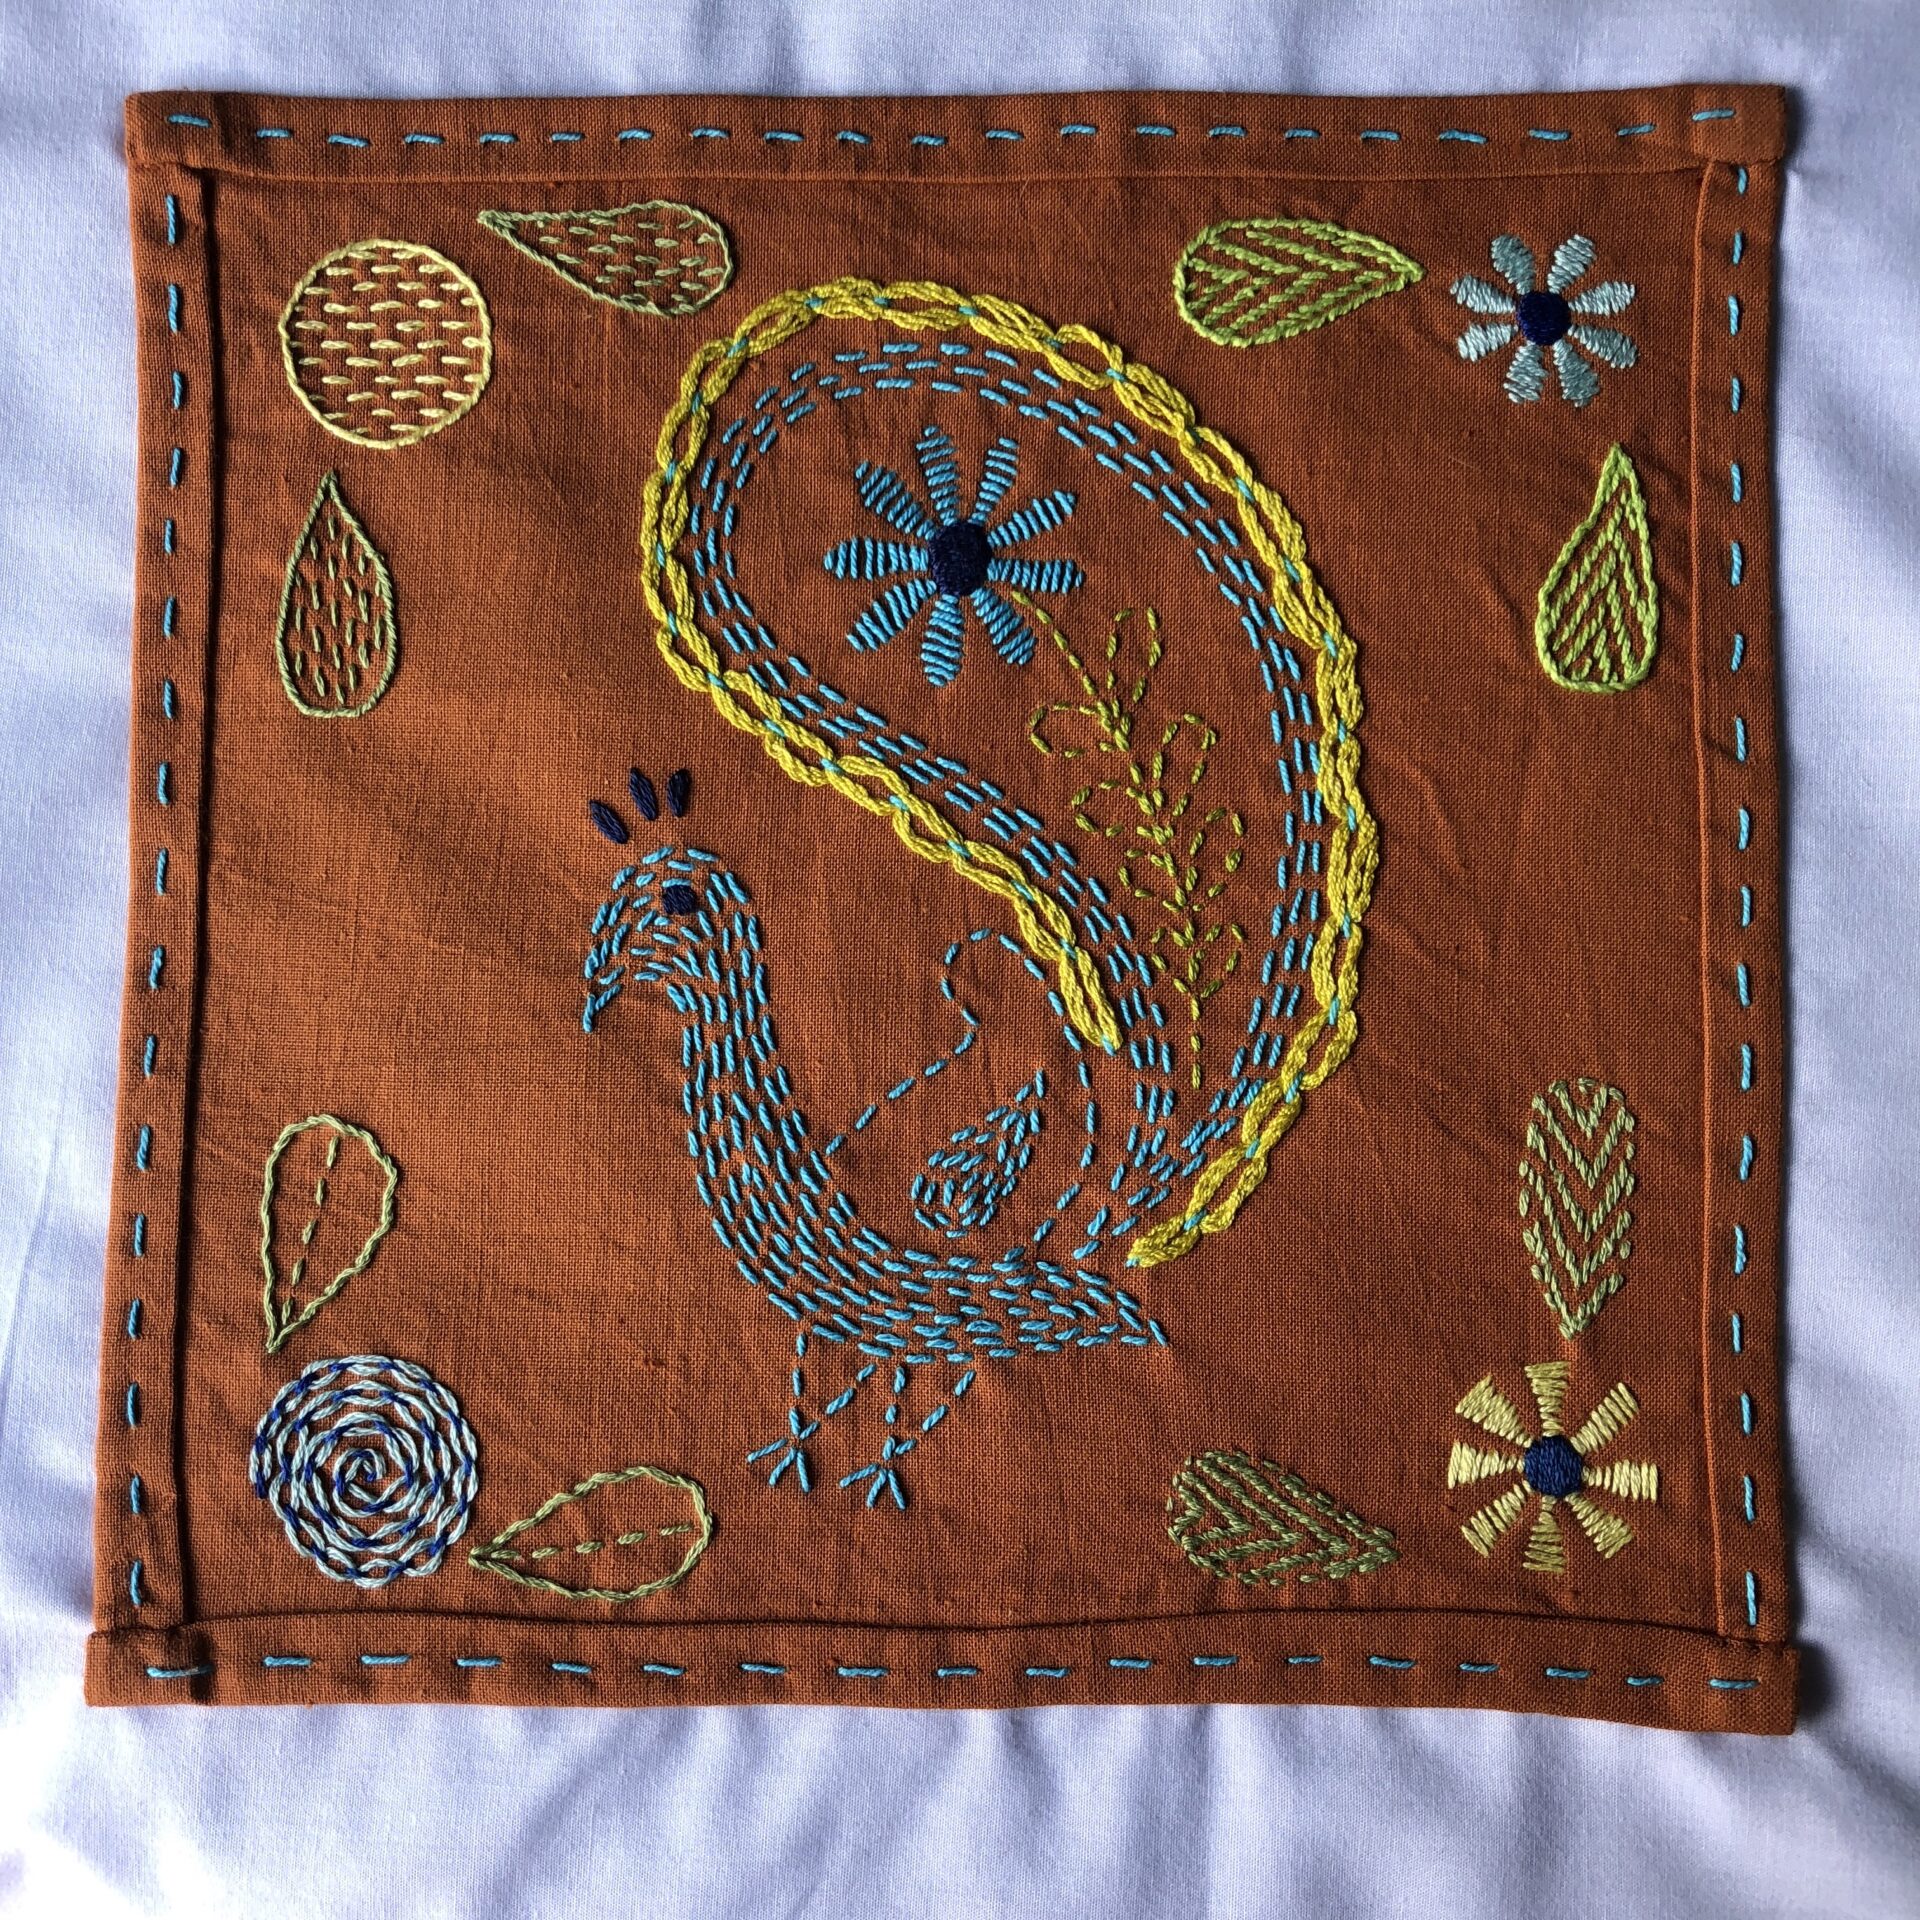
For the second Beyond TAST embroidery challenge we had to take an isolated stitch, or part of a repeated stitch and rearrange it into different patterns. Having already investigated many of the isolated stitches dueing the 2015-2017 TAST challenge, I decided to take a single repeat of some stitches and see what I could do.

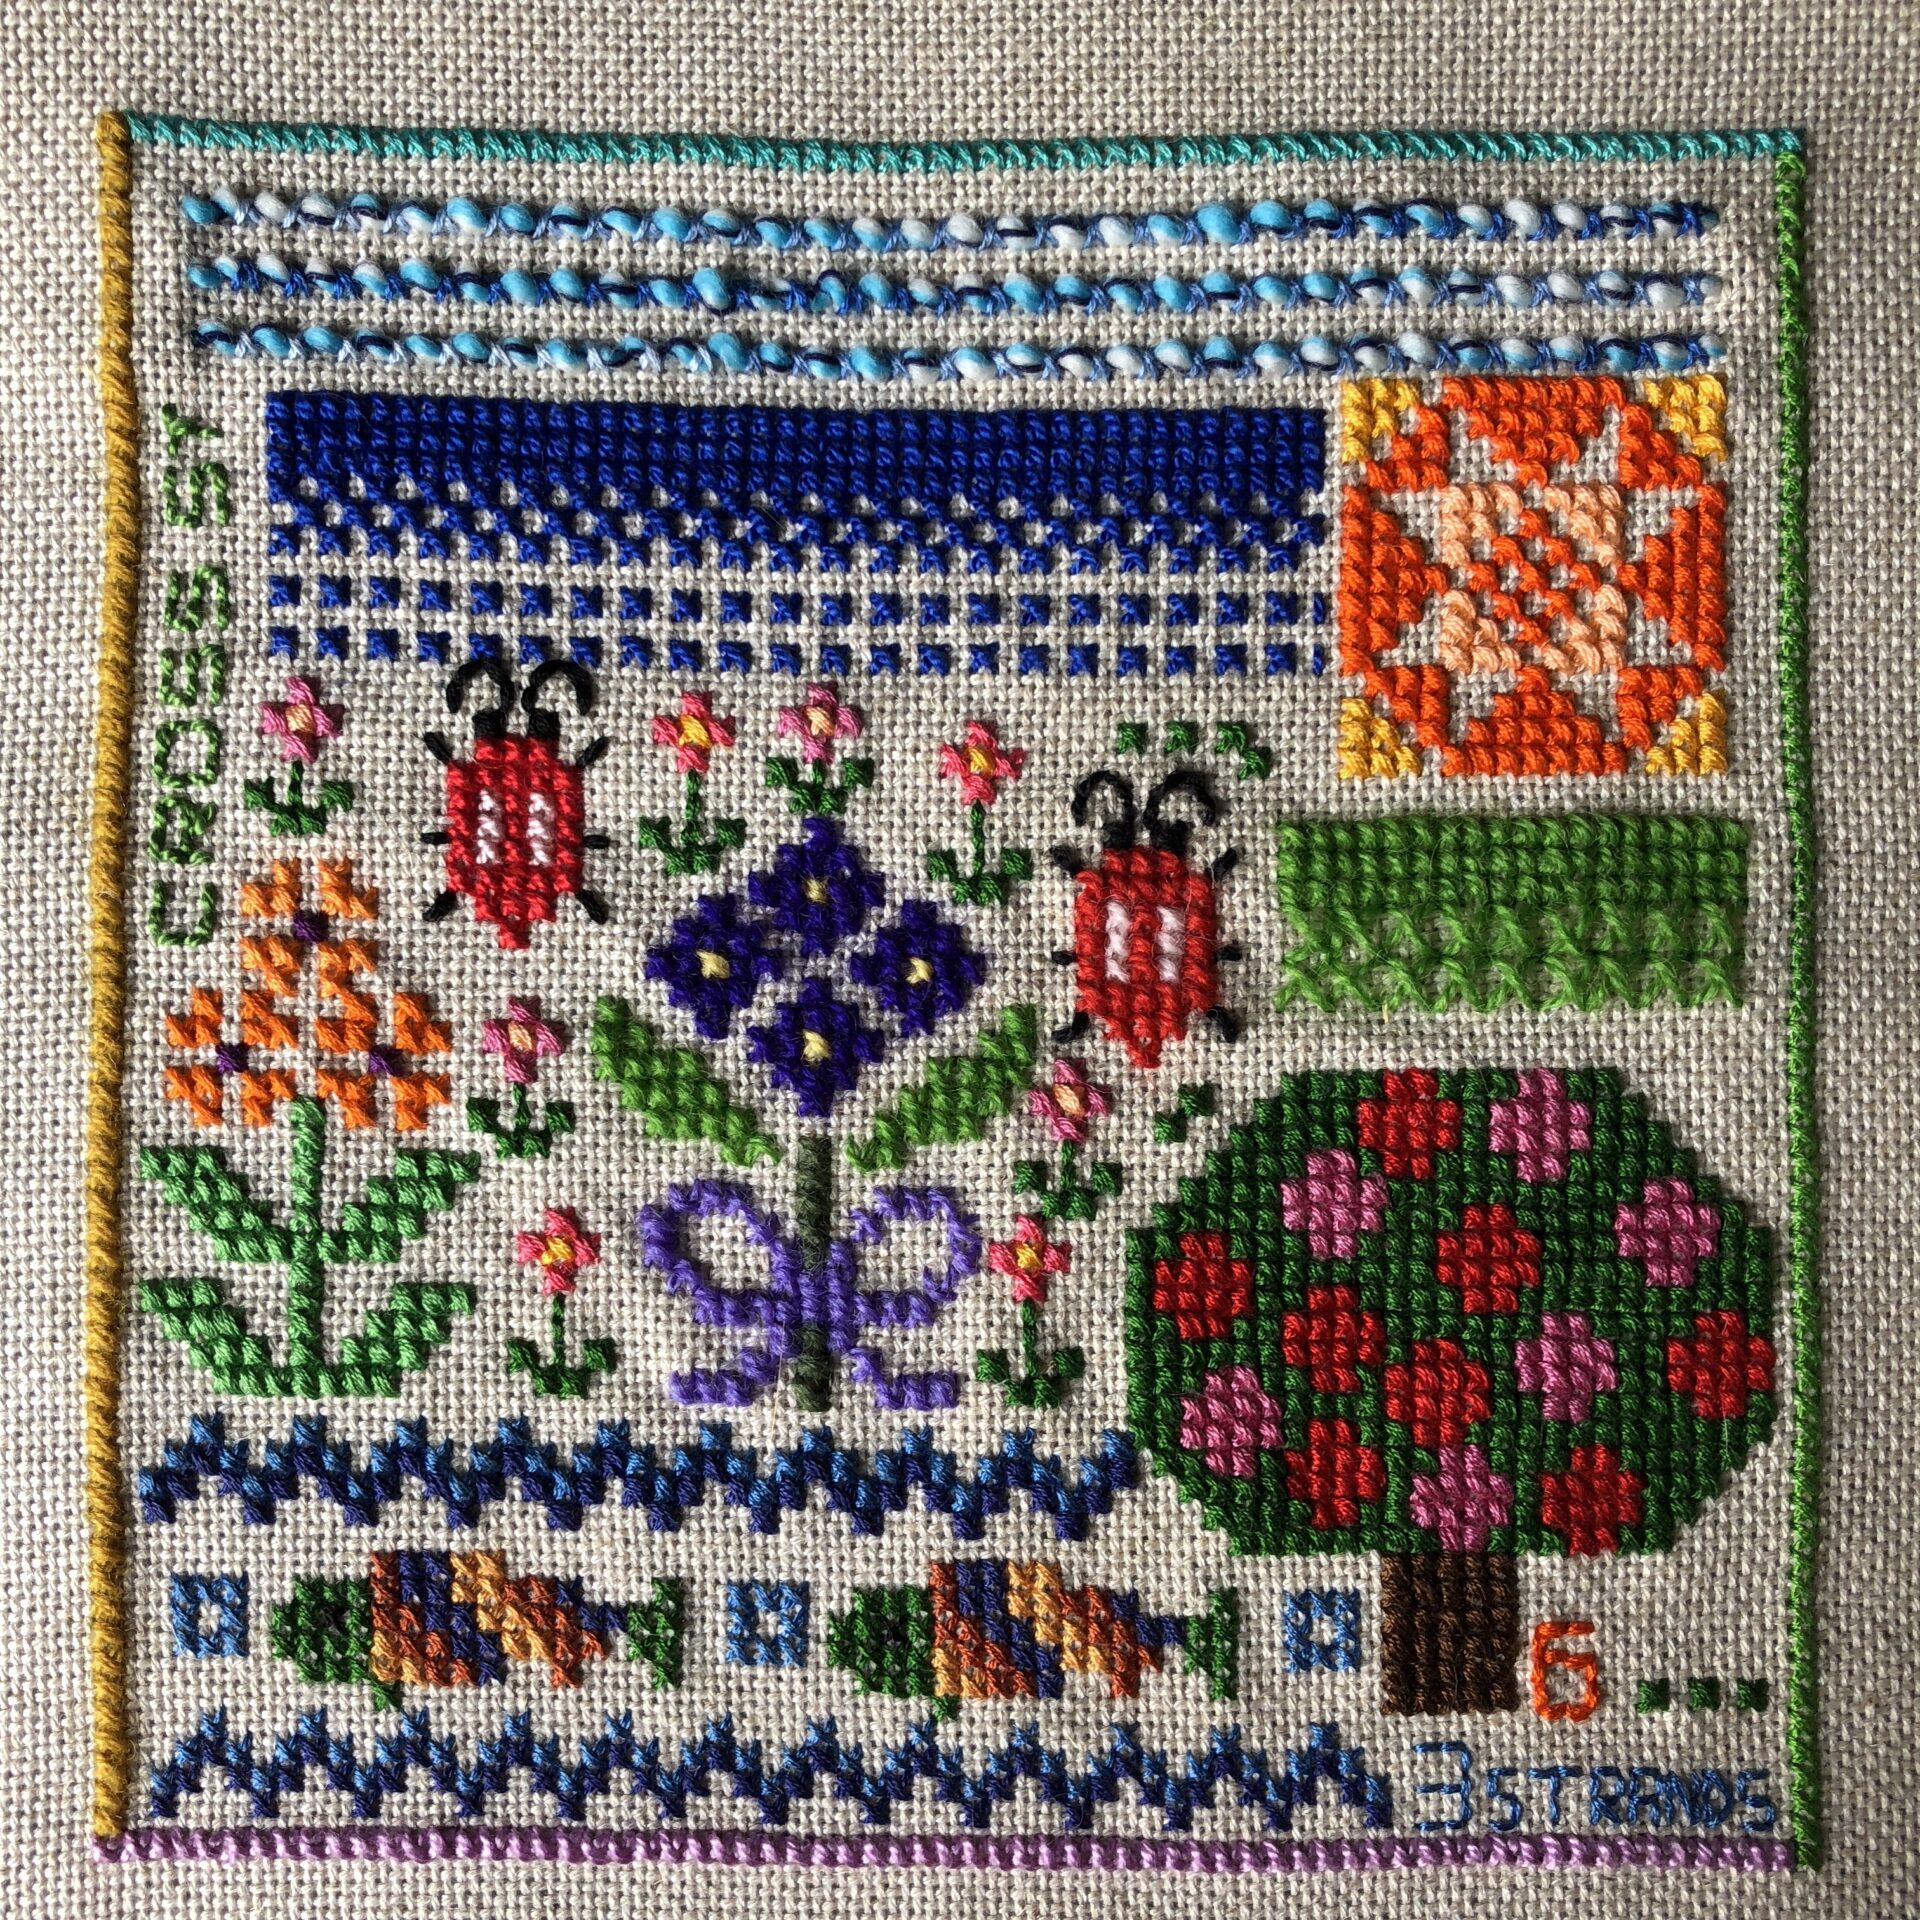
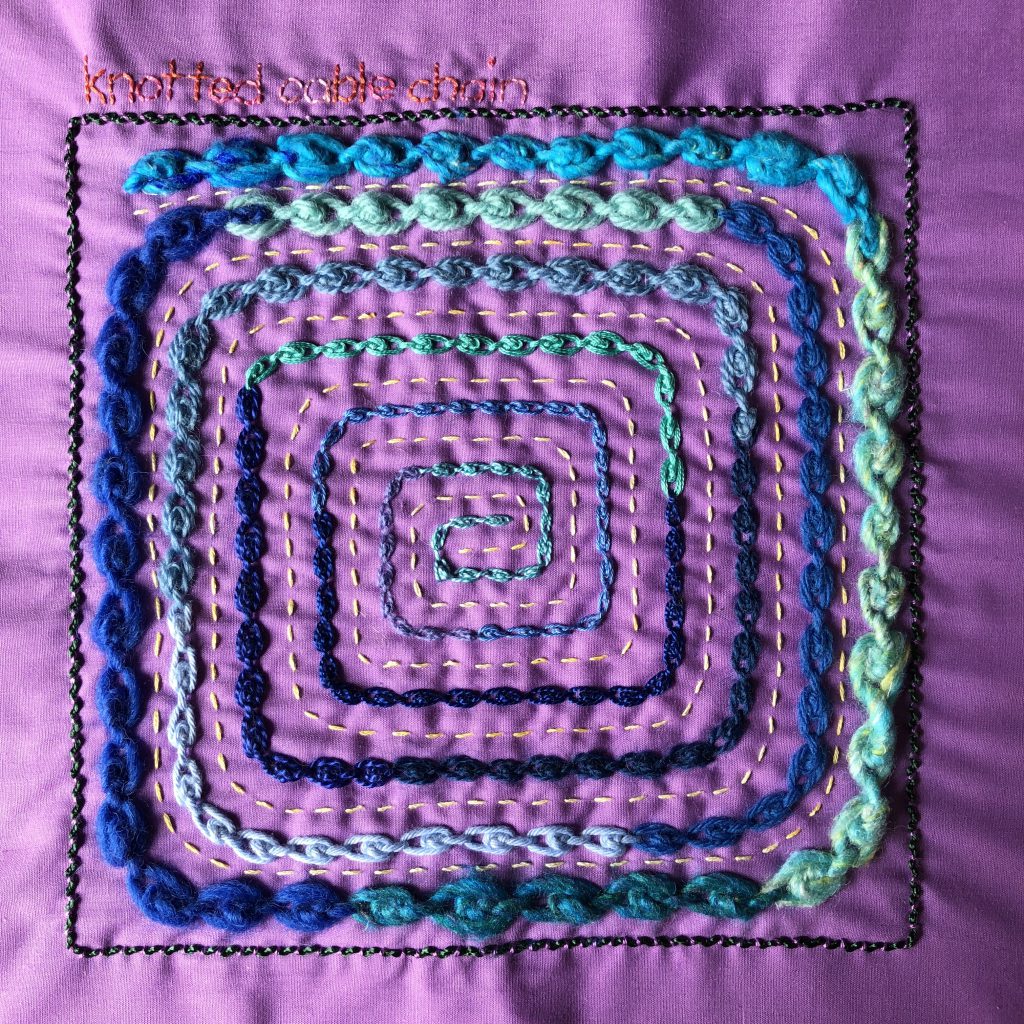
Firstly, open chain. At the top you can see a line of open chain, with a single repeat of the stitch next to it. I then took the single repeat and arranged it into fillings, square, hexagonal, circular and oval motifs (which I turned into flowers because I usually end up turning everything into flowers at some stage).

Various ways of stitching an embroidered sampler using single units of open chain stitch

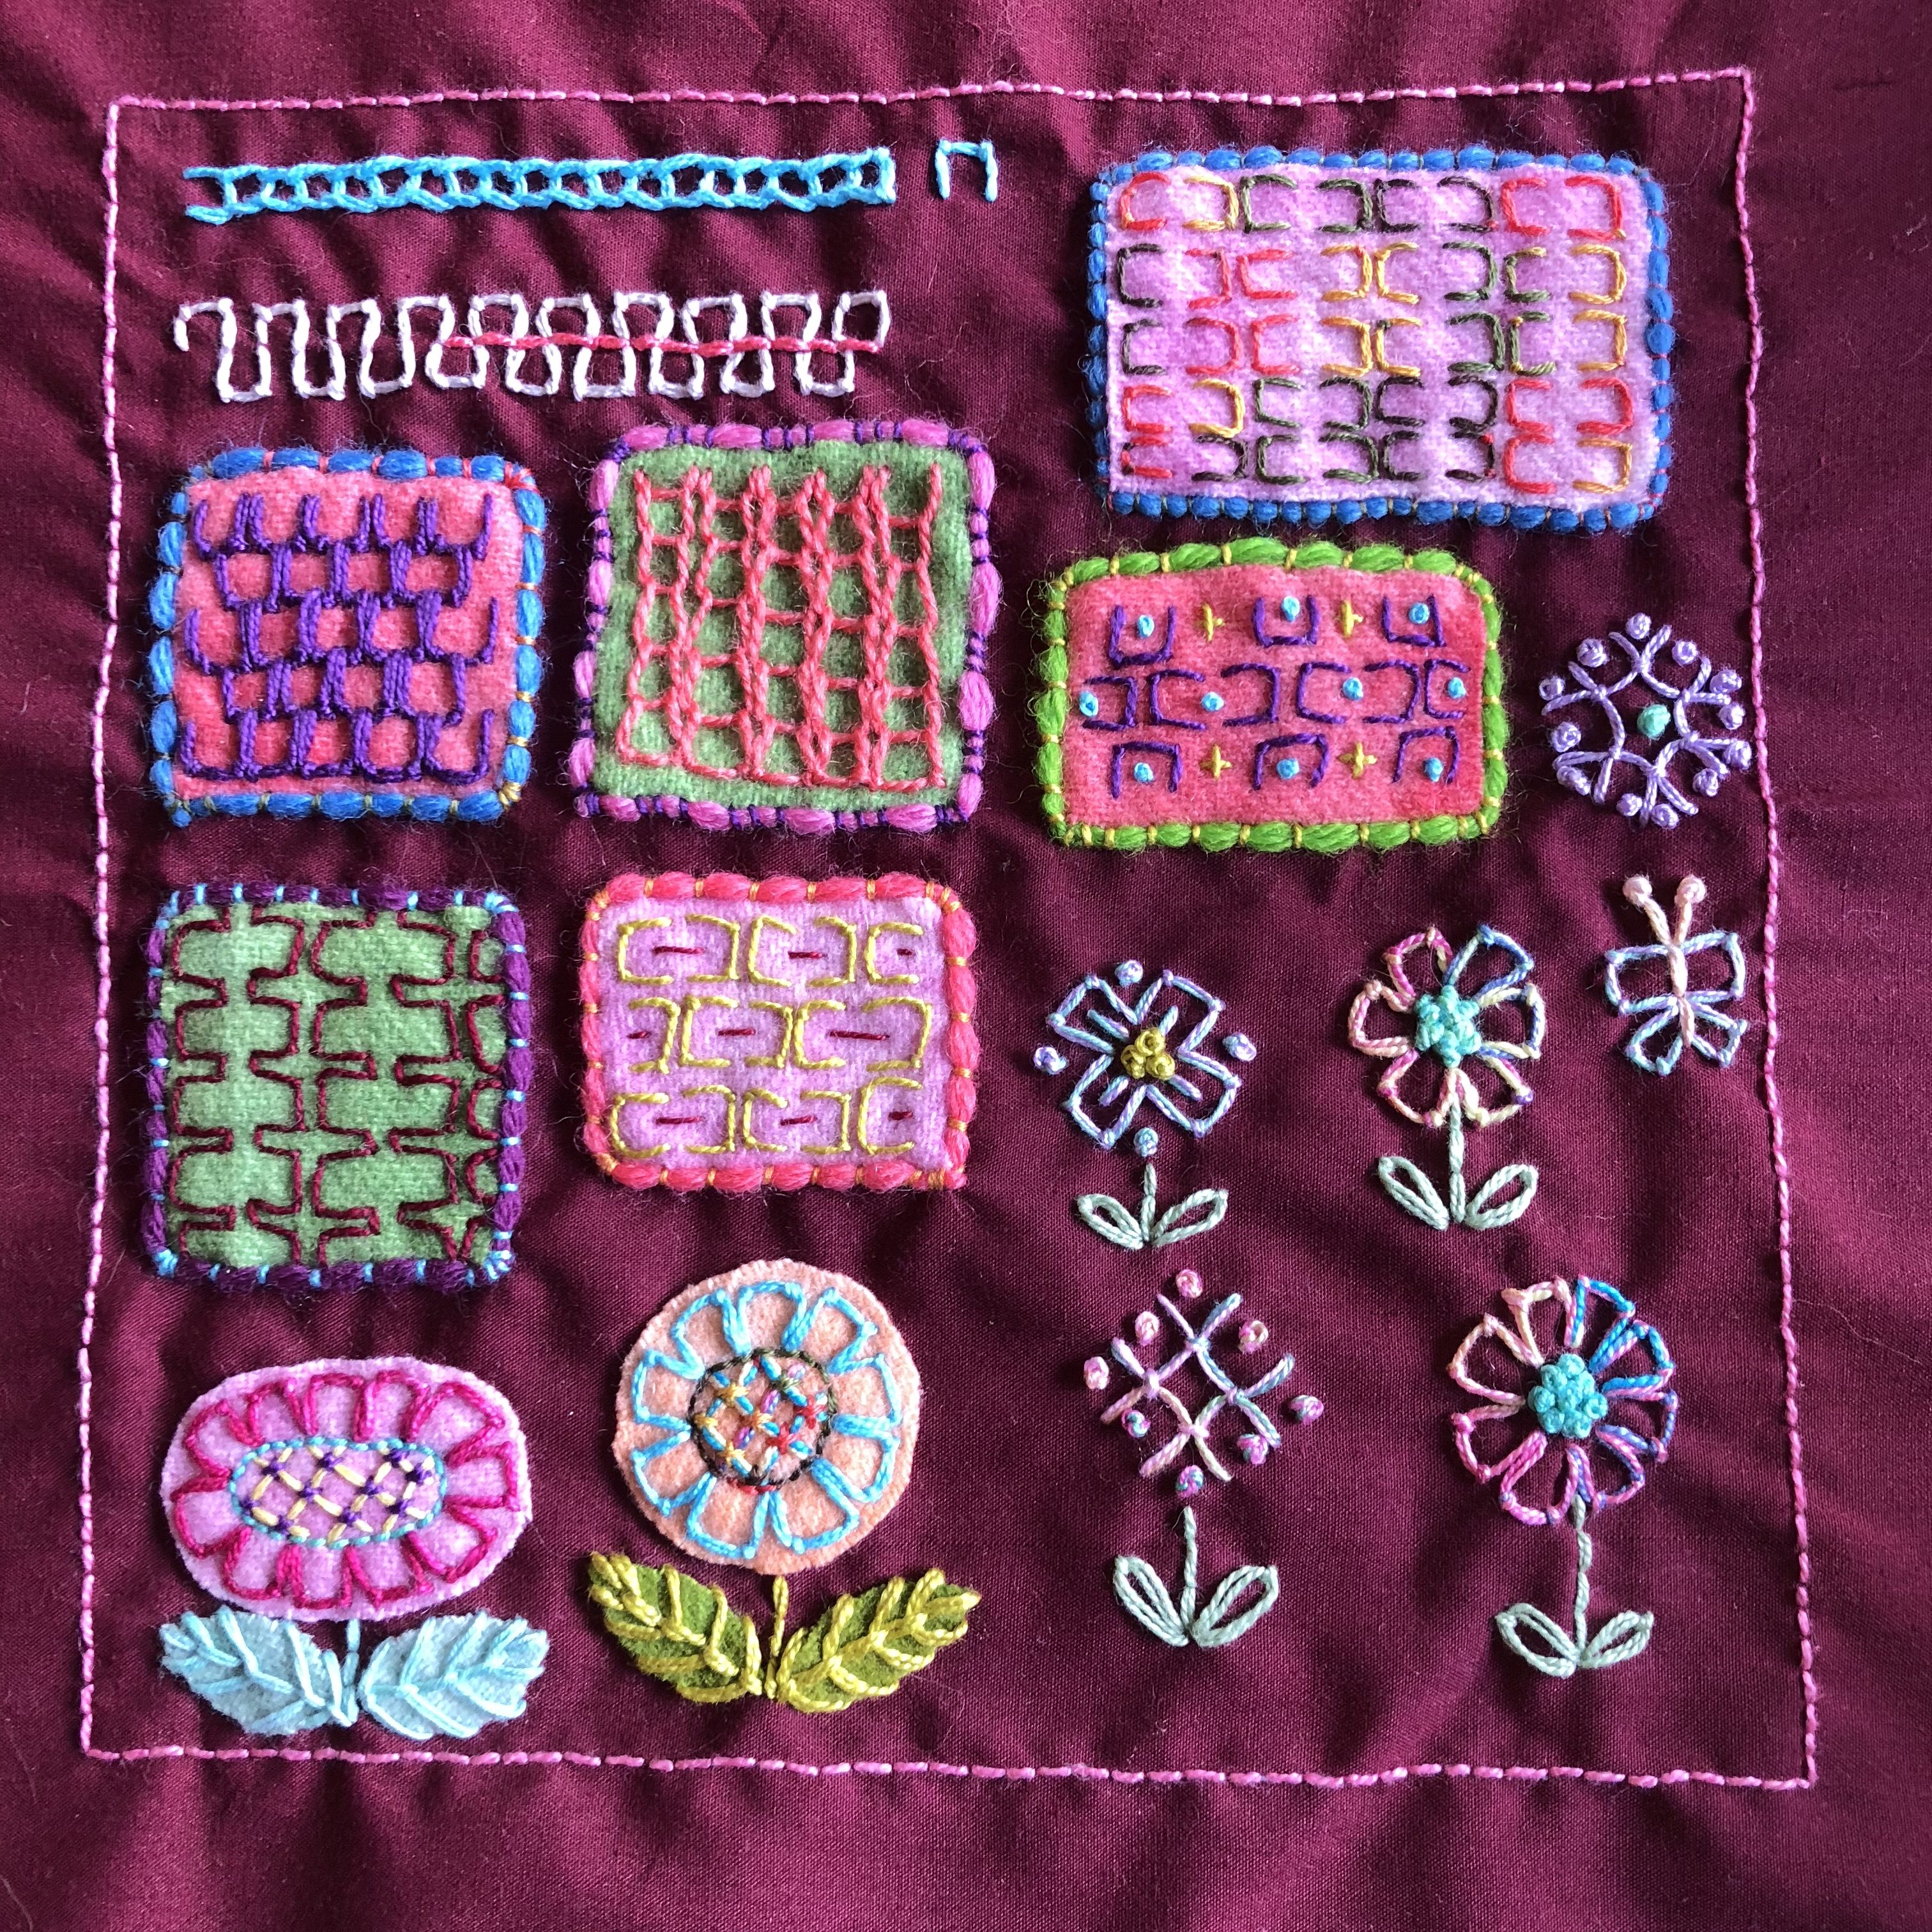
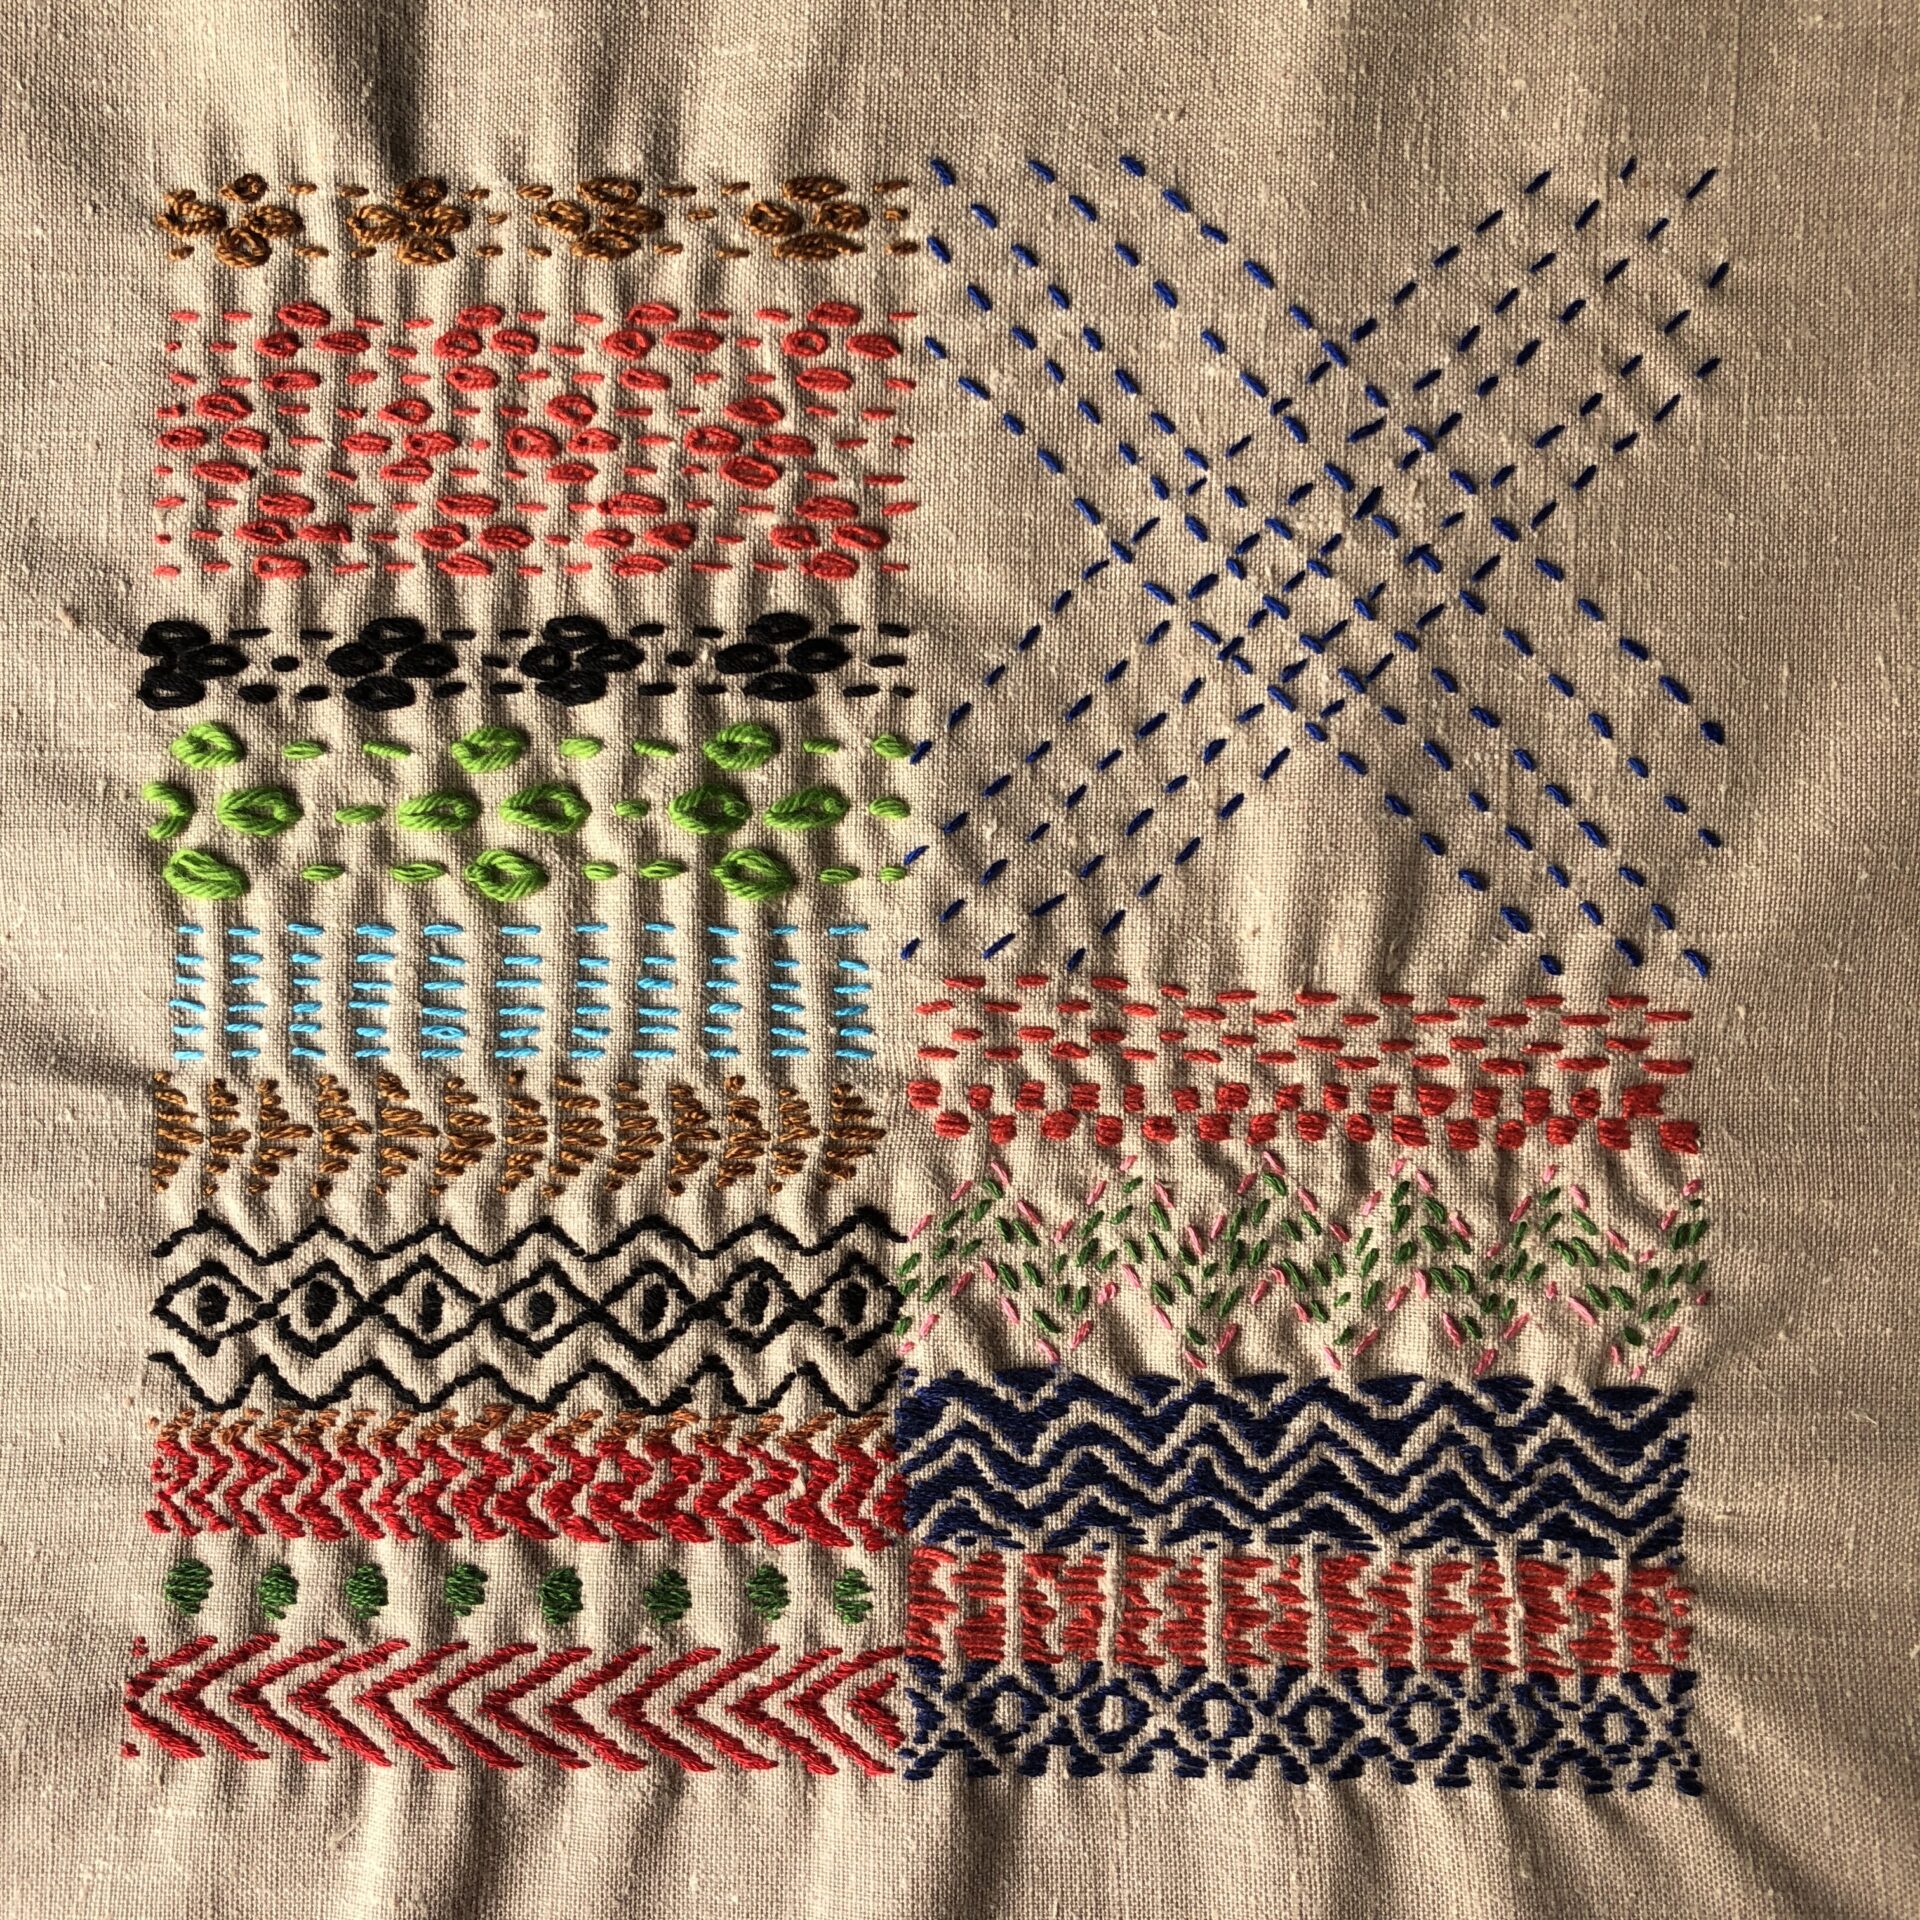
Next, I did the same with maidenhair stitch and threaded, or interlaced running stitch.

You can see on this sampler that I also tried a single unit of interlaced running stitch as a random filling stitch and a couching stitch, to hold down some yarn. I ended up threading each running stitch twice to make the stitch bolder.

Embroidery sampler investigating different ways to use single units of maidenhair and threaded running stitches.

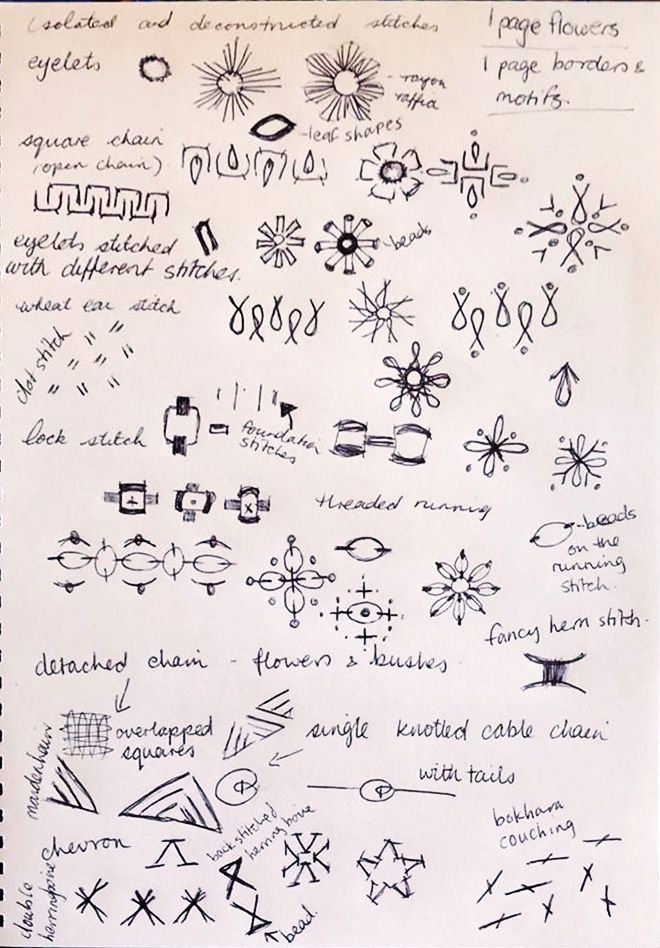
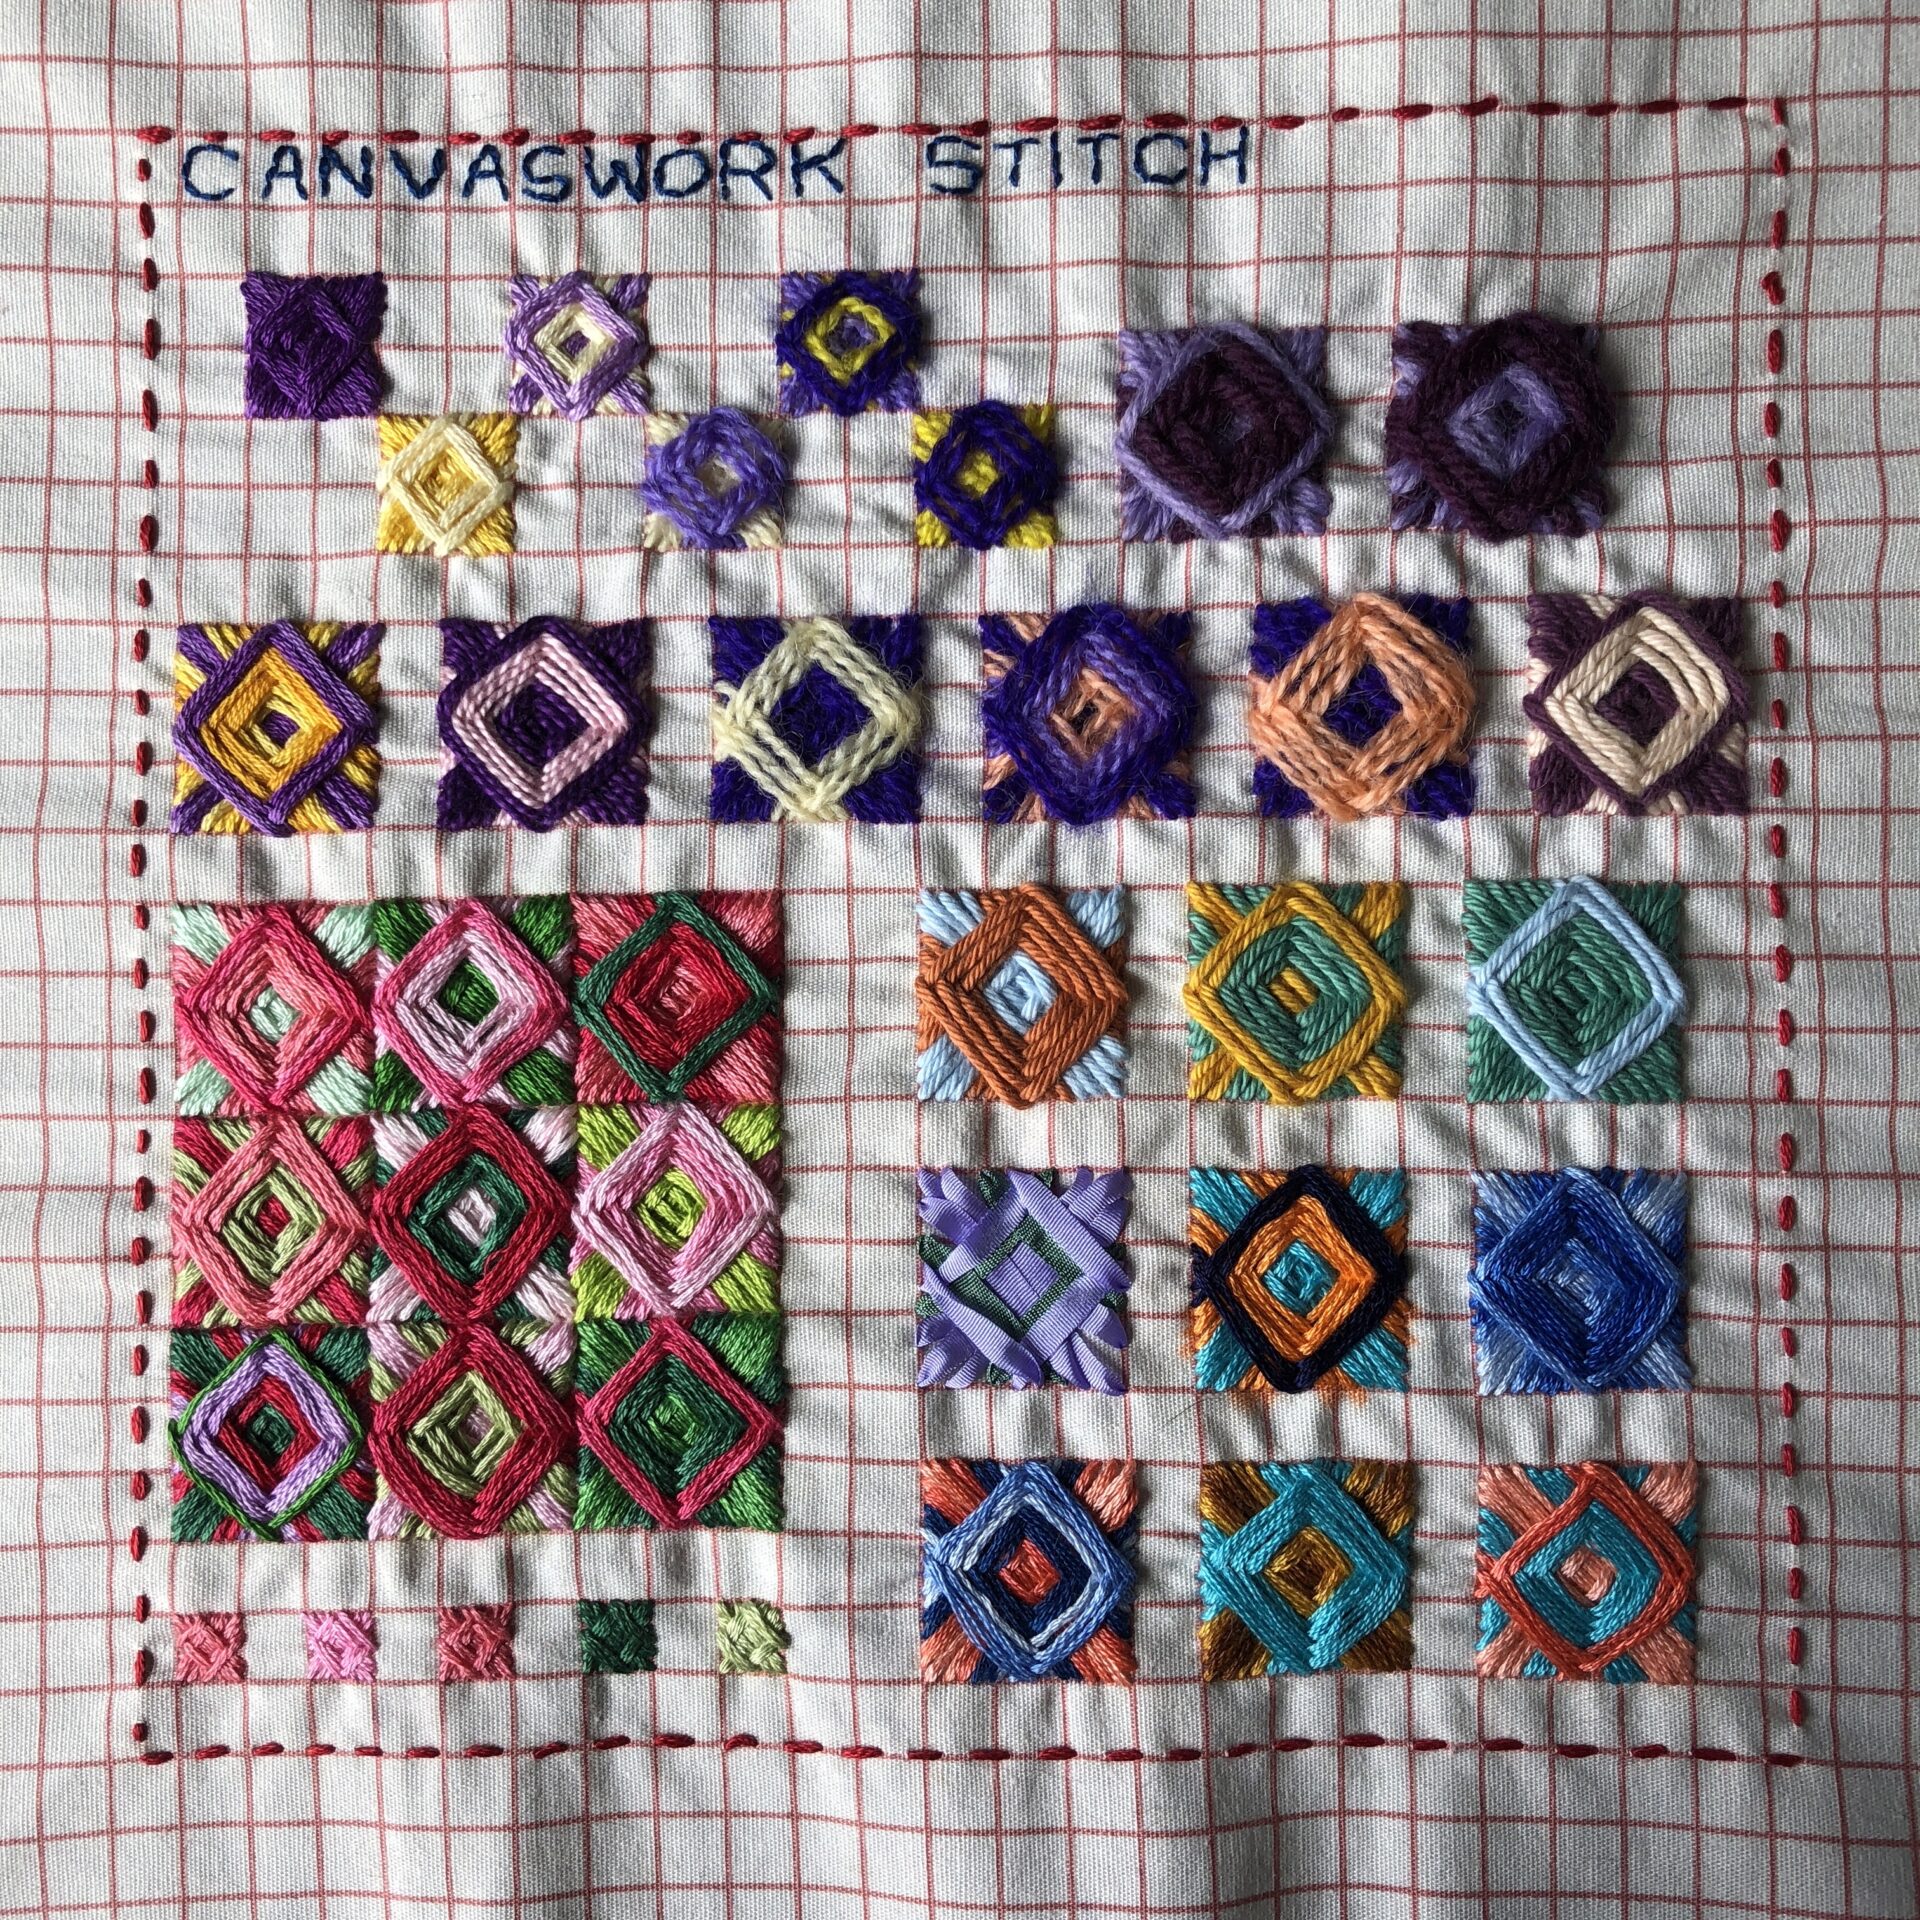
While I was working on these samplers, I came up with an “investigation language” to use on other stitches.

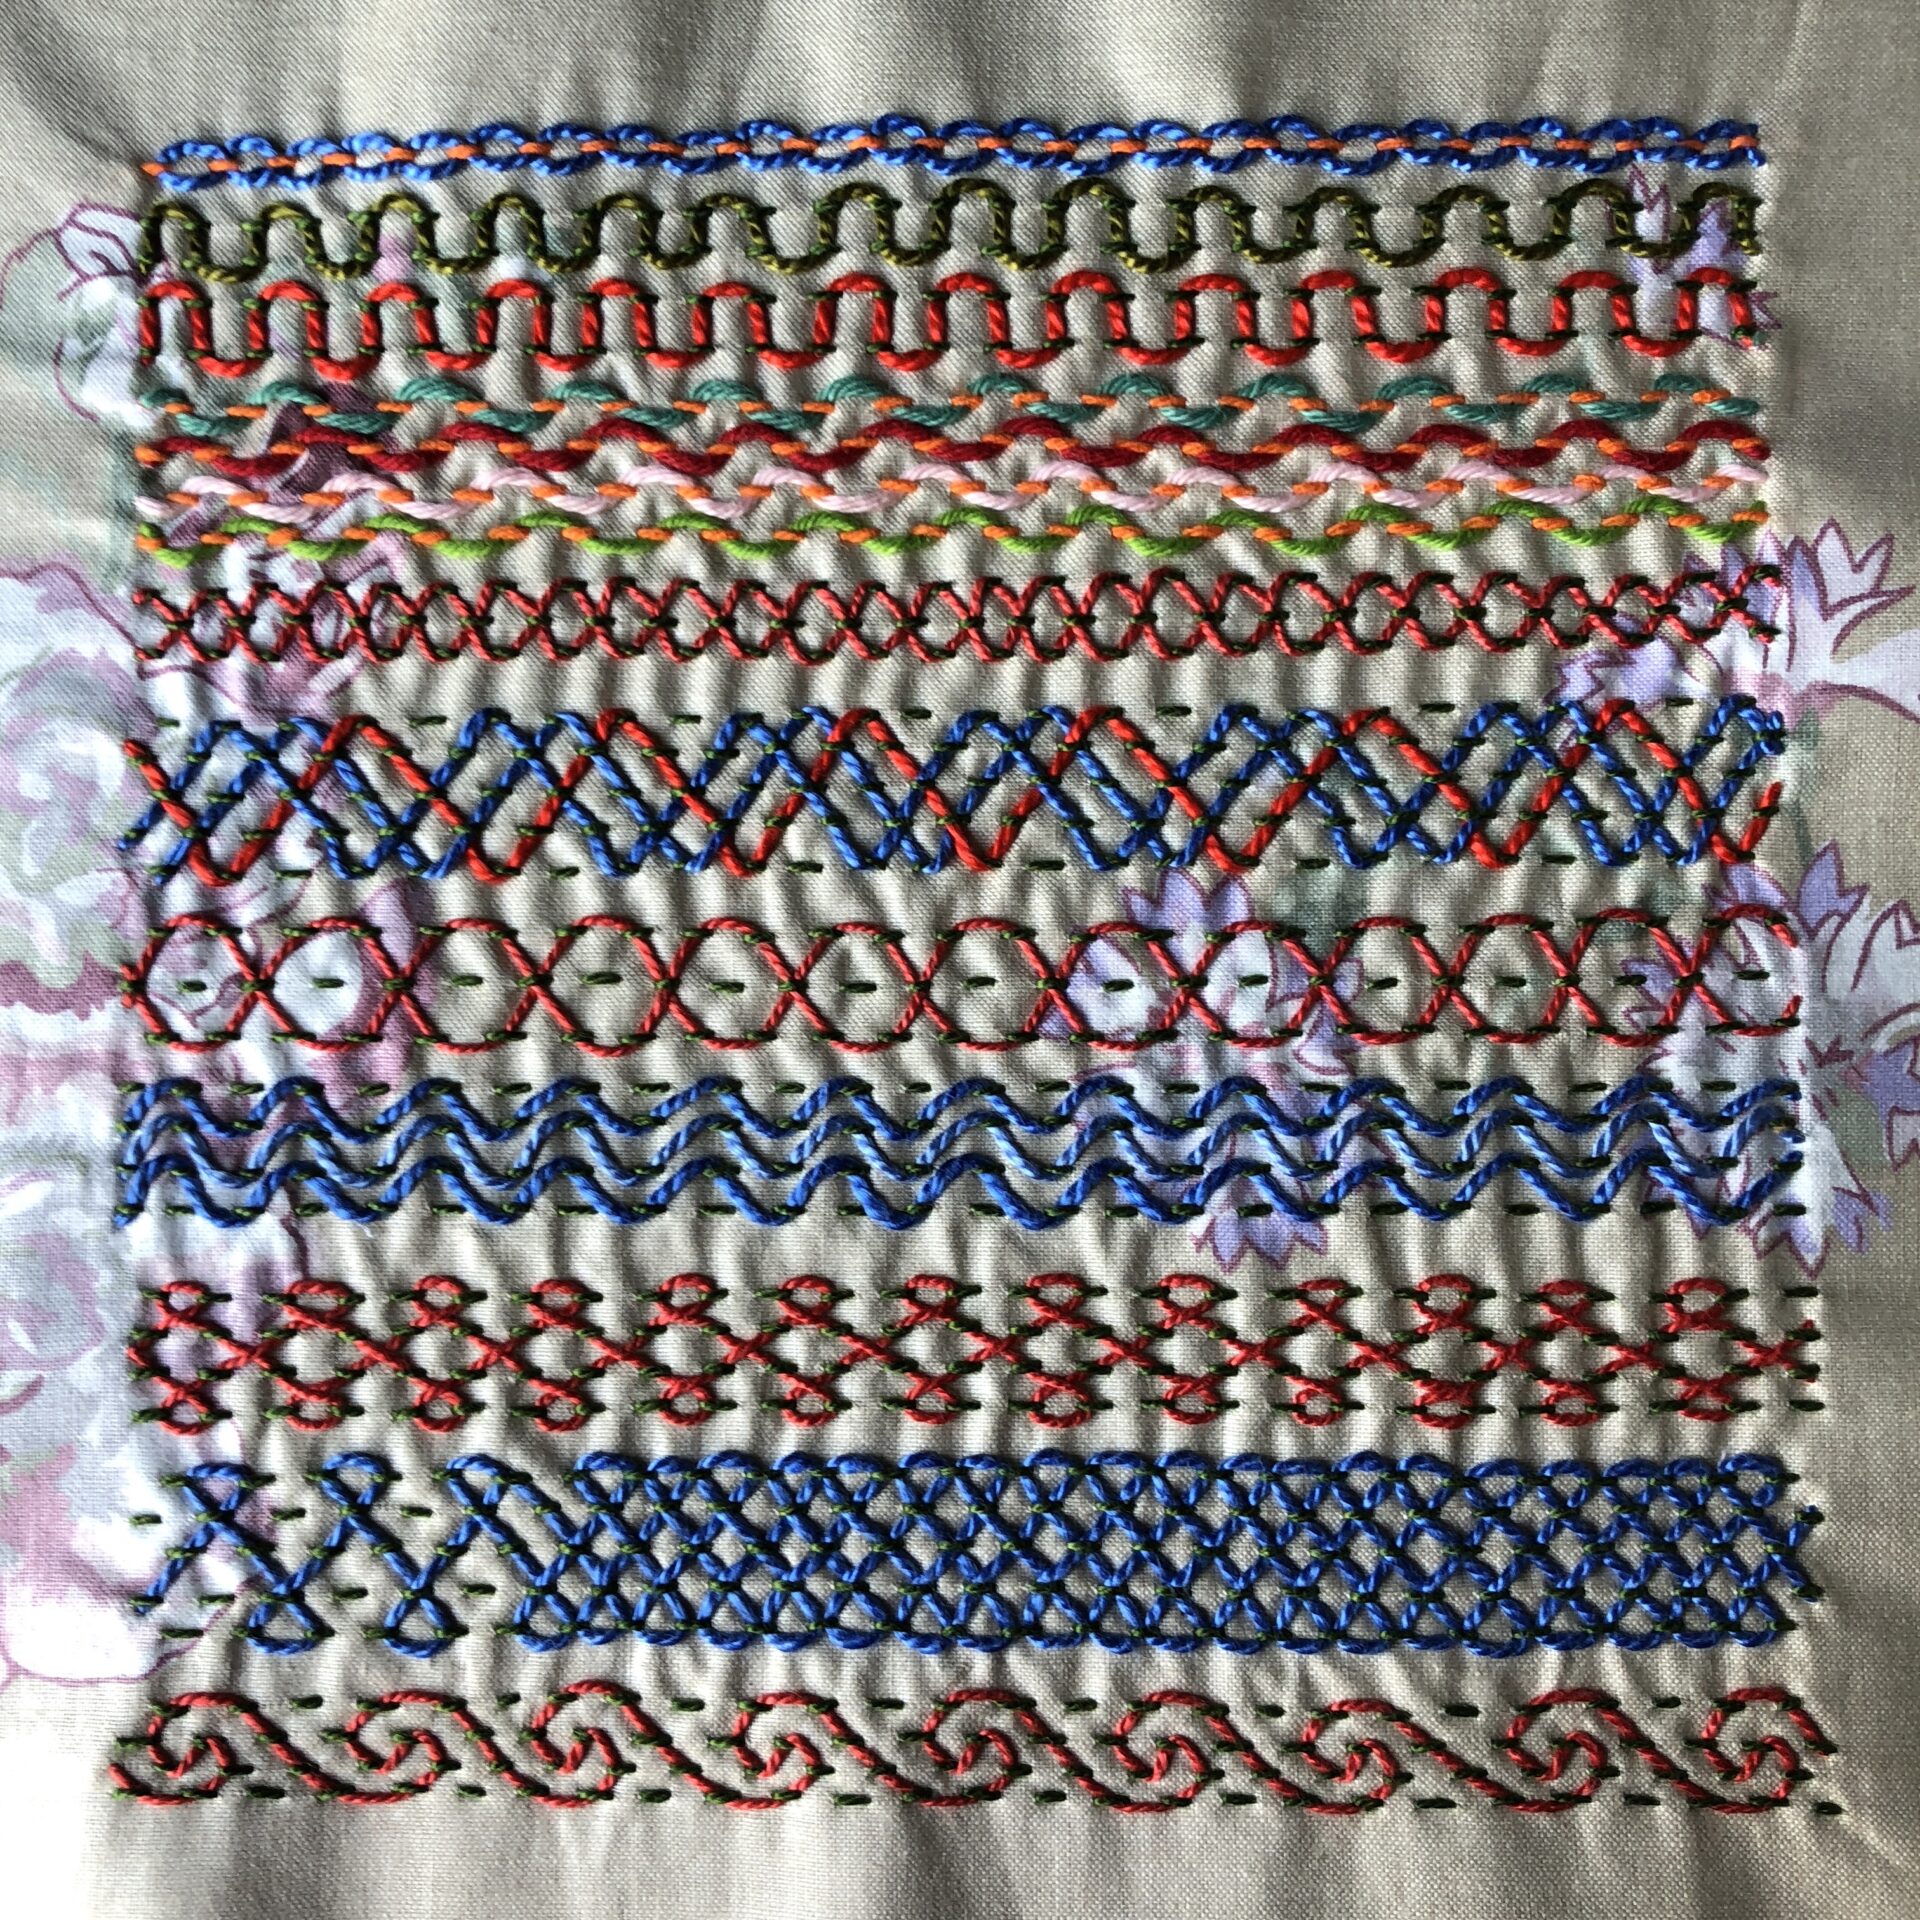
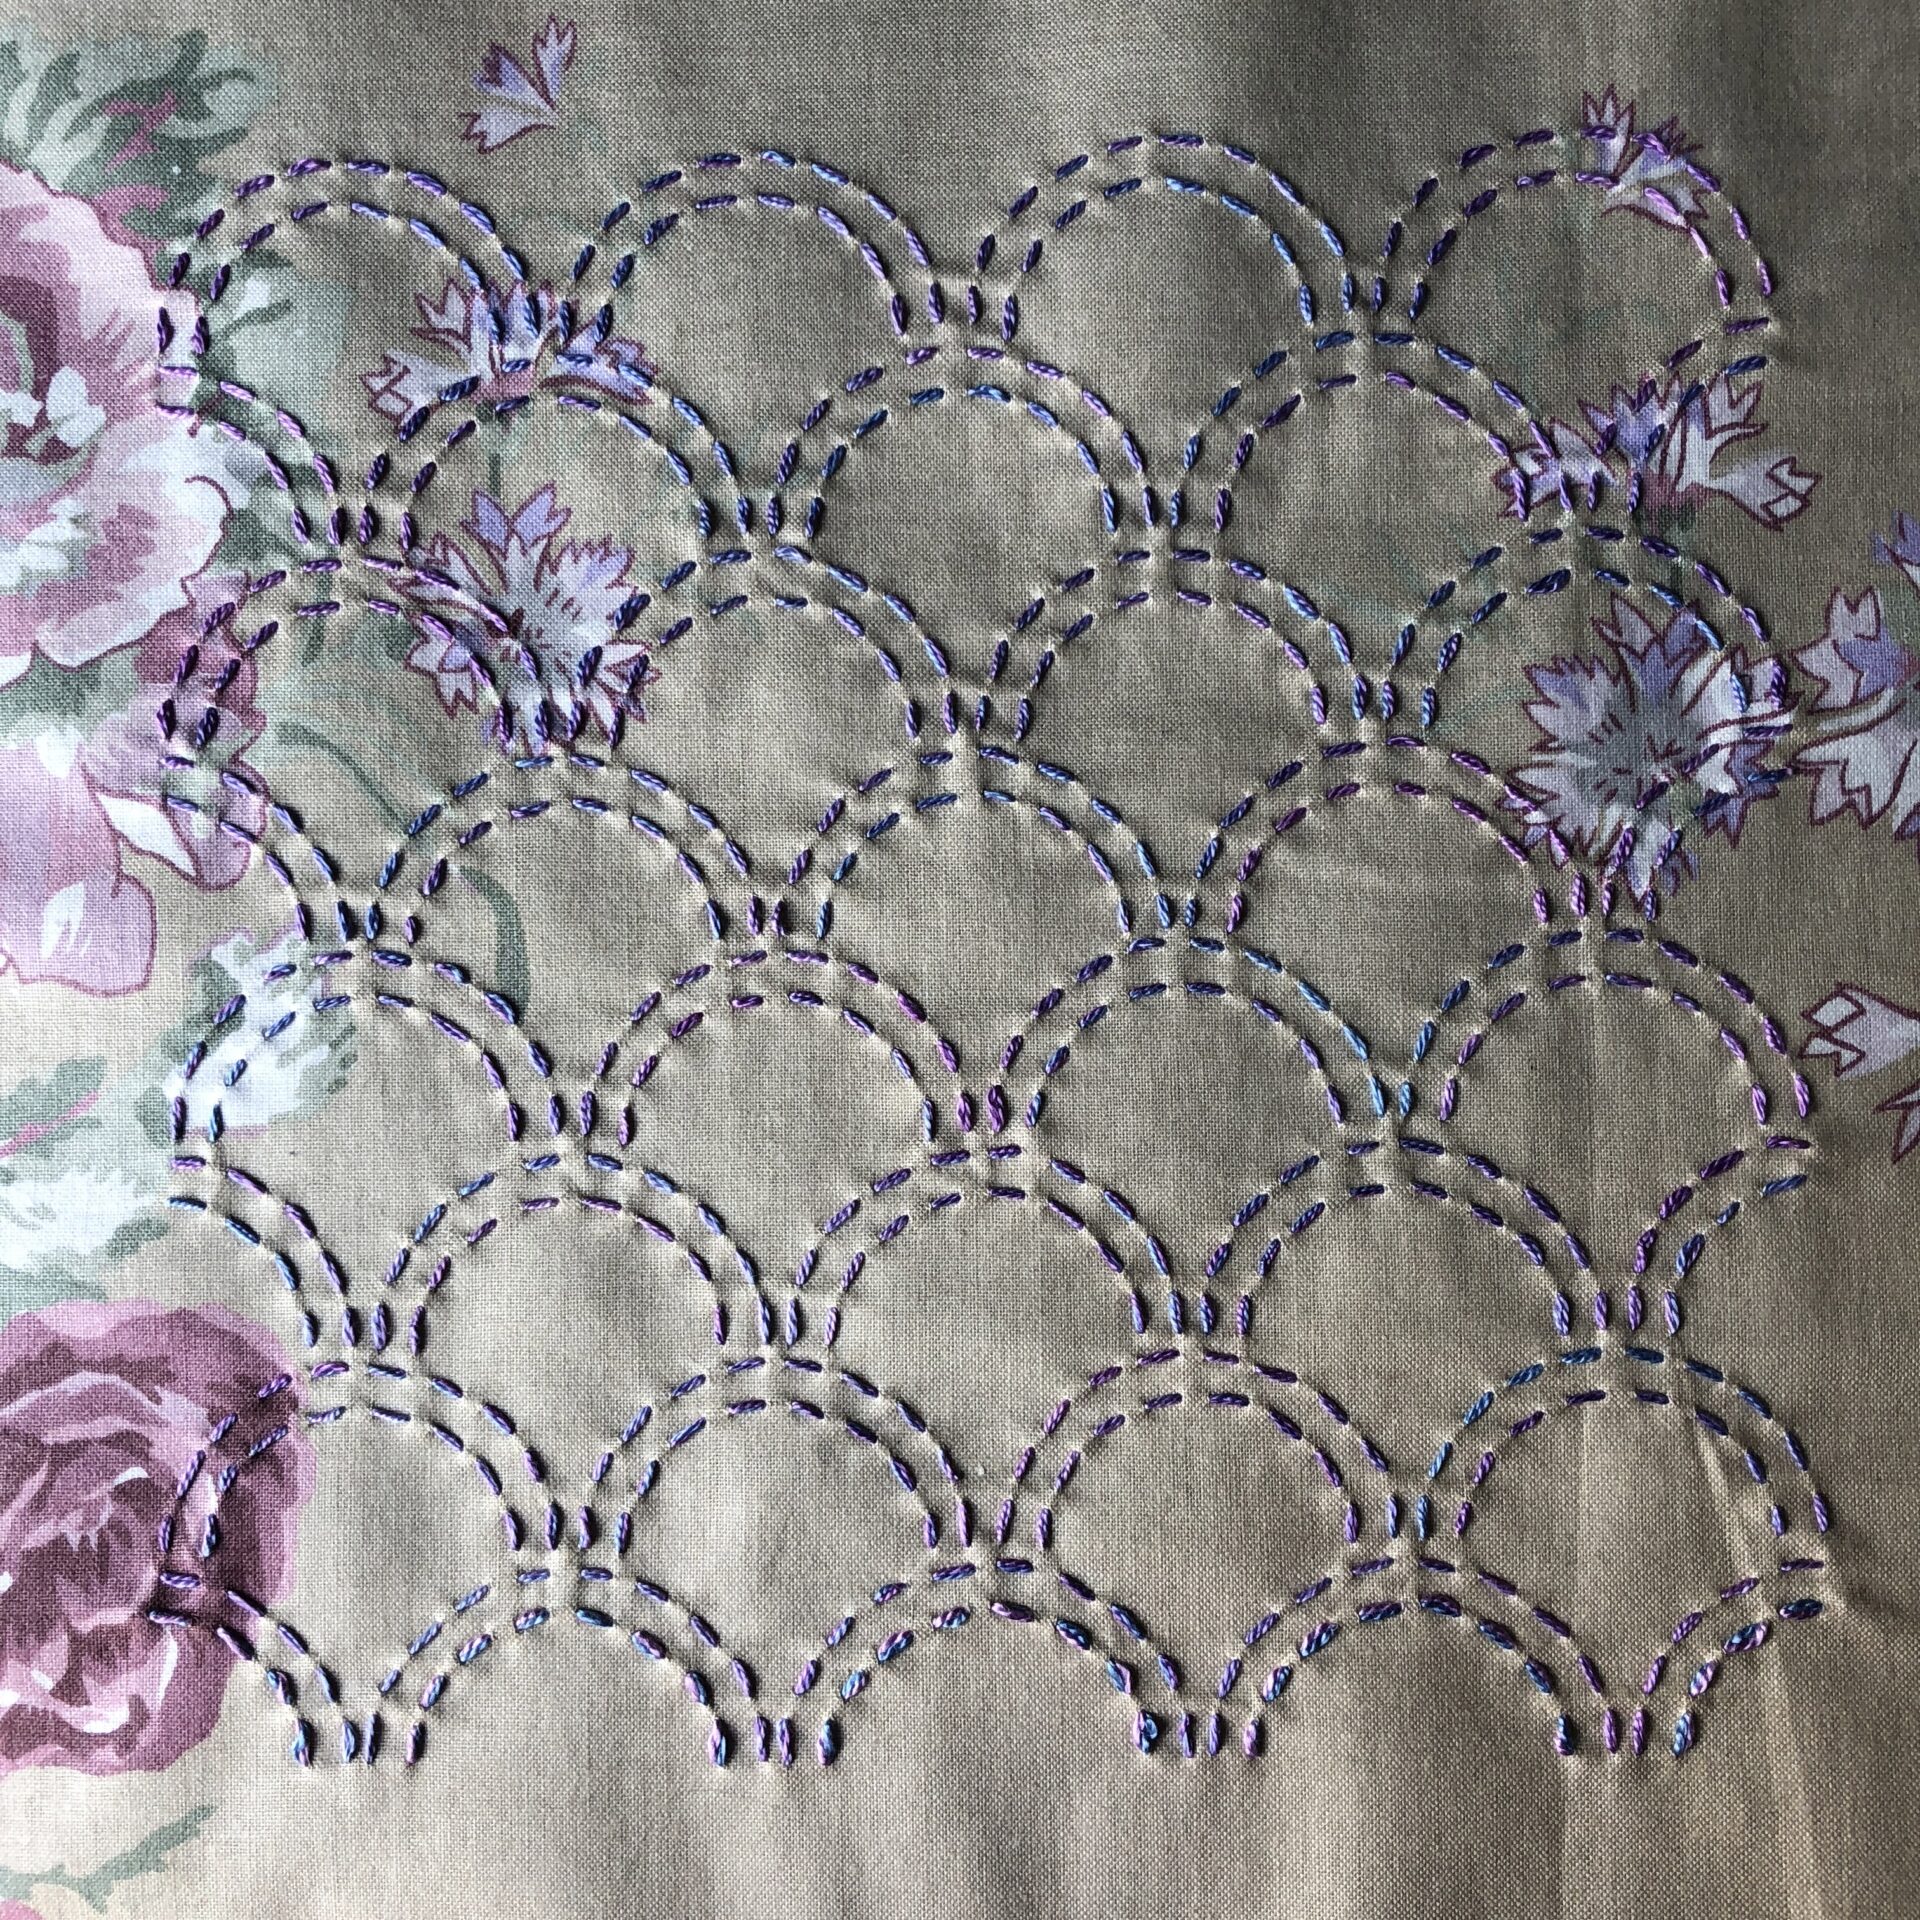
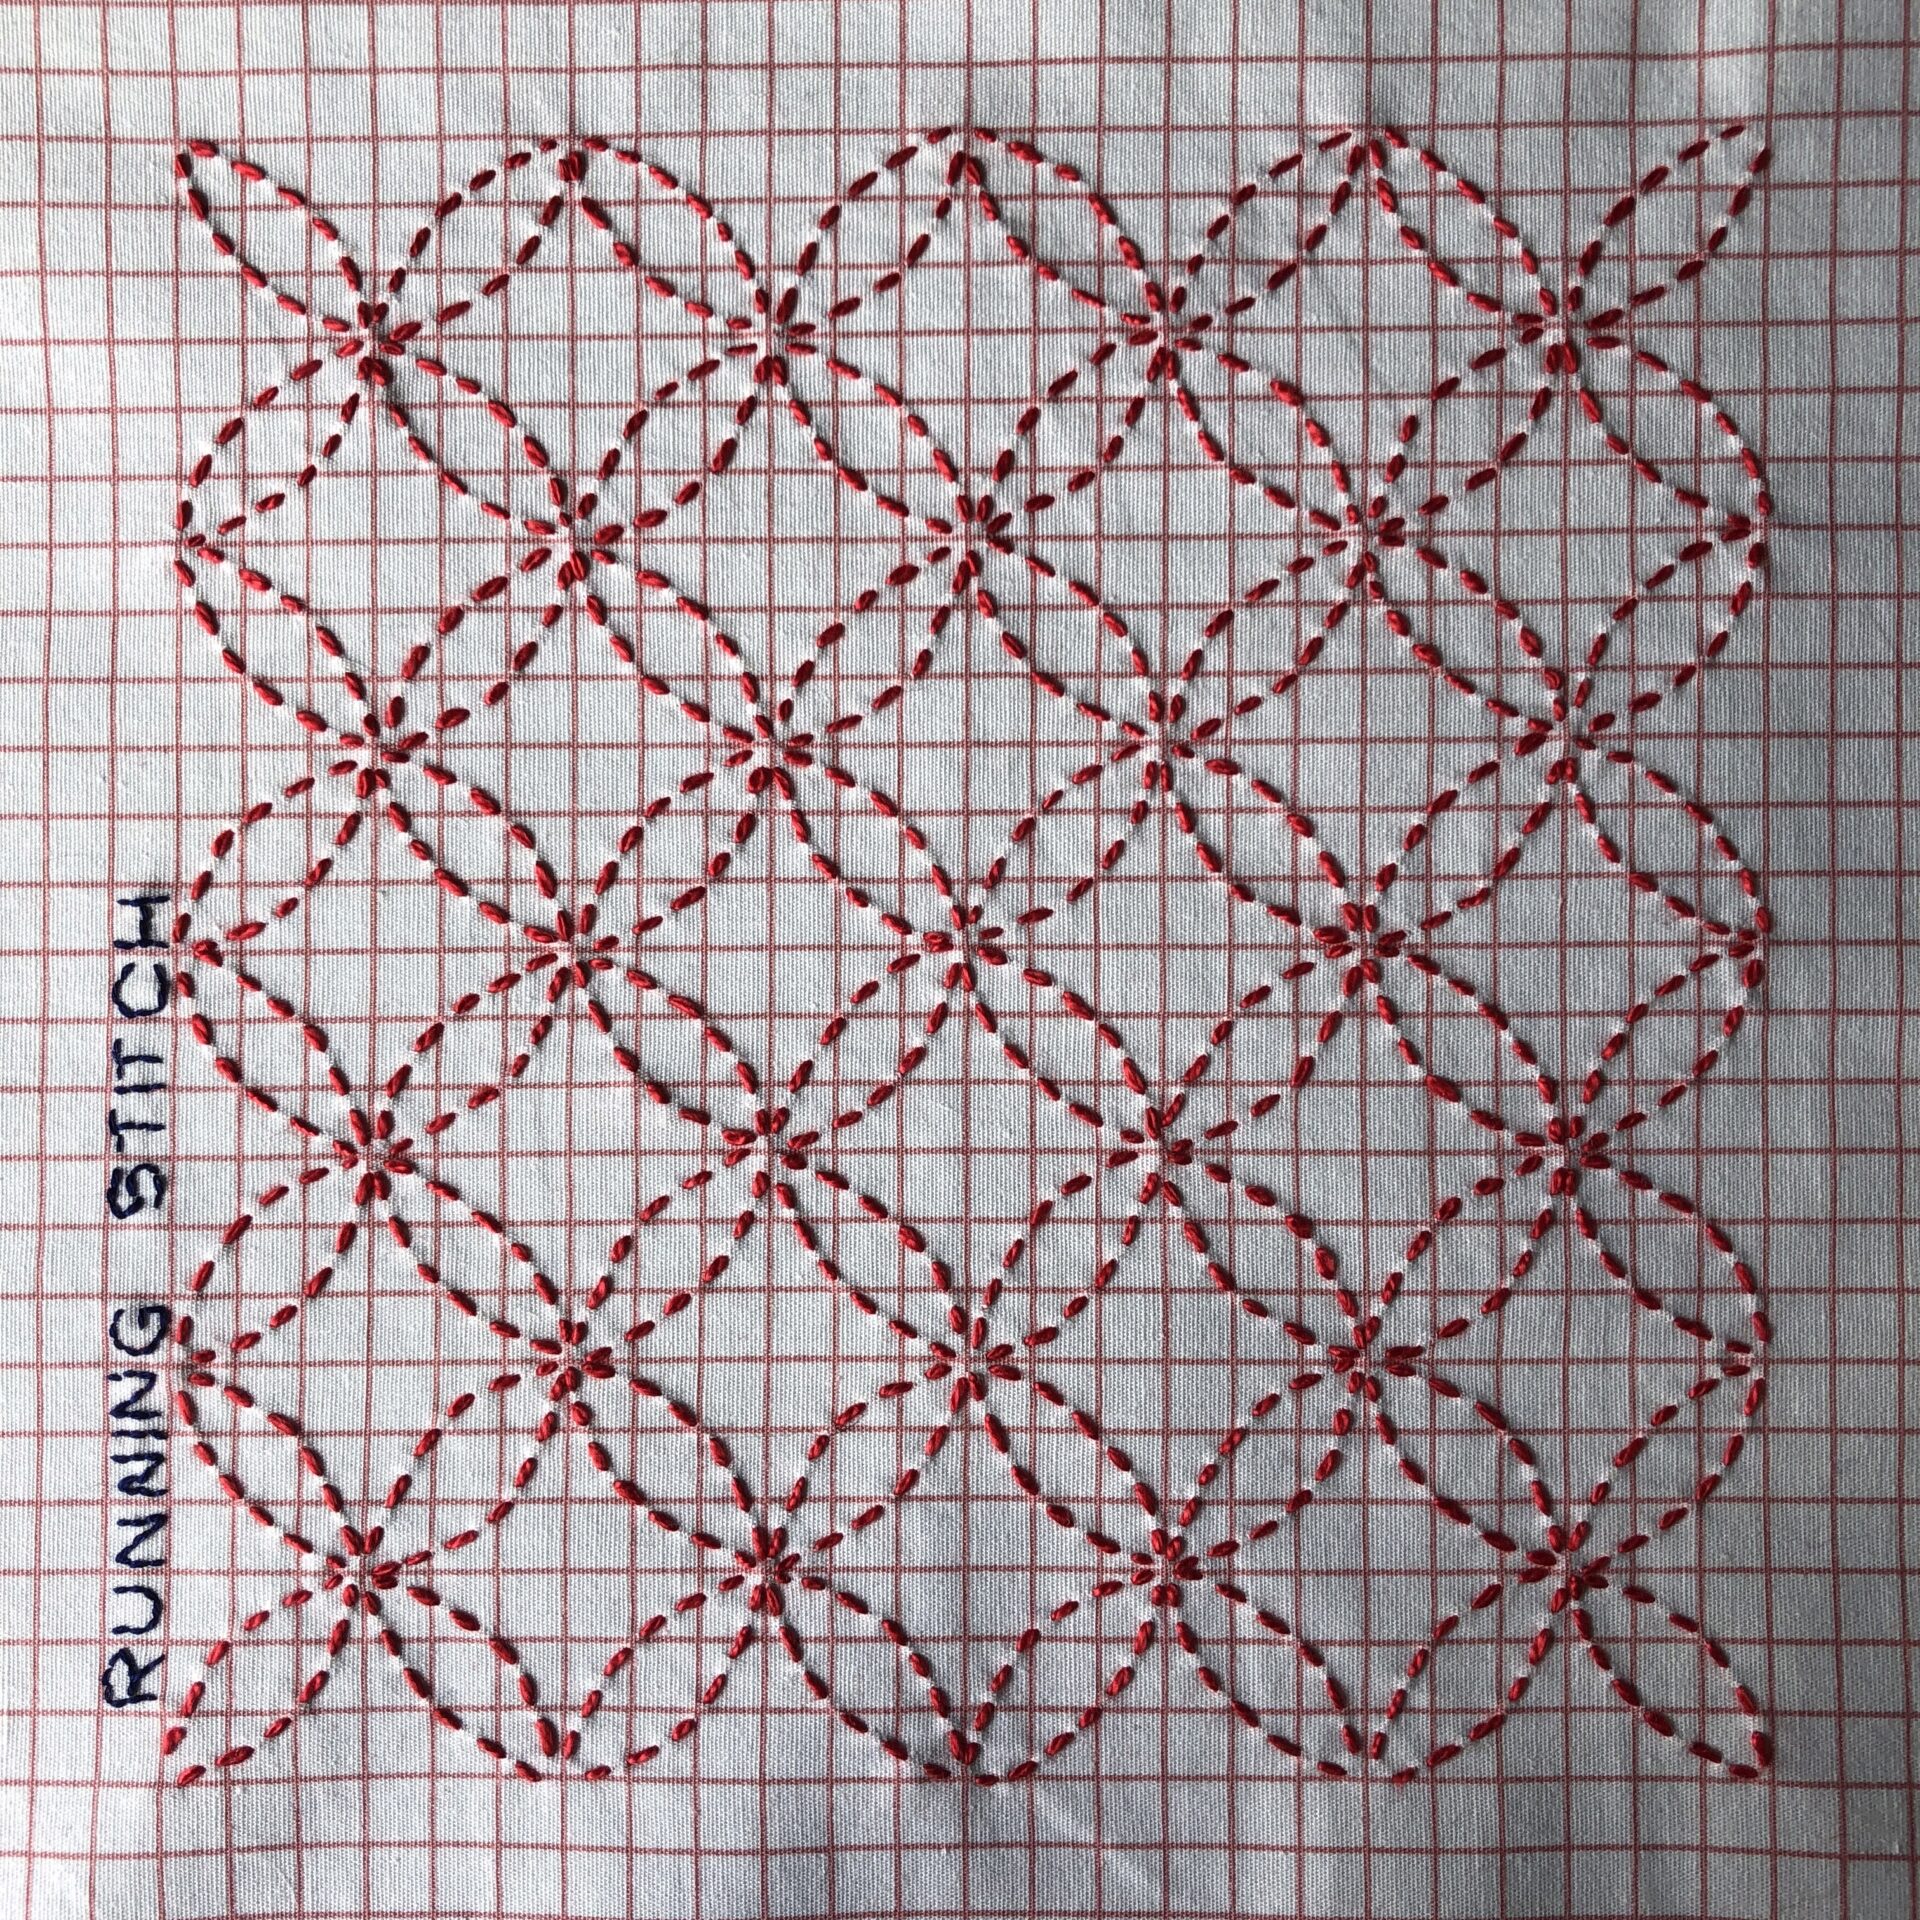
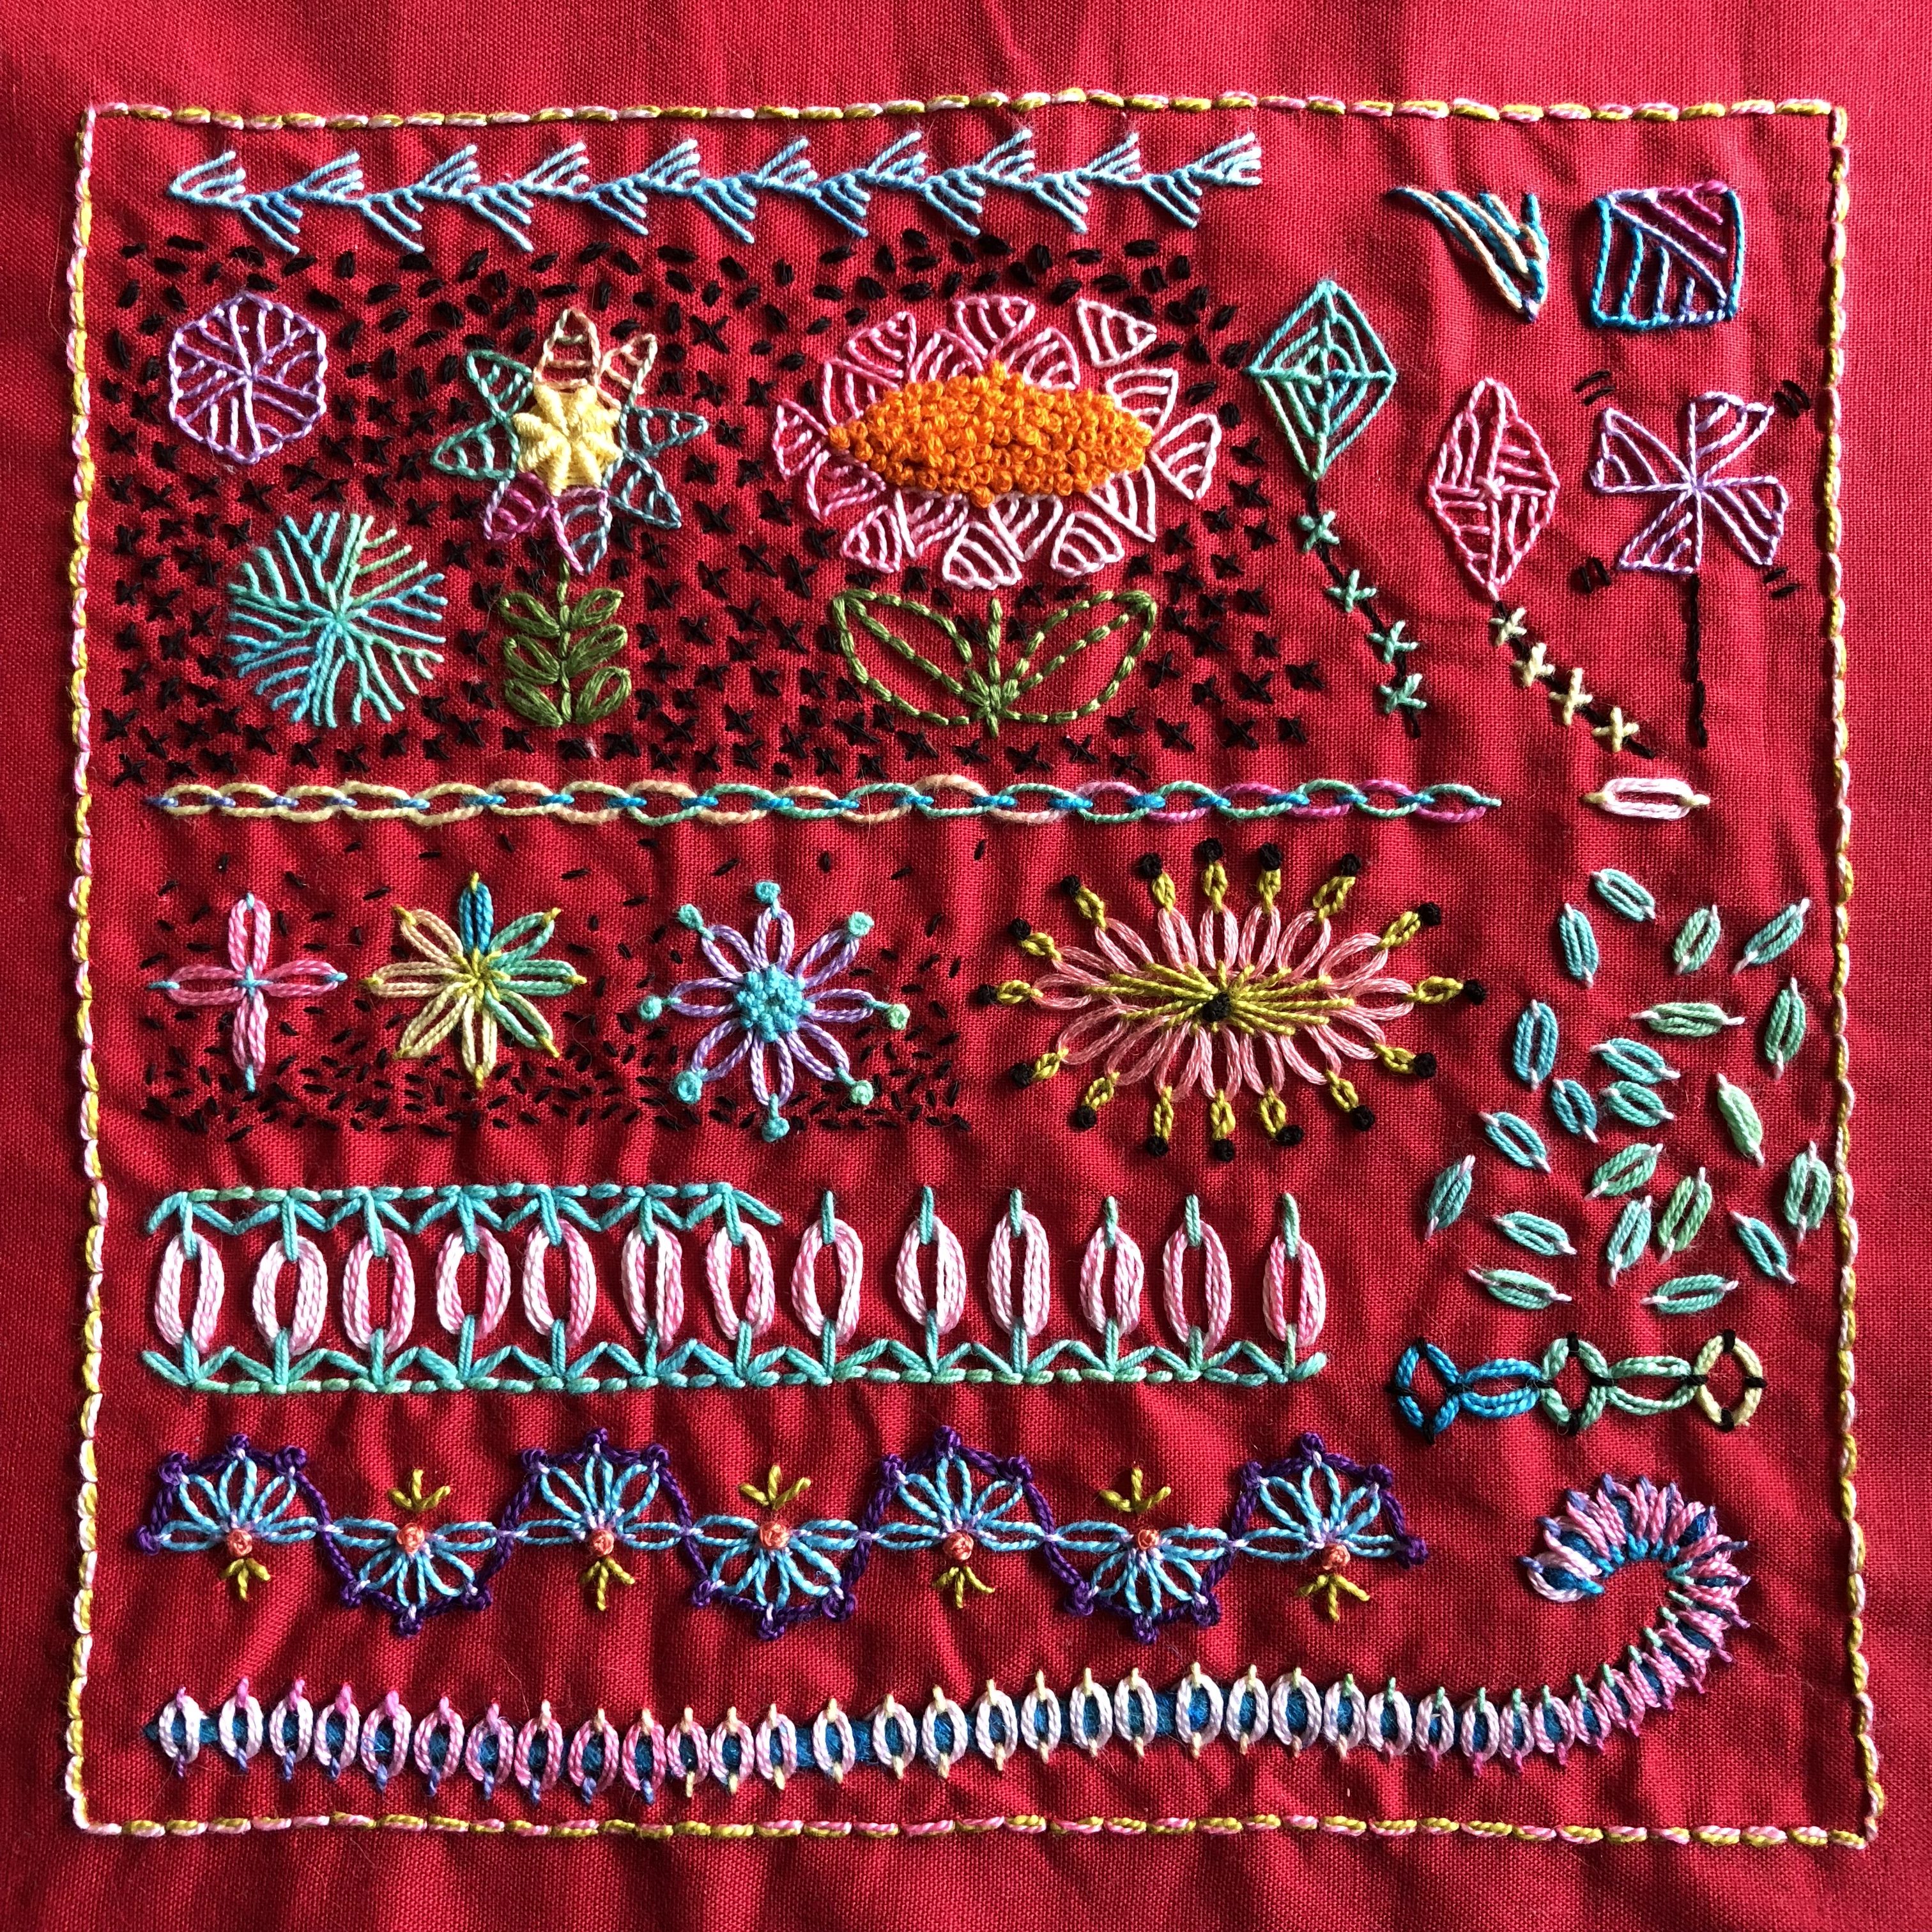
Firstly, some basic ways to try repeating stitches to make motifs and repeats. Then some ideas for ways to repeat stitches in borders. You can see that I used the “half circle on top of a line, followed by a half circle underneath the line” repeat with the interlaced running stitch to make a very decorative border.

Sometimes, as with the open chain border sketched below, it was immediately obvious there was a better way to make this stitch, so I didn’t end up stitching it out. In this case, back stitch is probably a better idea. I think that would make a great border with the addition of some beads or satin stitched blocks.

Sketches of ways to arrange embroidery stitches to form borders, fillings and motifs

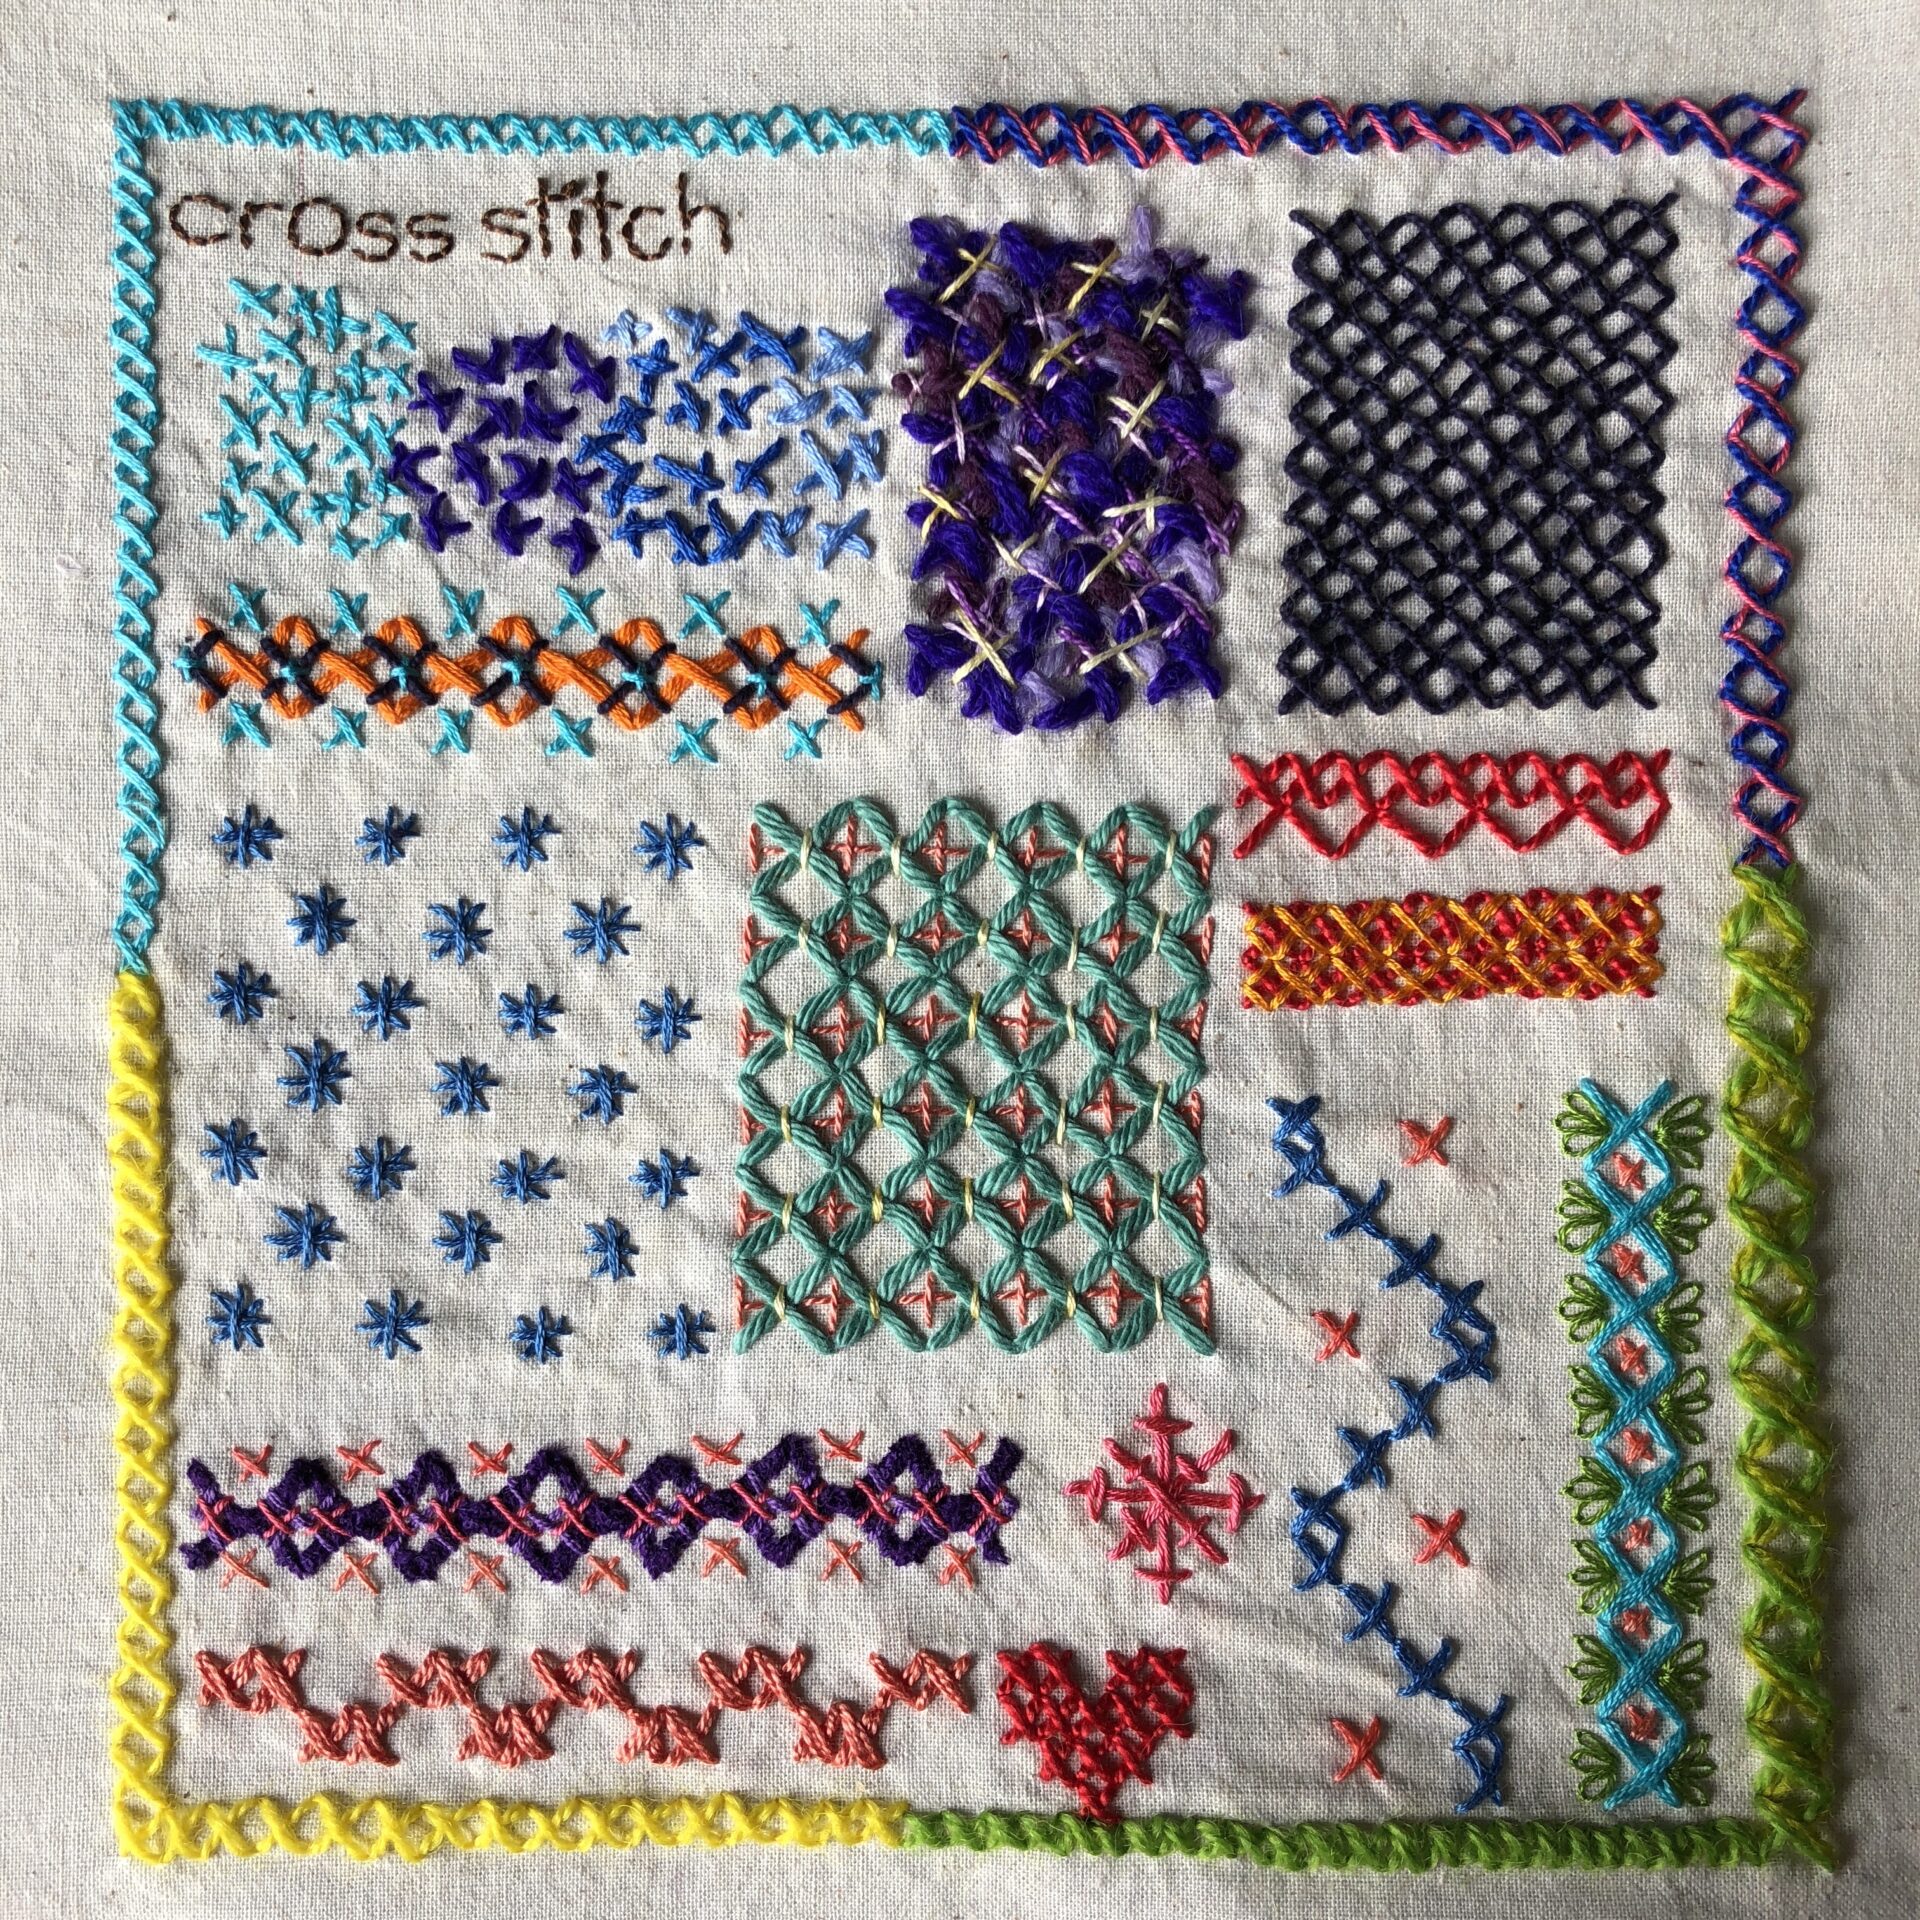
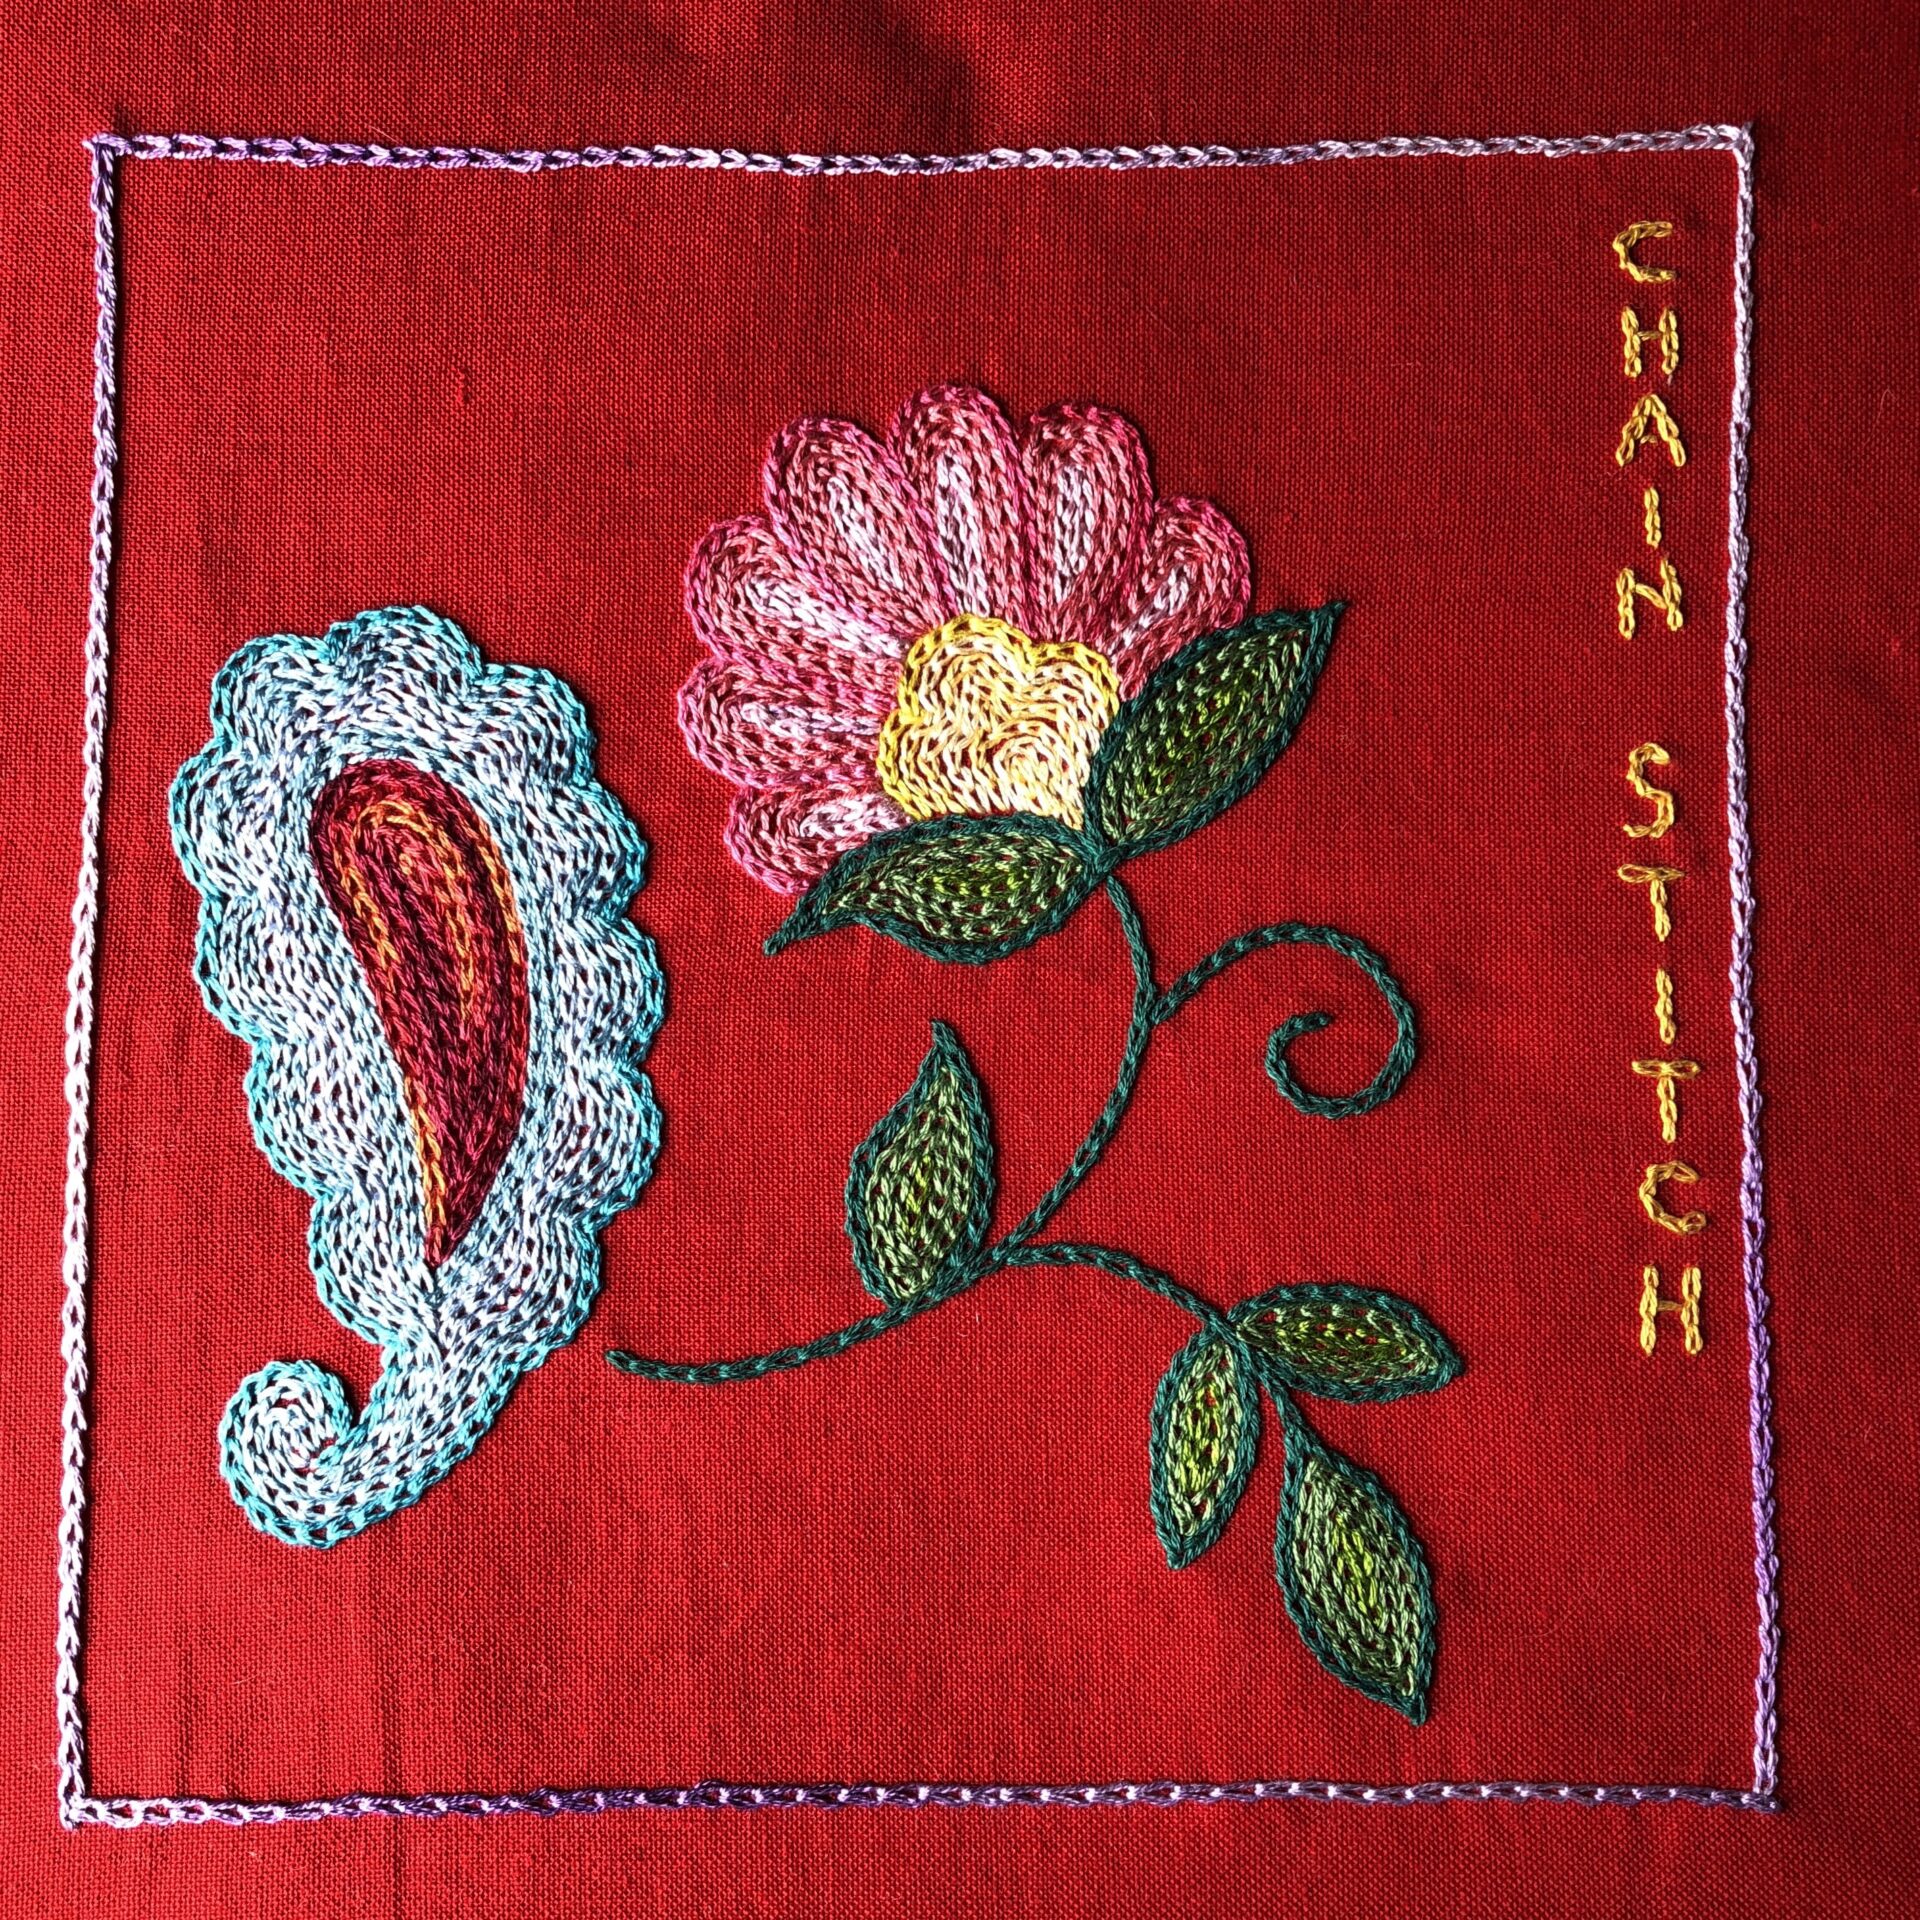
Then I thought of different ways to change each stitch, using chain stitch as an example. Whilst I didn’t use most of these ideas in my current samples, they’ll be very interesting to play with in future.

Different ways to change detached chain stitch in embroidery

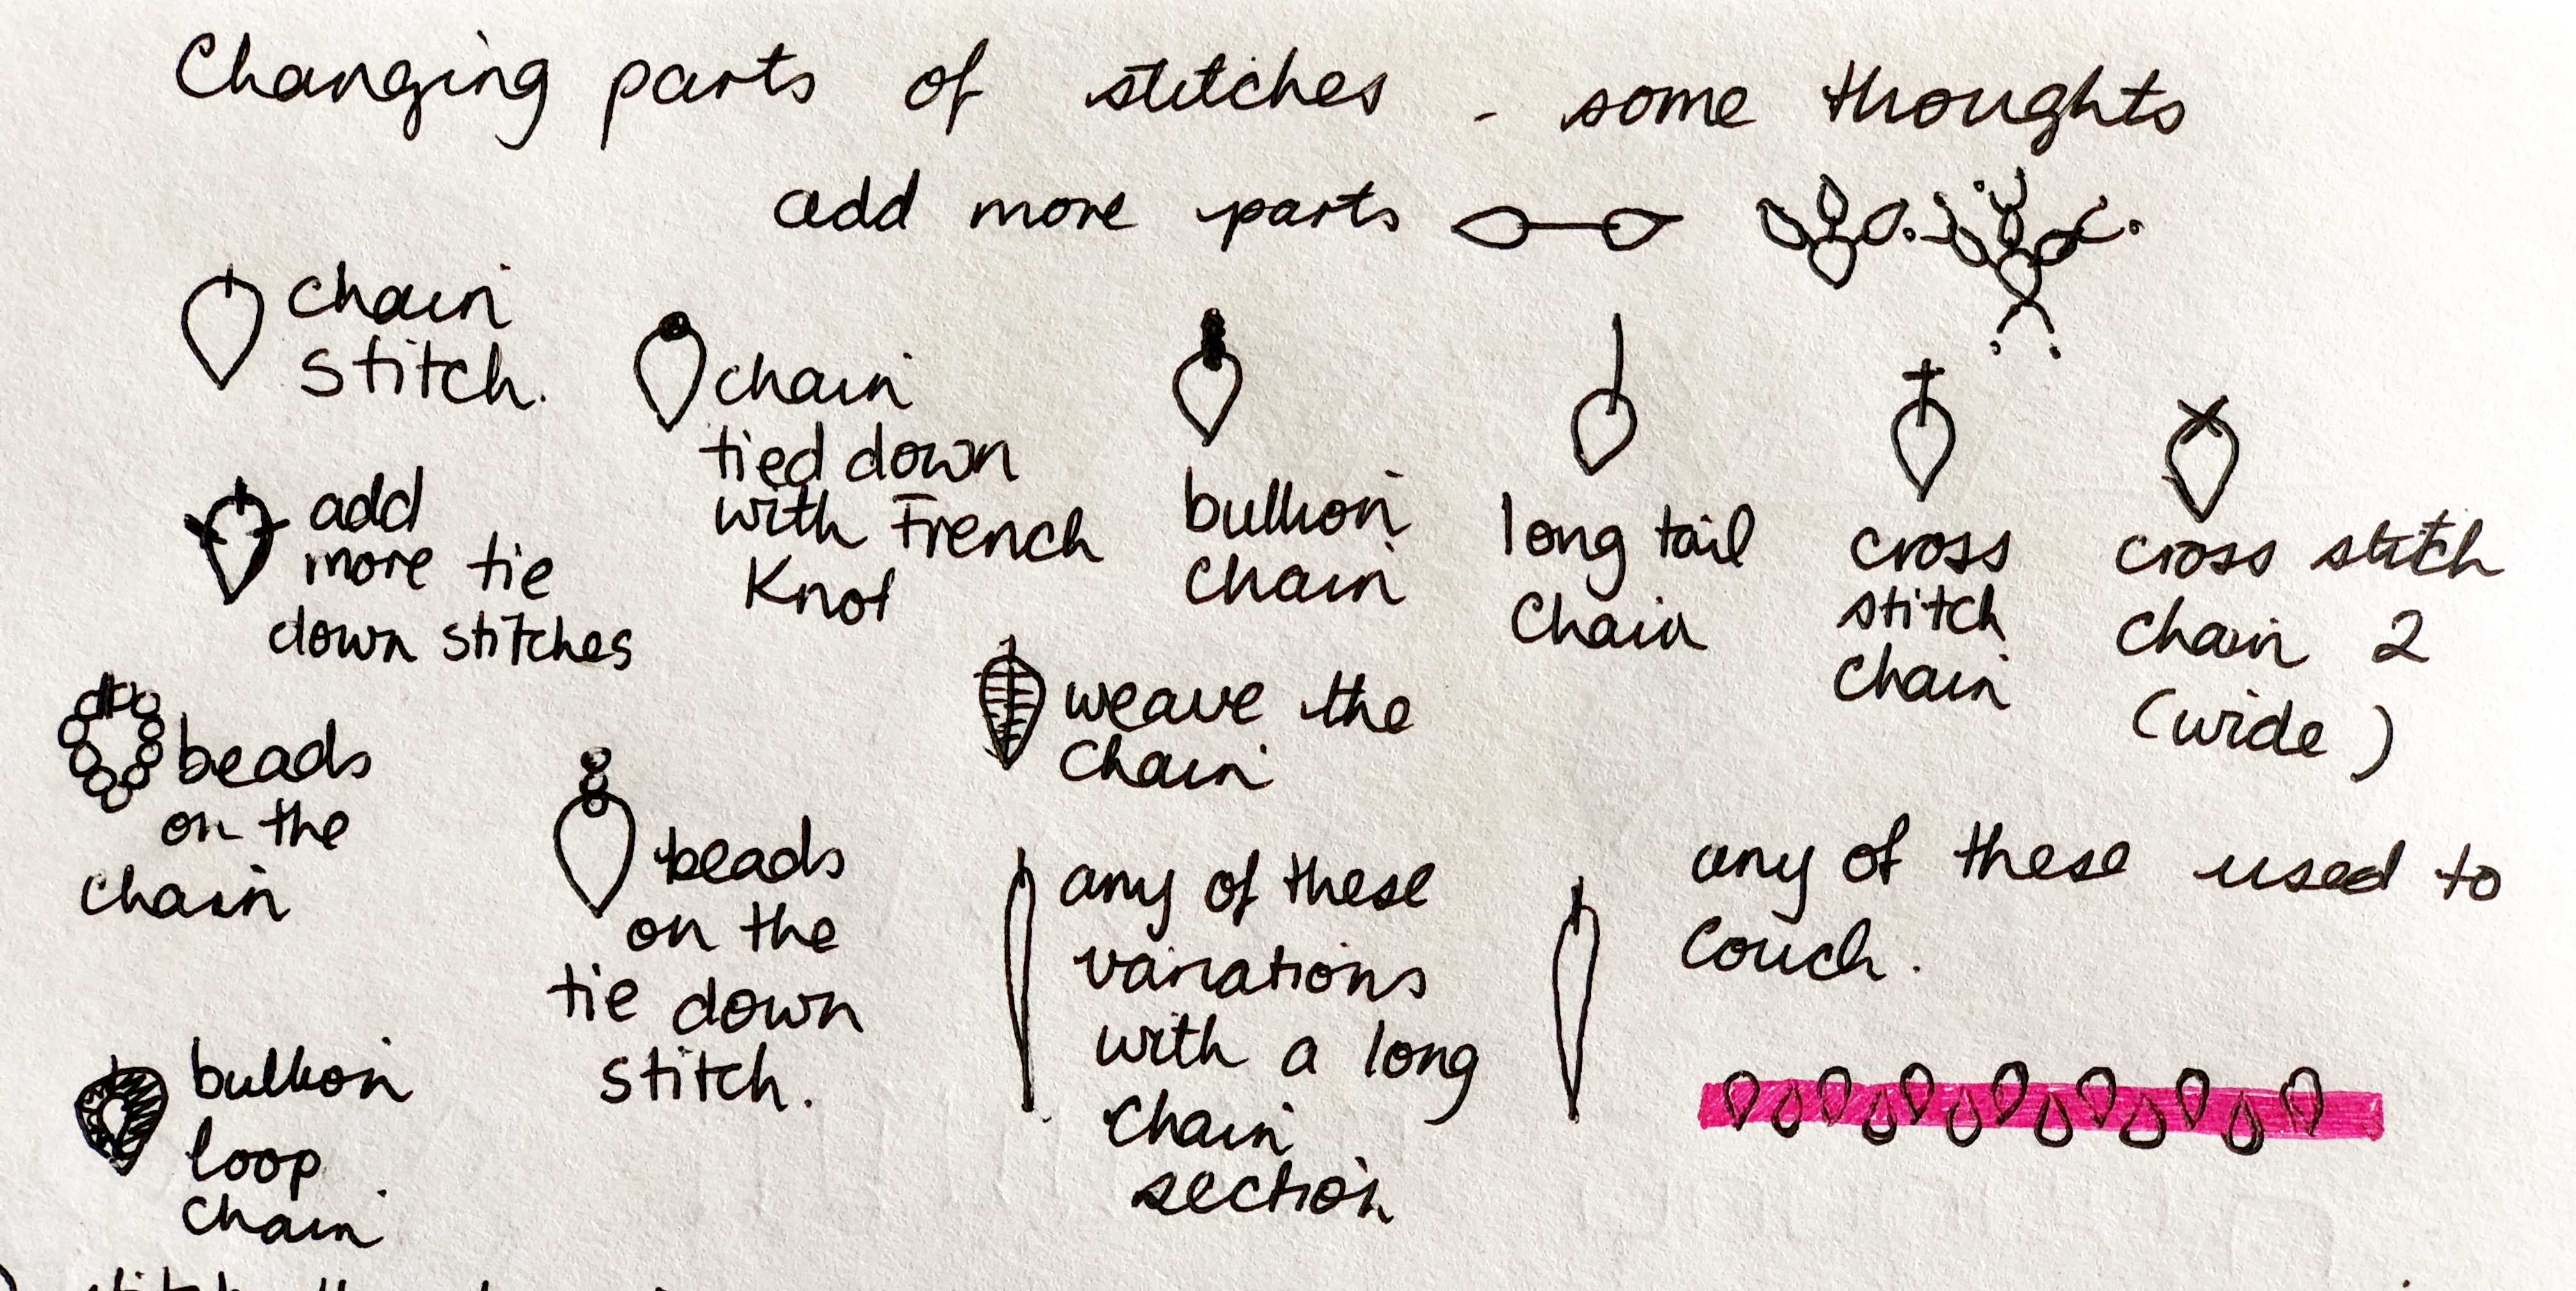
These ideas can be used with almost any stitch.

  1. Add more parts to the stitch by repeating sections. For example, adding a second chain stitch to the other end of the little “tie down” stitch on a detached chain stitch. Tying down a chain stitch with three tacking stitches instead of one.
  2. Replace part of the stitch with something else. E.G. tying down a detached chain with a french knot instead of a little tack stitch. Using a bullion stitch to make the looped part of the chain stitch.
  3. Add beads to different parts of the stitch.
  4. Take any variation and make part of it longer.
  5. Use any of the variations to couch down another thread, ric-rac, or fabric.
  6. If you change the order of the steps to make the stitch, can you then use more colours? For example, make the tack stitch of a detached chain or fly stitch first, then make the loop in another colour.
  7. Can you weave part of the stitch?

There are probably more ways to change a stitch. If you can think of any, please leave a comment with your idea. I may end up giving them a try!

signature

Isolated Stitches in Embroidery – Beyond TAST

A new challenge for Beyond TAST came out this week: exploring isolated stitches. Seeing how they can be used, made into patterns, or created from other stitches that usually form lines and fillings. For example, chain stitch is a line and filling stitch, with lazy daisy (aka detached chain), being the isolated version of the same stitch.

I grabbed a few of my embroidery books that I thought might help me come up with some ideas. Stitches: New Approaches by Jan Beaney, The Batsford Encyclopedia of Embroidery Stitches by Anne Butler, and The Stitches of Creative Embroidery (later edition) by Jaqueline Enthoven.

Three vintage embroidery books.

I picked out a few different types of stitches to play with. If I didn’t restrict myself then I’d end up with eight zillion samplers!

I chose open chain, eyelets, wheat ear stitch, lock stitch, threaded running, and maidenhair stitches as my main stitches. Others I may include if I have time are dot stitch, fancy hem stitch, knotted cable chain, bokhara couching, double herringbone, backstitched herringbone, detached chain and chevron stitch.  I wanted to include some stitches that are already isolated, and some that are single sections of a repeating stitch (like maidenhair stitch).

After doing a bit of research, I usually start by scribbling whatever ideas I can come up with in my sketch book.

Thoughts so far:

  • I might give eyelets their own page as I’ve never experimented with them before.
  • Try the different stitches in different motif and flower styles, e.g. four spoke cross, six spokes, eight spokes, twelve spokes, circles and ovals.
  • Use stitches as texture by overlapping.
  • Move bits of the stitches around to different places.
  • Lengthen parts of the stitches. E.g. detached chain becomes long tail chain.
  • Isolated stitches used as a filling. Dot stitch is a typical isolated stitch used as a  filling stitch, what happens if other stitches are used this way?

And that is where I’m at so far! Now I just need to grab some fabric, pick out some threads and get stitching. I have a feeling this is going to take a while.

signature

Please note: This post contains affiliate links to Amazon.com. I won’t receive a commission if you purchase the linked books but may do if you purchase a new item after clicking these links.

Beyond TAST 1: Pattern Darning

This year, as well as rerunning the regular TAST, Sharon Boggon is also running “Beyond TAST” for those of us who finished TAST already. In Beyond TAST, we spend 4-6 weeks investigating a stitch family or technique.

The first technique was pattern darning. Being me, I ended up making 5 of my 8″/20cm square samplers. For my first piece I wanted to use darning as the background. I layered fabric scraps, basted them with sewing thread and then darned, and darned, and darned some more. You may be able to see that I changed colours so the darning looks like patches as well, but they’re in different shapes to the fabric patches underneath.

When I got tired of that, I added a flower, and finished the whole piece by zig-zagging all the way round with my sewing machine. I zig-zagged with two threads together in a large needle (I think it’s a denim needle). Even though my machine will sew through almost anything, it struggled with thick fabric on the left and thin on the right hand side, so I had to pull it through a bit. I really love the effect of using two threads in the machine together, I’m going to try it with some free motion machine embroidery in future.

Embroidered picture worked in pattern darning and running stitch.

My next samplers were inspired by Kantha embroidery.

Border patterns and fillings. (See my Kantha Pinterest board for more). I drew the basic lines for each border with a water erasable pen before stitching.

Various borders and fillings worked in running stitch.

Then I tried pattern darning used as fillings and to make flowers. I made some double folded hems around the brown fabric and stitched them down with running stitch. I also kept to a very limited colour palette of yellow, green and blue. Limited colour palettes are unusual for me, as I usually restrict myself to using all of them 😉

Embroidered peacock and flowers worked in running stitch and variations.

Finally, in my Kantha inspired samplers I made parallel rows of darning with threading through the stitches to form the patterns. I used an unusual fabric for this, glazed cotton with a floral pattern on it. I think it worked well.

Various deigns of threaded running stitch worked on glazed cotton.

And of course, no investigation into patterned running stitch is complete without a little Sashiko. Embroidered on the same glazed cotton as the previous sampler using two strands of variegated perle cotton. I ran out at the last row and substituted other plain threads of the same colour but they ended up being a bit thicker. Oops.

I used Sew Easy templates and a water erasable marker to draw out the design

Running stitch sashiko embroidery

Next up I’ll show you my latest Dropcloth sampler. I’ve almost finished, although it’s currently drying because I spilled something on it. Hopefully tomorrow it will be dry and I can finish it.

signature

TAST Catch Up 5 out of 5. I Did It!

Welcome to my very last post about the TAST 2015-2017 challenge! Today I feature two non-TAST stitches and revisit two old favourites.

I didn’t think a collection of embroidery samplers would be complete without Cross stitch, so I worked two. One sort of freestyle  on plain cotton and one on evenweave fabric.

Cross stitch is a great stitch to “sketch” with so I started with some scribbly and textural samples (top left and top centre). Then I tried various fillings and seam/border treatments in a range of different threads. I drew a lot of these first with a water erasable marker. I usually use Hemline water erasable markers because they’re easier to find locally but I prefer the Clover Chacopen Water Soluble Marker as the Hemline markers smudge a lot and get all over my hands when I’m drawing. They’re fine once they dry though.

Borders and fillings embroidered using cross stitch.

For my evenweave cross stitch sampler I used a scrap piece of linen I found at the op shop (charity thrift store). The patterns are from an Ondori embroidery book from the 1970’s. I used six strands of embroidery floss and crewel wool for the most part, although the sky is some vintage knobbly knitting yarn couched down with cross stitches worked in floss. I’m afraid I have no idea what count this linen is as I’ve never been much of a cross stitcher. I do love working small motifs here and there with waste canvas though.

Counted cross stitch sampler worked with a variety of threads.

Revisiting stitch 8: Chain stitch

Since I’m going to use my collection of TAST samplers for future reference, I decided I had to record using chain stitch as a filling. I used 3 strands of embroidery floss throughout (I think. I might have used 4, although I didn’t want to pick at it with a pin to try and count the strands).

The yellow in the flower centre is variegated, as is the centre of the paisley. For the other sections I worked darker outlines, then a medium shade, and finally lighter towards the middle. Chain stitch as a filling is remarkably fast to stitch and is a great way to fill in large, simple shapes like these. This is one of my favourite samplers, even though it’s one of the simplest.

Flower and paisley embroidered with chain stitch filling.

I came across canvaswork stitch while browsing videos on YouTube (that’s a link to the video, BTW). As you can see, I tried it in lots of different threads, and found that something smooth works the best. It would probably be a lot neater worked on an evenweave fabric or canvas (duh) rather than my quilting cotton, but hey, I’m a rebel. I really loved playing with all the different colour combinations on this one.

Canvaswork stitch worked in a variety of threads.

Revisiting stitch 10: Running stitch

My many investigations into running stitch simply would not be complete without a little sashiko. (see week 10, running stitch, revisiting running stitch, and this post from August last year for more running stitch samplers. I love running stitch).

If you’d like to learn more about Sashiko stitching, I recommend the Creativebug class, Sashiko Sewing with Lisa Solomon for beginner embroiderers, or for more experienced stitchers, The Ultimate Sashiko Sourcebook. Lisa makes drawing the designs on the fabric look so easy that I’m itching to try more designs from the book.

Embroidered sashiko sampler on red check fabric.

And that completes my collection of samplers for the 2015-2017 TAST embroidery challenge! Now that I’ve ironed them all, and shown them all off, I just need to bind them into fabric books and they’ll be ready to peruse any time I need them. After I embroider a few covers.
😉

If you’d like to see more, click on the “TAST challenge” tag under this post, or come back in a couple of days for the beginning of my “Beyond TAST” adventure!

signature

  • This post contains affiliate links to Amazon.com and Creativebug, (where you can get a 2 week free trial and 60% off coupon for Joann’s for a limited time).

TAST Catch Up 4 out of 5

Welcome to part four of my, “Oh crap, I forgot to blog about all these TAST samplers” catch up series.

Revisiting stitch 86: Knotted cable chain

I only worked a couple of lines of knotted cable chain when the stitch was first announced, so I took an opportunity to go back and work it the way I had originally intended. I used every type of blue thread I had to work an ever decreasing square spiral, starting with the thickest threads and working towards the thinnest. I also worked the chain much closer to the “knot” than I did the first time. I much prefer it worked this way. I think every type of thread looks great, and it has a great texture that I was missing the first time. I filled in the spaces with a spiral of yellow running stitch because a little contrast always looks nice.

A square spiral of knotted cable chain, worked in a variety of threads.

Revisiting stitch 45: Portuguese border stitch.

I really like Portuguese border stitch, so when I saw this video on YouTube, I knew I wanted to try embroidering it in a flower shape. I used a range of threads, working one, two, or three lines of the whipped part of the stitch to fill (or not), the petal shapes. For one leaf and part of the border, I added beads to the stitches that form the ladder part of the stitch and left just enough space to work the whipped section at either side.

I’m glad I revisited this stitch as it’s gone from “that’s pretty”, to be one of my all time favourites.

Portuguese border stitch worked in a flower shape using a variety of threads.

Leaf stitch is not a TAST stitch, however, when I saw this video on YouTube, I knew I had to try it. I found that it looks best in smooth threads. I’d love to try it with a thread similar to the one in the video. The colour changes are a lot more fun than any threads I had at the time. Have you noticed that I like flowers just a little bit yet?

Floral sampler worked in leaf stitch.

Stitch 95: Zig-zag coral stitch.

I had an absolute blast with zig-zag coral stitch. I did little more than try out a load of different threads and a little bit of couching, but it looked great in anything I tried. I particularly like the way crewel wool turns the knot of the coral stitch into a little loop. (The peach line on the left, 8th row from the bottom if you don’t count the border).

Zig-zag coral stitch worked in a variety of threads on red even weave fabric.

Come back tomorrow for my final TAST 100 stitches instalment!

signature