Menu Close

Year: 2014

Triple Single Bracelets on the Rainbow Loom

My rainbow loom arrived at last! Next time there’s a rainbow loom “drought” in Australia I’m just going to wait for shops to get stock in. Back ordering mine was a bit of a disaster since the shop didn’t keep customers up to date with the ever changing delivery times. But it’s here now (and Charlie has stopped asking how many sleeps until it arrives) and that’s all that counts.

Triple single rainbow loom bracelets

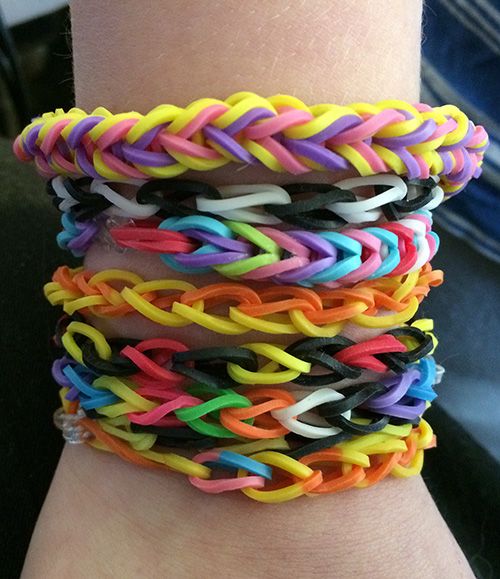
Charlie and I decided to start off with an easy style of bracelet since he likes stripes and I like to stop my brain from melting and leaking out my ears. We (and by “we” I mean “Charlie”) chose the triple single bracelet.

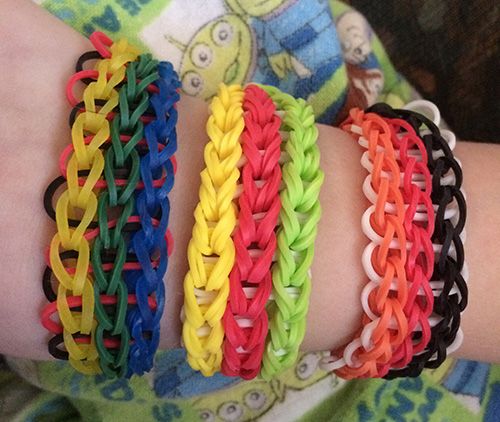
From left to right the photo above shows: a bracelet that Charlie (age 5) put on the loom himself. I finished it off for him but he really enjoys making the patterns with the bands on the loom. In the centre is a bracelet I made with two bands held together for the stripes,  and finally a bracelet with single bands in the stripes.

I used the following video, which takes you step by step through the process with clear and thorough instruction for both weaving the decorative part of the bracelet and making it longer for different sized wrists.

Charlie and I disagree with what to make next. I want to make myself a beaded bracelet but he wants me to make him a red Angry Bird charm. So I guess I’ll be doing both!

Don’t worry if you come here for free knitting patterns and other vintage crafts though. Knitting-and.com hasn’t turned into the all singing, all dancing rainbow loom show just yet. At the moment my partner is working on scanning book four of the Good Needlework Gift Book series, and I have some vintage knitting patterns ready to type up, which I’ll release one at a time over the next couple of, um, years (there are hundreds of them). I’m also still working on translating my vintage Latvian knitting book from 1956, which is going extremely well considering I don’t speak any Latvian!

signature

How to Sew Name Labels Into Knitting & Crochet That Stretches and Charlie’s New Hat

Charlie's Block Head hat

As promised, here is Charlie’s new hat! Not only is it proof that I can crochet, it’s also proof that sometimes I buy patterns that were written more recently than 1969 🙂

Here are the details, because this hat is so ridiculous that everyone should make one!

Pattern: Blockhead Man Hat by Darleen Hopkins – $4.50 US
Yarn: Cascade 220 (not superwash, just the regular kind)
Hook size: 5mm/US size H
Size: medium/large (Charlie likes his hats loose and long so he can pull them down over his ears but the smaller size really was going to be a bit tight)
Skill Level: Super easy but make sure to keep track of the end of your rounds!

Charlie insists he’s never going to take this hat off, so I had to sew a name label in it because of his school’s clothing policy (I.E. put a name label in all your kids clothes or we’ll look at you with the same expression we use on the 5 year olds when they’ve done something silly).

Of course, I could find neither the name label tape, nor the laundry marker that I bought for this purpose (It’s probably in my sewing box which is the only place I didn’t look), so I made a label with vintage seam tape and a Sharpie.

Fold the ends of the tape over and fasten the thread with a few stitches over the top of each other. Then over-sew to the hat, catching just the back of the stitches so it doesn’t show from the outside.

How to sew in a name label part 1

Make sure to leave a slight “bubble” in the label so that there is enough room for the crochet to stretch.

How to sew in a name label part 2

Here it is seen from the side.

How to sew in a name label part 3

I have my fingers crossed that Charlie doesn’t still manage to lose it. Whenever his Dad or I pick him up from school, he’s always managed to spread his belongings all over the classroom verandah so you never know!

Now I’m off to play with my our new Rainbow loom, which arrived during breakfast this morning!

signature

Rainbow Looms and a Band Brand Review

My son Charlie and I have finally succumbed to the Rainbow Loom craze! Yes, it took us a while but with friends on Ravelry telling me I should get one, people ending up on Knitting-and.com looking for information on them and then Charlie coming home from his best friend’s house with them all up his arms, I decided it was time to give in. Plus they’re, you know, kind of cool 🙂

Rainbow loom bracelets
Charlie’s rainbow loom bracelets

Our loom was on backorder so Charlie decided to get his Dad to buy a cheap pack from K-Mart, which came with a little plastic crochet hook. At first, we used the instructions that came with the bands. They’re basically the same as the instructions in this video, except you pinch the beginning bands between your fingers instead of using the mini loom. We made them with single bands, then two bands of different colours at a time (like the top bracelet on Charlie’s arm).

Our loom still hadn’t arrived so I bought a pack of proper Rainbow loom bands with a gift certificate from Spotlight (thanks Spotties!) and decided to try this technique, which is apparently called a fishtail bracelet.

I think we both love the fishtail bracelets and using double bands more than the others. They’re much more substantial and you can play with blending colours. When I say “we”, I mean I make the bracelets and Charlie wears them and runs away with the ones I made for myself 😉

I was very surprised at the difference in the quality of the bands. The K-mart bands started perishing within a couple of weeks of making the bracelets. When Charlie stretched them, they became pitted and weak, making many points along each band where they eventually broke. The real Rainbow loom brand bands however, have been treated to an equal amount of abuse and are holding up fine. I also found them to be easier to work with as they’re thicker and less likely to twist.

If you’d like to keep up with which projects Charlie is getting me to make for him on the loom (when it finally arrives), you can sign up to my blog over there in the right hand menu and be notified whenever I post. It’s a great way to find out when I post free patterns and booklets as well 🙂

Now I’m off to finish a crochet blanket. I’ll show you Charlie’s new hat tomorrow!

signature

Choosing Buttons for Baby Garments

I love knitting for babies and one of my favourite things about it is the huge range of cute, and sometimes bizarre, novelty buttons that you can find to sew on them.

As a mother, however, the one thing I hate most about knitwear for babies is trying to do up the buttons on a cardigan wrapped around a 4 kilo mass of wriggling baby, especially when the buttons aren’t chosen to be functional.

If you’ve ever knit something for a baby and it has never been worn, it might not be because the parents are ungrateful un-knitworthy hand-made hating ingrates. They might be, but they might have just had a difficult time doing up the buttons. So from my years of experience doing up cardigans on wriggling babies, here is my guide to choosing buttons for baby garments.

The irresistible but poky novelty button.

These are the type of buttons that have little poky bits sticking out everywhere but they’e cute so we must put them on all the things. Star shaped buttons are the WORST. Unfortunately they are also adorable.

These buttons should be used strictly as a decorative element, as trying to put them through a buttonhole that is in constant motion just causes yarn snags, sudden knitwear hatred and wild emotional swings (especially if the person trying to do them up is sleep deprived).

Novelty buttons
I am not a functional button!

 The irresistible but mostly round novelty button.

This type of button works well on knitwear most of the time. If it has any part that sticks out, like the cat’s ears, they are smooth and won’t snag.

The only time I would avoid using buttons of this type is if my yarn is particularly splitty as it still might snag, but who wants to knit with that kind of yarn anyway?

Novelty buttons
I am cute and functional! Most of the time.

Round decorative buttons

These are my favourite type of buttons to put on baby wear. Printed with cute characters or flowers, special 3D look patterns or interesting moulded but completely smooth shapes. The buttons below are all vintage but you can still get printed buttons with classic children’s characters in most shops that sell buttons.

They’ll never snag the yarn, no matter what you’ve knit with, how wriggly the baby is or how tired the person trying to do them up.

Four round vitnage buttons

Putting my buttons where my mouth is

Figuratively speaking.

This is a baby surprise jacket that I knit for my nephew. I used vintage pale green buttons for fastening the front and a poky novelty ladybird button purely for decoration.

Baby surprise jacket
Two types of buttons used in the right spots.

I’d love to hear your thoughts on choosing buttons for baby and toddler knitwear so please feel free to leave a comment below!

signature

Free Knitting Pattern – Latvian Boy’s Hat from 1956 (Translated into English)

Boy's hat from Adījumu Raksti un Adīšanas Technika

Today I finished translating the boy’s hat from my vintage Latvian knitting book and have uploaded it for you to knit.

I test knit the pattern (I’ll show you my hat once it’s dry), and was very pleased to find that I translated it properly and managed to correct the errors and add the missing information (it didn’t say how long to knit before casting off).

I tried the finished hat on my son Charlie, who is about the size of the average seven year old, despite only being five, and it fit perfectly! All my experience in knitting hats paid off and I didn’t have to add or unknit any rows. Phew.

Now I wonder what to tackle translating next. There’s a very cute looking baby cardigan, or I could really challenge myself and see if I can make heads or tails of the chapter on knitting Latvian mittens…

signature