Menu Close

Tag: TAST challenge

French Knot Sampler for TAST 2015

French knot meteor on featherwale corduroy

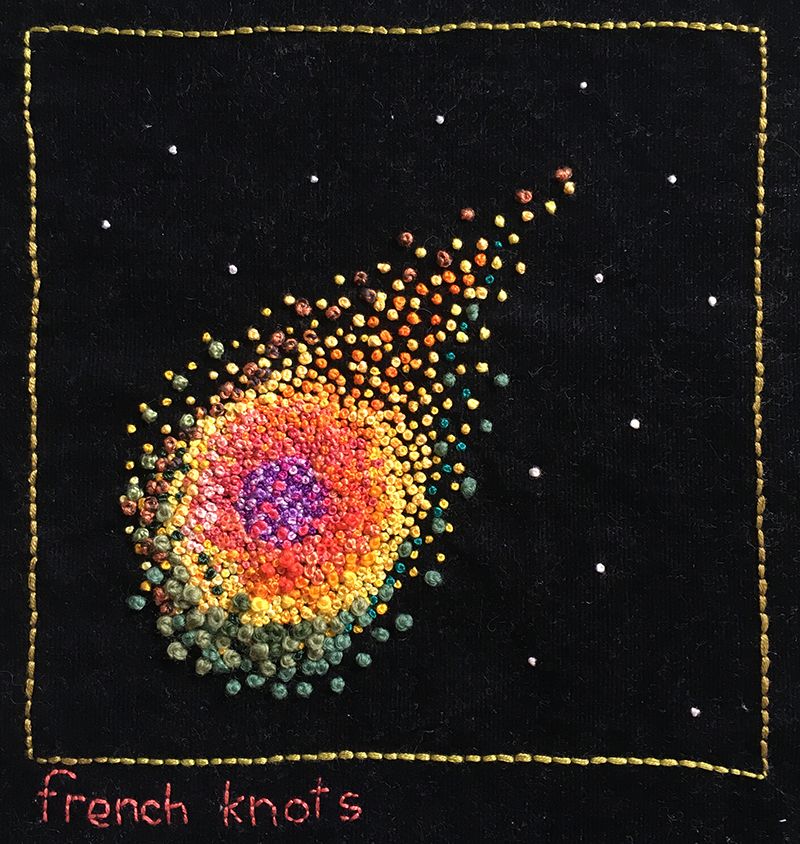
Who knew, when I started my embroidered French knot sampler for week 15 of the Take a Stitch Tuesday challenge, that it would result in a fiery meteor of thread oddments hurtling towards Earth?

I certainly didn’t.

I had intended for this week’s sampler to be a negative space cookie cutter image in the centre, surrounded by French knots but it didn’t turn out that way. I ran out of time to mark my fabric on a day when I knew I’d be in a waiting room for at least three hours so I just grabbed everything and headed out the door.

I then began stitching what I thought was going to be a target shape of my basic sampler colours (purple, yellow, orange, green and brown) but when I checked my bag of oddments, most of the interesting greens were rather thick and they made the circle look like it was gathering mass from somewhere, or breaking up through the atmosphere. And so it evolved into a meteor. My love of dodgy science fiction movies may have been a slight influence there.

My background fabric this week was cut from a remnant of black featherwale corduroy. No matter what I tried, I just couldn’t remove the fine white fibres that were stuck on it so now they’re space dust.

🙂

My threads include everything from 3 to 8 strands of embroidery floss, rayon, tapestry wool, Appleton wool, size 5, 8 and 10 perle cotton gobelin wool and whatever else was in the scrap bag.

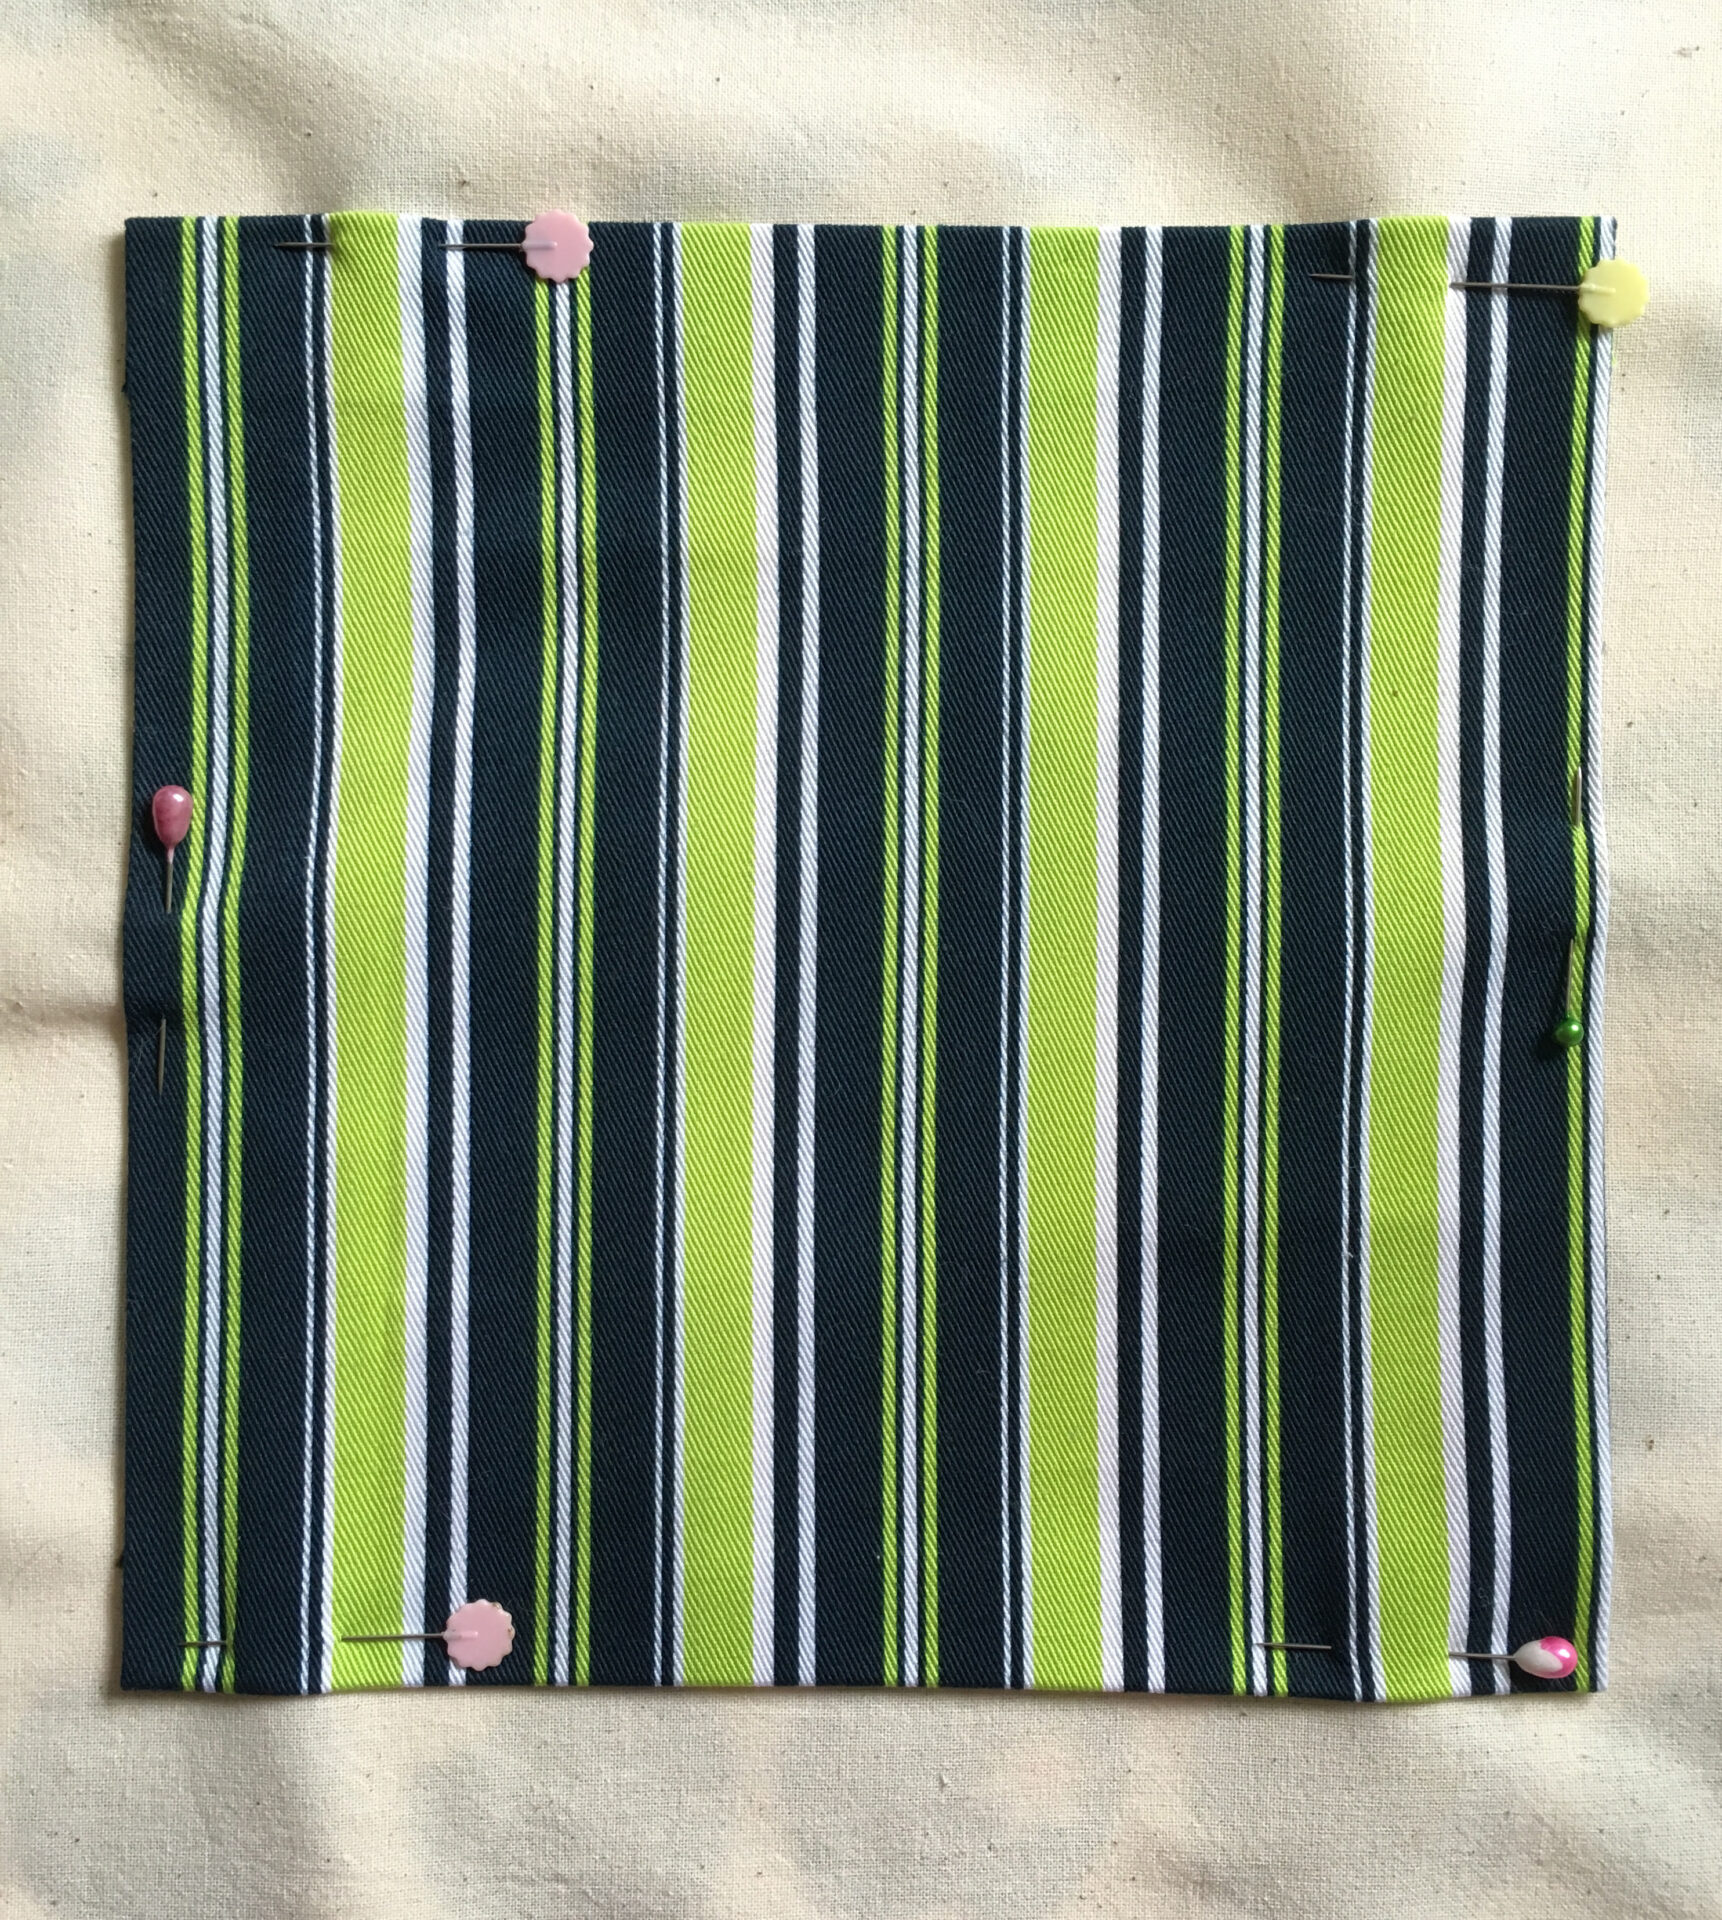
I’m all ready to start stitching week 16’s wheatear sampler on another op shopped remnant, this time it’s twill cotton stripes in white, navy blue and a disturbingly intense lime green. I plan on sticking to just two threads, one navy blue and the other white but to be honest, anything could happen once I start stitching.

A square of navy blue, lime and white striped twill cotton fabric pinned to a background of unbleached calico.

Some useful links:
TAST on Facebook
Sharron’s TAST FAQ on her website, Pintangle.
Free vintage stitch book downloads.
My TAST Pinterest Boards

signature

Embroidered Stem Stitch Sampler for TAST Week 14

For my stem stitch sampler this week I wanted to achieve something very simple, to work neatly. Specifically to learn to work tight curves and to document the way I turn sharp corners because I can never remember how I did it last time.

Embroidered sampler with butterflies and curlicues worked in stem stitch

(Click the photo for a larger view).

I used some of my antique embroidery transfers (I trace them with an iron on pencil) because the butterflies are really great practice for both, with their spiky edges and big curvy wings. (You can download the butterflies and the curlicue on the left from the 20’s for free). The top butterfly is worked in mercerised cotton sizes 8 and 10. The bottom large and small butterflies are worked in 3 threads of stranded embroidery cotton. The tiny bug has perle cotton for the body, vintage rayon for the wings and size 30 Japanese sewing silk for the antennae. The spirals are worked in different thicknesses of perle cotton and differing numbers of strands of stranded embroidery cotton.

I read somewhere (sorry, I’ve forgotten where), that the way to work stem stitch around tight corners is to use very small stitches so you don’t get a spiky edge. That worked beautifully. At times, I put my needle under just one or two threads for each stitch, especially on the arch shapes on the butterfly wings.

I couldn’t find any information on turning sharp corners and it took a bit of work to remember how I usually do it.

Turning Corners in Embroidered Stem Stitch

Here is my technique in pictures.

How I Turn Corners in Embroidered Stem Stitch - Part 1

How I Turn Corners in Embroidered Stem Stitch - Part 2

How I Turn Corners in Embroidered Stem Stitch - Part 3

How I Turn Corners in Embroidered Stem Stitch - Part 4

Now turn and continue in stem stitch as usual.

How I Turn Corners in Embroidered Stem Stitch - Part 5

As I finished off I realised the weave of my fabric was far too tight for working with Appleton wool and it was getting badly shredded so I pulled it all out and reworked it in cotton 🙂

Picking Out Shredded Appleton Embroidery

Here’s a birth sampler I made earlier in the year for my nephew. Most of the filling and outlines are stem stitch, worked in full or half thicknesses of Semco Gobelin wool, which is about the same thickness as dk weight knitting yarn. I really love how the characters worked in the thick yarn seem to sit on top of the fabric.

Vintage Semco Birth Sampler

Now I had better get going on my French knot sampler. I’ve done about 1/3 so far!

Some useful links:
TAST on Facebook
Sharron’s TAST FAQ on her website, Pintangle.
Free vintage stitch book downloads.
My TAST Pinterest Boards

signature

S is for Satin Stitch

My Take a Stitch Tuesday embroidery sampler for this week is satin stitch.

This week I used a purchased embroidery design from Urban Threads and worked mostly in Appleton wool, with the letter S worked in two different hand dyed mercerised cottons.

Embroidered satin stitch sampler with padding and different satin stitch techniques

(Click the photo for a larger view)

For this sampler I wanted to improve my satin stitch, which was a bit sketchy around the edges, and try some different techniques I hadn’t used before.

Techniques I tried:

  • Bottom right flower – Single strand wool with no padding or outline
  • Top right – Single strand wool with split stitch border and straight stitch worked as padding under the leaf border, light purple border and light yellow centre
  • Top left – Leaf border and light purple flower border have split stitch borders and chain stitch padding. The centre pale yellow dot has three layers of satin stitched worked one on top of the other and the tiny yellow petals have two layers of satin stitch
  • Bottom left flower is worked in long and short stitch shading with two strands of appleton wool. The leaf is worked in a single strand of wool and has a split stitch border with chain stitch padding underneath the satin stitch. The body of the leaf is worked in long satin stitches couched down along the veins with back stitch
  • The swirly vines (centre top and centre right) are worked completely in double appleton wool. The outlines and centre lines are back stitch and the leaves are satin stitch
  • For the centre purply green motif (directly behind the “S”), I wanted to try using strands of two different colours together. The centre leaf sections are satin stitch couched down with back stitch, with the rest being worked in plain satin stitch with no padding.
  • The light green checked filler (you might not be able to see that it’s checked but it is), is again, satin stitch couched down with back stitch. To create the check (a bit unsuccessfully), the satin stitch is 3 stitches grey/green, one stitch bright green all the way across. The colours are a little too similar to see it clearly though.
  • Finally for the letter S, I wanted to try mercerised cotton. Outlined with sze 3 and stitched with size (I think), 5? I dyed it many, many years ago and I’ve forgotten unfortunately. I made a little check pattern made up of tiny satin stitch squares. Boy, did that take forever  😛

Things I learnt:

  • If you want a neat outline, thread matters. Fine threads or threads that “bloom” (like Appleton wool), work the best. However, if you’re filling in a shape that is surrounded by more embroidery like my letter S, anything goes. It all depends on the effect you want.
  • Something I already knew but only recently tried – if you’re using classic stranded embroidery floss, take the plies apart and then put them back together again, running them lightly through your fingers. It makes a HUGE difference.
  • Scooping the fabric (working the stitch in a single movement) might be fast but it’s rarely tidy. Two motions are best. Needle down through the fabric and pull the thread through, needle up through the fabric and pull the thread through.
  • When couching down satin stitch, don’t pull the couching thread tight. Let it sit on top of the satin stitch. If you pull it tight you’ll get gaps and the background fabric will show through. Of course, if you want that effect then pull the couching threads tight.
  • Your stitches often need to be closer together than you think to cover the background properly.
  • Pay very close attention to where your needle goes at the edges of your design. If you’re losing concentration, stop!
  • When curving your satin stitch around a bend don’t just fan out the stitches at the top. Snug them a tiny bit closer together at the bottom as well. You get better coverage that way.

Now on to stem stitch! I need to learn how to stitch around bends and corners properly…

Some useful links:
TAST on Facebook
Sharron’s TAST FAQ on her website, Pintangle.
Free vintage stitch book downloads.
My TAST Pinterest Boards.

signature

Barred and Alternating Barred Stitch Embroidery Sampler for TAST Week 12

This week’s stitches for the Take a Stitch Tuesday stitch-along were barred and alternating barred chain. It took me a few days to figure out what format I wanted my sampler to take, but once I did, it was a quick stitch which I really enjoyed.

(Click on the photo to make it bigger).

Geometric vase with flowers worked in barred and alternating barred chain stitch and french knots

It’s not as pretty as most of my other samplers but it records and works out all the things I wanted so I’m very happy with the outcome.

Whenever I don’t know how to set out a sampler I first list what I want to achieve. For this sampler I wanted to:

  • Try both versions of the stitch
  • Use threads of wildly different textures and thicknesses
  • Make the bars different lengths
  • Try it on curves and circles
  • Stack several rows as a filling

Secondly, I need to find a format that will keep my interest. My samplers are 8 inches or 20cm square, which is pretty big. I chose the size because I wanted to try everything that interested me for each stitch and have a nice record at the end to use as a reference for future projects.

Sometimes you don’t really need that much room so I like to throw myself a challenge. I decided to use as few colours as I could, while still keeping the design interesting. My first choice was to make a design that splits down the centre, with reverse colours on each side.

I learnt a few important things that I’m glad I have a record of (I keep a notebook with my samplers in which I’ll be recording everything I’ve written in my blog posts):

  • I really like the texture of the stitches when worked with short bars in thick matte thread such as tapestry cotton
  • Circles don’t work well if you work them with the bars pointing towards the centre as the twisted chain stitches fold over and won’t lie flat
  • It’s really difficult to make whipped barred chain look nice, which is why I ripped it all out
  • With long bars, the stitches would be more interesting used sparingly
  • In a design of this type, it’s more important that the colour of the threads match each other, than to have some that match the fabric and some that “almost” match. Even if that means that all of your threads almost match the fabric. In fact, I think I prefer the darker green wool and cotton to the perfectly matched stranded floss.
  • Large areas of solid colour, when reversed on the background look nice (see the difference in the vase in my sampler and the sketch below)
  • With a few changes, this design might look nice done in appliqué and embroidery using much smoother stitches. Or at least not as many spikes 🙂

Floral Idea for Applique

So the outcome, though somewhat ugly, taught me a lot!

signature

TAST Week 11: Embroidered Whipped Wheel Sampler

whipped-wheel-sampler

This week’s embroidered sampler for the Take a Stitch on Tuesday challenged evolved a lot during stitching.

I started with the thought of making a simple spot pattern testing different threads, in a continuation of last week’s spotty theme. After working the right hand third though, it was looking a little dull so I started playing with using different stitches for the spokes and all hell broke loose!

First I worked the large variegated green wheel on the bottom left, using fly stitch for the spokes, then tried the big lavender and yellow wheel with long tail chain. Adding the French knots to the green wheel made me think that adding decoration to the other wheels might look nice. Then adding the French knots to the outside of wheels made me think long tailed French knots might make good spokes.

I ended up trying a lot of different things for the decoration:

  • Lots of French knots everywhere
  • Outward pointing fly stitch, starting at the tip of each spoke to make stars and flowers
  • Outward pointing fly stitch starting between spokes to make little “tips” on each spoke (like the half purple, half green wheel with orange knot in the centre)
  • Inward pointing fly stitch between spokes
  • Inward pointing fly stitch between spokes with a straight stitch in the centre of each
  • Inward pointing fly stitch with a French knot in the centre of each
  • Straight stitch between spokes with a different coloured French knot on the end
  • Fly stitch spokes in two colours (one for the fly, one for the spoke)
  • Fly stitch spokes in two colours with a stitch across the end of the fly to make little triangles
  • Leaving half the length of the spokes showing
  • Working the whipping “upside down” so you can see what would usually be hidden at the back (go over the spokes, then back under instead of the usual way – under then over -). These look particularly nice surrounded by rings of chain stitch
  • Combining regular and upside down whipping
  • Working the whipping in two coloured halves, whipping half and then twisting around the other colour before turning and going back.

For spot motifs of this kind my favourite threads are quite fine with a firm twist. Flower thread, perle cotton in sizes 20 – 5 and Coats chain mercer crochet all worked well. For a textural piece just about anything would work well except fibres with a lot of natural curl to them like mohair. The mohair thread just wanted to go it’s own way too much, rather than wrapping around the spokes where I put it.

Along with my beaded feather stitch fish sampler, this has turned out to be on of my favourite finished samplers so far!

Some useful links:
TAST on Facebook
Sharron’s TAST FAQ on her website, Pintangle.
Free vintage stitch book downloads.
My TAST Pinterest Boards

signature