I love knitting for babies and one of my favourite things about it is the huge range of cute, and sometimes bizarre, novelty buttons that you can find to sew on them.
As a mother, however, the one thing I hate most about knitwear for babies is trying to do up the buttons on a cardigan wrapped around a 4 kilo mass of wriggling baby, especially when the buttons aren’t chosen to be functional.
If you’ve ever knit something for a baby and it has never been worn, it might not be because the parents are ungrateful un-knitworthy hand-made hating ingrates. They might be, but they might have just had a difficult time doing up the buttons. So from my years of experience doing up cardigans on wriggling babies, here is my guide to choosing buttons for baby garments.
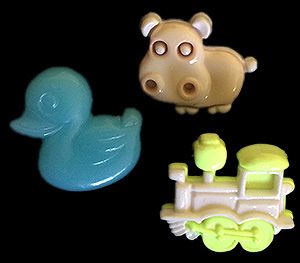
The irresistible but poky novelty button.
These are the type of buttons that have little poky bits sticking out everywhere but they’e cute so we must put them on all the things. Star shaped buttons are the WORST. Unfortunately they are also adorable.
These buttons should be used strictly as a decorative element, as trying to put them through a buttonhole that is in constant motion just causes yarn snags, sudden knitwear hatred and wild emotional swings (especially if the person trying to do them up is sleep deprived).
I am not a functional button!
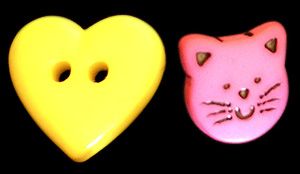
The irresistible but mostly round novelty button.
This type of button works well on knitwear most of the time. If it has any part that sticks out, like the cat’s ears, they are smooth and won’t snag.
The only time I would avoid using buttons of this type is if my yarn is particularly splitty as it still might snag, but who wants to knit with that kind of yarn anyway?
I am cute and functional! Most of the time.
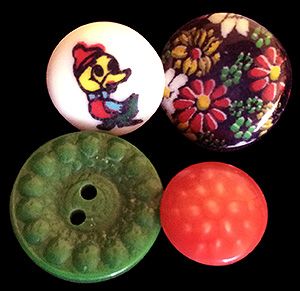
Round decorative buttons
These are my favourite type of buttons to put on baby wear. Printed with cute characters or flowers, special 3D look patterns or interesting moulded but completely smooth shapes. The buttons below are all vintage but you can still get printed buttons with classic children’s characters in most shops that sell buttons.
They’ll never snag the yarn, no matter what you’ve knit with, how wriggly the baby is or how tired the person trying to do them up.
Putting my buttons where my mouth is
Figuratively speaking.
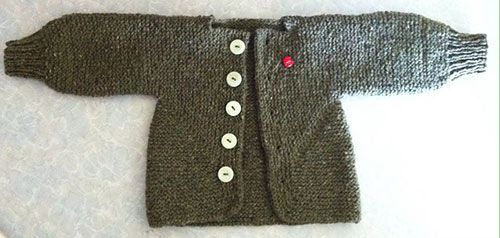
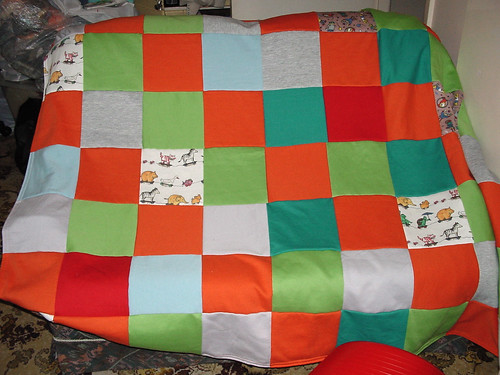
This is a baby surprise jacket that I knit for my nephew. I used vintage pale green buttons for fastening the front and a poky novelty ladybird button purely for decoration.
Two types of buttons used in the right spots.
I’d love to hear your thoughts on choosing buttons for baby and toddler knitwear so please feel free to leave a comment below!
Since baby-to-be’s parents are huge Doctor Who fans, I’ll be making the style with bow ties because bow ties are cool! I’ve cut them out of stash fabrics, I just have to get the courage to use my daughter’s sewing machine to sew them together because mine’s being repaired. Again.
Now I must go and turn the heel on my current sock knitting project or I won’t have anything to knit while watching monster trucks tonight! I don’t think I can turn a heel, watch a 5 year old and an 85 year old all at the same time.
Like many knitters, whenever I hear there’s a baby on the way I can’t help breaking out the needles and getting completely carried away. So when I heard that my sister in law was making me a nephew, I thought I’d show my appreciation by making more knitwear than a baby could possibly need in Australia. Luckily, since I have previous experience in knitting for babies, I decided to make them in all sorts of sizes so they wouldn’t all need to be worn in the first 5 minutes :). I’ve just handed them over so now I can tell you about them!
I started with the one pattern that all babies must have at least one of, or it’s obvious that no-one loves them, the baby surprise jacket by Elizabeth Zimmermann. This one is knit from an unknown tweed wool mix that I was kindly given.
For wearability, the baby surprise jacket is my favourite baby garment. When knit in a single some-what neutral colour, it’s a great basic that can go with a range of outfits. The garter stitch also allows it to stretch as the baby grows so if you knit at a gauge to fit a one year old, it will often still fit for the next cold season.
I like to make sleeves on all the bsj’s I knit full length by picking up stitches and knitting downwards. That way you can lengthen the sleeves whenever needed or easily replace worn out chewed cuffs. Did I mention some babies chew their sleeves? Yep, they do. They have absolutely no respect for knitwear. Luckily they look so damn cute in it they can be forgiven a little slobber.
You can find out all you need to know about knitting the baby surprise jacket here on knitting-and.com and the baby surprise jacket entry in the wiki on Ravelry.com. You’ll need to sign up to see the entry in the Ravelry wiki but it’s free 🙂
The other cardigan I knit is the Aussie baby cardigan by Bev Tilson, from her self published book “Knitting Patterns for Hand Spinners”. I reviewed the book a few years ago, and you could purchase copies from her then. I’m not sure if she has any left but it’s a great book. When it comes to tried and true baby patterns that have withstood the test of generations, you really can’t go past some of the self published books that various hand spinners and guilds publish.
I’ve made the Aussie baby cardigan a couple of times. It’s designed to be knit with handpainted or variegated yarns but I think it looks just as nice with plain colours. Whilst it’s definitely a pain in the bum sewing in the raglan sleeves, it’s worth the effort. When it comes to seaming I almost always use a mattress stitch seam but in this case a careful backstitch is the only way I’ve found to get the raglan seams to look good. Once you know that, though, the raglan seams are no problem. Yes, I did rip the seams out several times before I remembered that’s what I did with the first one. Ahem.
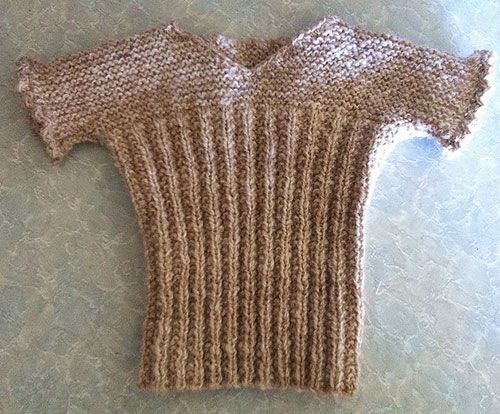
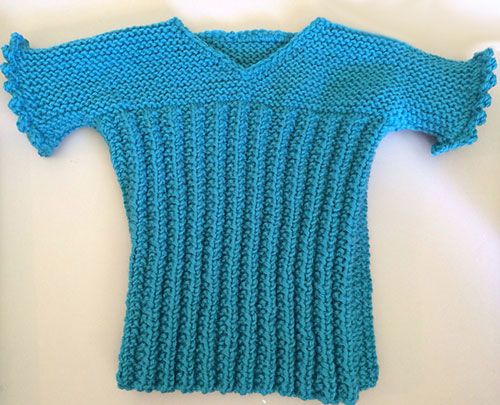
I liked this next pattern so much that I made two. It’s the baby vest from page 9 of Knitting Patterns for Hand Spinners. It’s knit in one piece from the bottom of the front, up over the shoulders and down the back. All you have to do when you’ve finished knitting is mattress stitch the side seams and add an optional crochet border.
I made one in handspun alpaca. I didn’t spin this, it’s handspun my sister gave me.
and one in Spotlight Basics dk weight wool. I would recommend using a machine washable wool for baby clothes that are given as gifts, but I’m allergic to one of the resins used to coat some machine wash wools so, with the mum to be’s okay, I used strictly hand wash only yarns as much as possible.
This pattern is going on my “favourite things to knit for babies” list. It will stretch a LOT in both the width, due to the ribbing, and the sleeves, due to the garter stitch. I couldn’t resist adding the suggested crochet shell stitch to the sleeves. It’s just so Victorian (regular visitors will know just how much I love Victorian era knitting patterns)!
To work this particular shell stitch, work a row of double crochet (US single crochet) around the sleeve. Next round: *slip stitch in the first stitch, then work – double crochet (US single crochet), treble (US double crochet), double crochet (US single crochet) all in the second stitch. Repeat from * around.
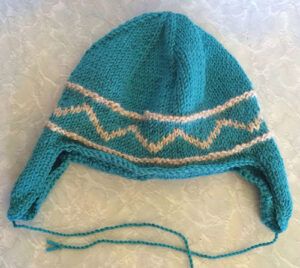
Knitting any more jumpers would have seemed a bit odd (damn), so I switched to hats at this point with another pattern from “Knitting Patterns for the Hand Spinner”.
A toddler sized earflap hat knit with the same yarns used on the other projects. There were a couple of errors in this pattern and one change that I made.
Pattern errata:
Work the first 10 sts of the chart only.
After working the chart, work in st st for 2 rows in the main colour, then knit 2 rows in the contrast colour.
Continue with pattern as written.
Changes:
I worked an extra couple of rows of decreases before finishing the top. (Decreased to 8 sts)
If I were to make this again (I just need people to have more babies), I would work the main colour after the flaps and before the contrast colour stripe in k1, p1 ribbing to help stop the curling of the bottom edge.
I’m not sure if Bev still has any copies of the book but, if she still has the same email address, you can contact her to see if she still has any. It’s totally worth the trouble to find it. I could have knit my nephew at least another half dozen things from it but I didn’t want my sister-in-law to think I was a crazy baby stalker. I am but she does’t have to know that 😉
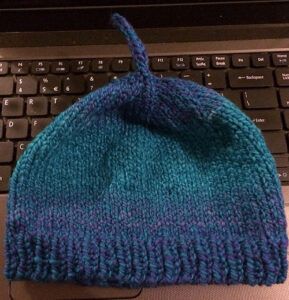
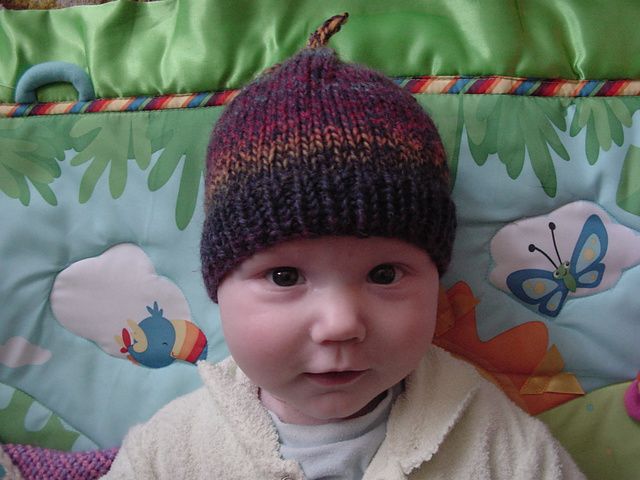
I also knit a knut hat from my free pattern and some handspun, shown very elegantly balanced on my laptop keyboard. I’m pretty sure this was spun from a fibre club sliver from Ewe Give Me the Knits.
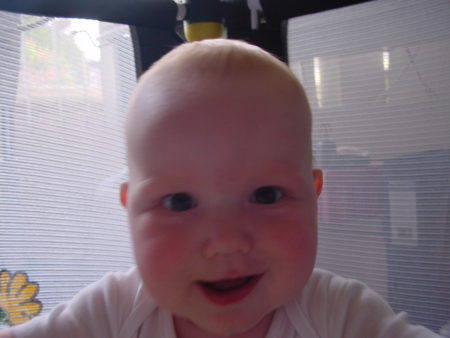
They look rather plain off, but when on a baby they reach new levels of adorableness. Here’s one I prepared earlier (that hat and the baby! He’s about to turn 5 years old).
Next is a plain stocking stitch baby blanket with garter stitch border picked up and knit around until I ran out of yarn. Knit with my own handspun made from 150gm of Indian Summer machine wash slivers from Ewe Give Me the Knits. (This is chlorinated machine wash, which I can use).
Just a plain stocking stitch square, with stitches picked up all around and worked in garter stitch with double increases at the corners on every second round until I had just enough left to cast off.
Finally, I got to the small things. Well, the really small things. You can’t really call anything other than blankets big when it comes to knitting for babies.
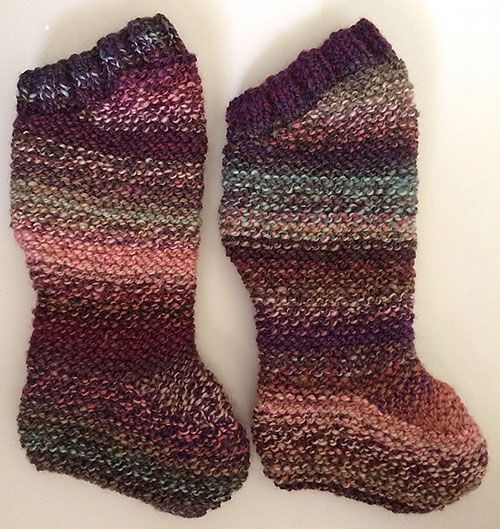
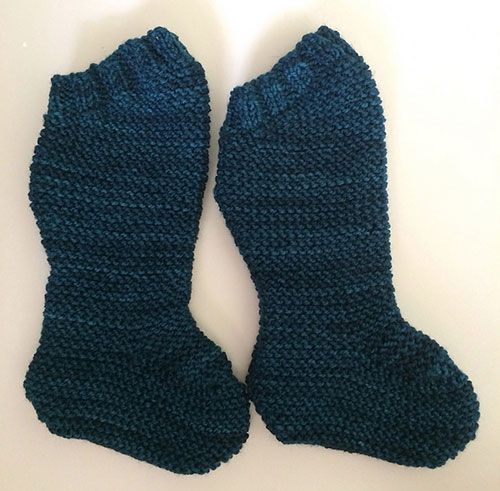
Tiny feet deserve to be warm, and they deserve to be warm in little socks that won’t fall off. These are the “baby legs” from the bouncing baby set in Interweave’s Homespun Handknit. I found socks that look the same in knitting books from the 1800’s but the pattern in Homespun Handknit has crazy additions like needle size and gauge and instructions that don’t make you want to cry.
This pair are knit with my handspun, spun from slivers I bought via ravelry destash, originally from Bee Mice Elf.
and this pair are knit from Koigu premium merino that was given to me about 15 years ago. Aged stash, I has it.
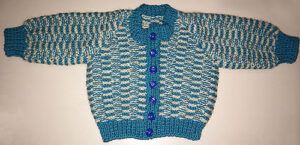
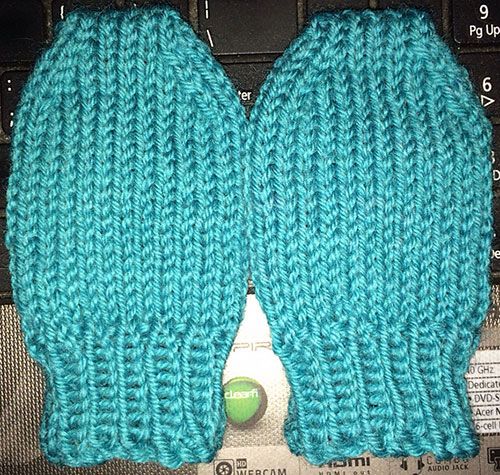
The only thing that grows faster than a newborn baby is a newborn baby’s fingernails. Sure, you can buy Winter onesies with the little cuffs that magically fold over to cover baby’s hands but there’s no knitting involved in doing that, so why would you want to?Despite looking different, these are the same Spotlight yarn and colour I used for the other turquoise projects.
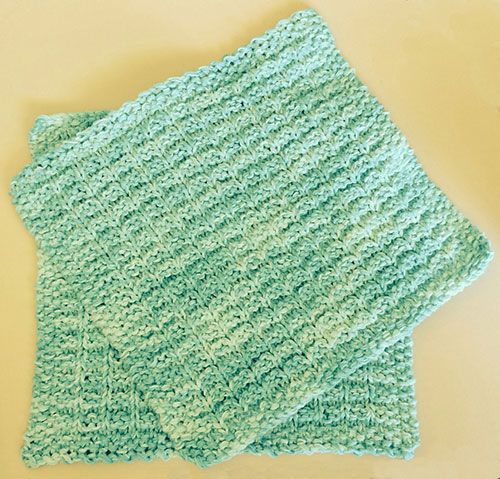
Last but not least (because that would be the mittens), I knit two Spa Day facecloths from three strands of op shopped cotton. I find it handy to have wash cloths that are easily identified as being just for the baby so you don’t accidentally go and wash your face with something that’s just washed a baby bottom. Clean baby bottoms are cute and make you want to kiss them (unless you already know better). Messy baby bottoms are not.
These are a similar colour to the Spotlight wool but in a variegated colourway with white.
Now if you’ll just excuse me, I have some sewing to do…
Grab yourself a coffee, this is going to be a long one…
I have discovered that it’s a lot easier to sew in small bursts than knit. With a 10 1/2 month old baby it’s very important to be able to throw down whatever you’re doing at a moment’s notice to rescue him from being stuck under a kitchen chair (for example) and not lose your place in your project. Not losing your place is especially important since by the time you pick it up and figure out where you’re up to the baby has gotten himself stuck under the kitchen chair* again and you haven’t made any progress.
It’s also far too hot to knit or crochet, so this is what I’ve been up to over the last month or two.
Firstly, I finished the 21 pairs of baby pants!
These pants were all made from patterns that I drafted. For the pattern I used the flat trouser block from Metric Pattern Cutting for Children’s Wear and Babywear: From Birth to 14 Years by Winifred Aldrich. Two of the fleece pants were made with a two-piece pattern and the rest were one piece. The two piece pattern was made by cutting the block in half and adding seam allowance so I could get an extra 2 pairs out of my dwindling fabric.
Firstly, we have baby stretch-knit shorts. All made on my fabulous new overlocker from op-shop fabric. I went into the op shop one day thinking “I’d like to find some blue and brown knit fabrics to make the baby shorts” and found exactly that in the very first op shop I went into. I’d say that doesn’t happen often but the truth is I seem to have some weird kind of op-shopping mojo and I often find exactly what I’m looking for. I don’t find everything but it happens a great deal 🙂
Baby nerd shorts. Nerds are cool, therefore my baby needs baby nerd shorts. These are also op shop fabric. I don’t know what the fabrics are but these are real favourite “going out” shorts. The green is woven but very elastic so I’m guessing maybe there’s some lycra in it or something. The green ones are also known as Charlie’s golfing shorts.
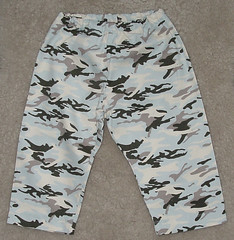
Blue baby camo pants. Lightweight cotton drill. The fabric from these was from the $2/m discard bin at Spotlight in Wollongong. I bought a meter, which should have provided me with enough fabric for a pair of shorts as well but it was cut really crooked so I didn’t have quite enough for the shorts. Boo to the person who cut it. Oh well, at least there’s enough left to do something with. I just don’t know what yet 😛
Baby track pants. All op shop fabric! I spent about $20 on various fleecy over the Winter. It turned out to be an AWFUL lot of fabric. I swear there was something like 3 or 4 meters of the orange. However a redheaded baby can only wear so much orange before looking like a piece of fruit, so I only made pants, no sloppy joes with it.
Long pyjama pants
Half of these get worn as daytime pants so maybe I should call them “versatile pants” or something…
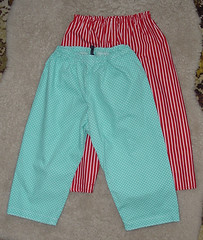
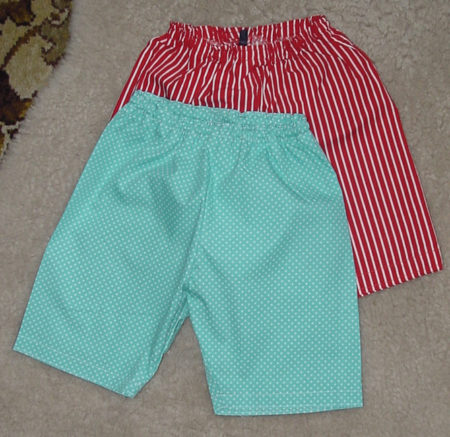
Spotty and stripy cotton pants. This fabric was from Spotlight, about $4 per meter. I managed to get shorts out of them too. I love this fabric, it’s easy to sew and doesn’t cost much.
These are made from a light vintage cotton that I found in an op shop in Dapto. Dapto has some really great op shops. It has little horses wearing hats on it.
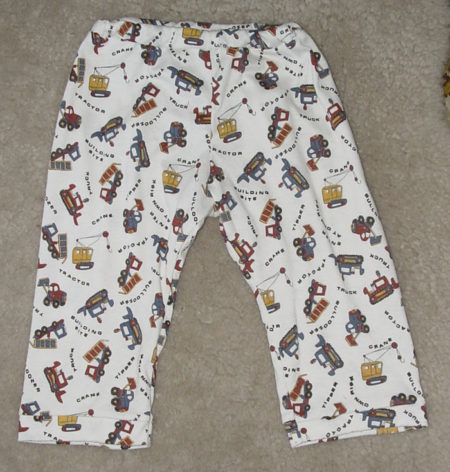
Another op shop find: stretch knit with trucks, tractors, cranes and bulldozers.
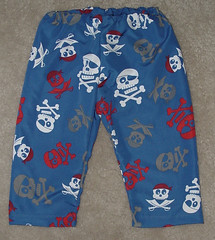
Microfibre pirate print, $5/m from Spotlight. I hate sewing microfibre. I need to learn more about how to control it. These kept gathering up as I was sewing.
Short pyjama pants
Yet more op shop fabric. The local op shops have such great fabric that I buy a lot there.
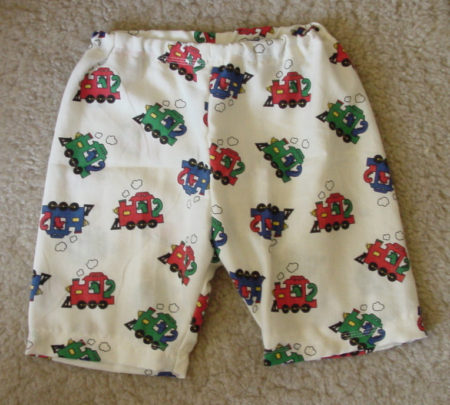
These are a very lightweight cotton with little dinosaurs driving trains. I don’t know why dinosaurs would be driving trains but there you go.
and these are the shorts I made from the previously mentioned spotty and stripy fabric.
That’s it for the baby pants! Here’s a cost breakdown for anyone who might be interested:
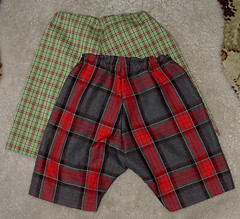
# 1 pair of red plaid shorts from op-shop fabric. Cost approx 50c
# 4 pairs of jersey knit shorts from op shop fabric. Approx cost 50c each
# 1 pair of blue sky camo pants from $2/m clearance fabric from Spotlight. Cost approx $1.25
# 1 long and 1 short pair of pyjama pants — aqua with white dots. Cost approx $2 per pair
# 1 long and 1 short pair of pyjama pants — red and white stripe. Cost approx $2 per pair
# 1 pair of lime green plaid shorts from op-shop fabric. Cost approx 50c
# 1 pair of long microfibre pirate skull pyjama pants from $5/m clearance fabric. Cost approx $2.50
# 1 pair long jersey knit pyjama pants with trucks, cranes and bulldozers. Op shop fabric. Cost approx $2
# 1 pair short cotton pyjama pants with dinosaurs driving trains. Op-shop fabric. Cost approx $1.50
# 1 pair long cotton pyjama pants with horses wearing hats. Vintage op-shop fabric. Cost approx $1
# 6 pairs of long winter fleece track pants. Op-shop fabrics. Cost approx 50c to $1 per pair
I have also been sewing for my daughter. She gives me most of the ideas and then I see what I can come up with.
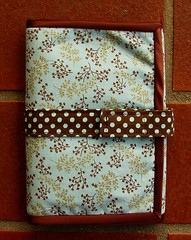
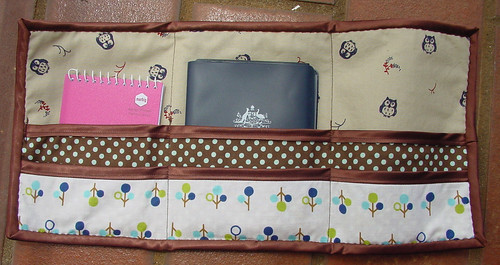
She’s going on her very first overseas trip soon so I made her this passport holder so she could keep postcards and stamps and whatnot in it as well. The outer fabric was a fat quarter that I bought for something else (not enough fabric), some brown satin binding from the op shop and for the pockets I used some fabric oddments that were given to me as a gift. I made the pattern up. It’s a bit wonky but who cares 😛
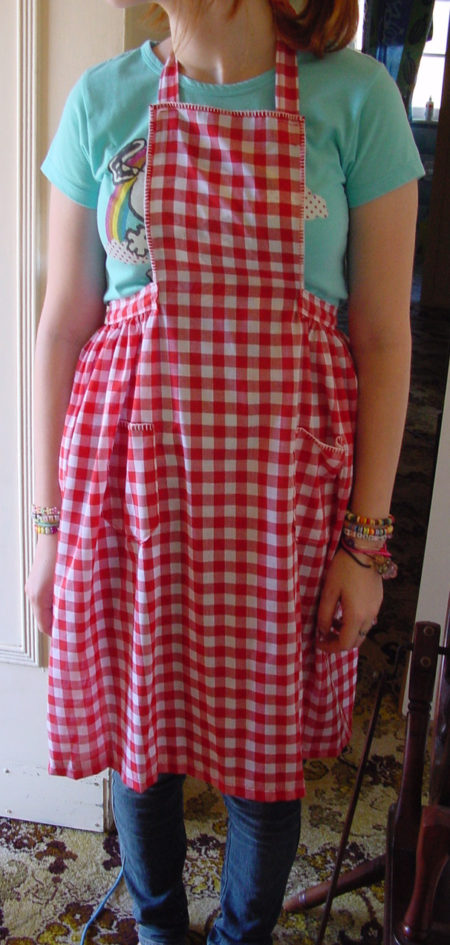
Magic apron
The magic apron is from “First Steps in Dressmaking” by the Woman’s Institute of Domestic Arts and Sciences Scranton PA 1949 Edition. It’s named thus because you draw the pattern straight onto the fabric and don’t need a paper pattern.
I really enjoyed the embroidery around the edges. I made a mistake on the strap (I folded it to the front instead of the back) but she didn’t mind so I left it that way. Next time I would make the seam allowances bigger than the 1/4″ in the pattern but that’s the only change I’d make.
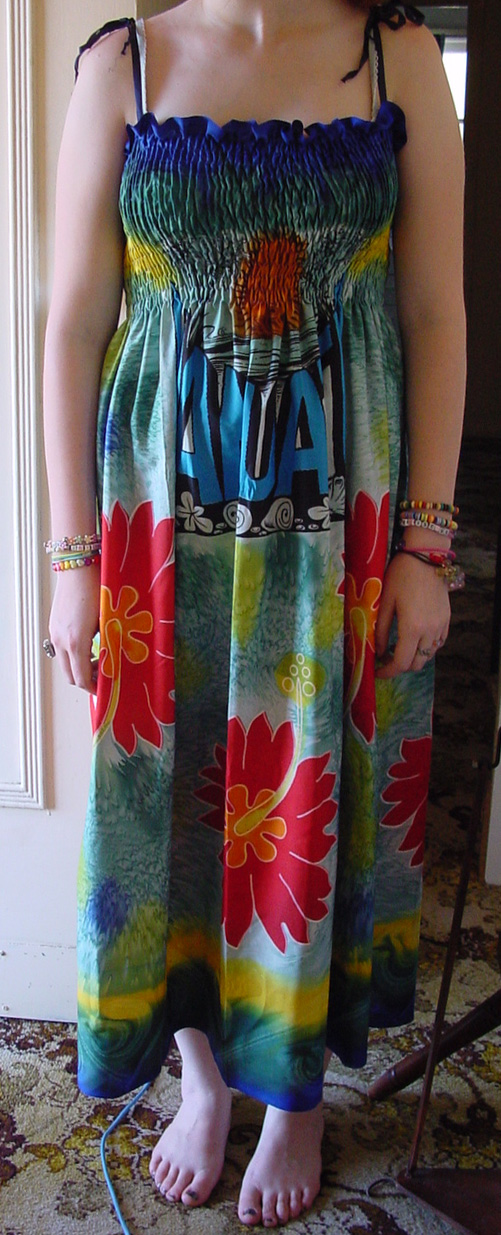
Shirred sun dress made from a souvenir sarong.
I fought hard with my machines to sew the shirring. I tried the sewing machine and couldn’t get it to gather. Then I tried the chain stitch on my overlocker and the elastic snapped. I ended up sewing 14 rows of 3.5mm long and 3.5mm wide zig-zag stitch with my sewing machine and threaded the elastic through it on the wrong side. An inelegant solution but it looks fine on the outside 🙂
Things I will try are loosening the tension on the chain stitch looper on the overlocker to the point where the elastic doesn’t break any more and see if that gathers. I’ve also seen the hint that if you have a sewing machine with a drop in bobbin, to try putting the bobbin in the other way around.
My shirring rows are approximately 1.5cm apart and 5cm longer than the measurement from underarm to the point where I wanted it to finish. Elastic was cut 5cm shorter than the under bust measurement (don’t worry if it shrinks after cutting).
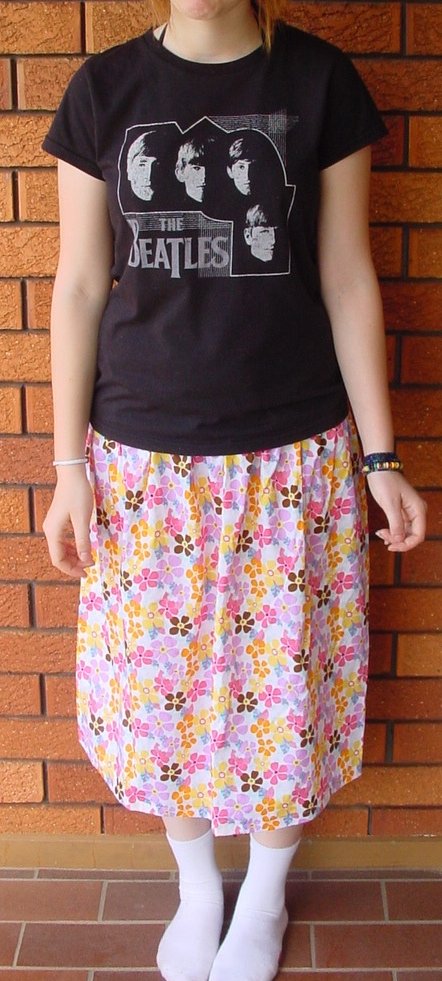
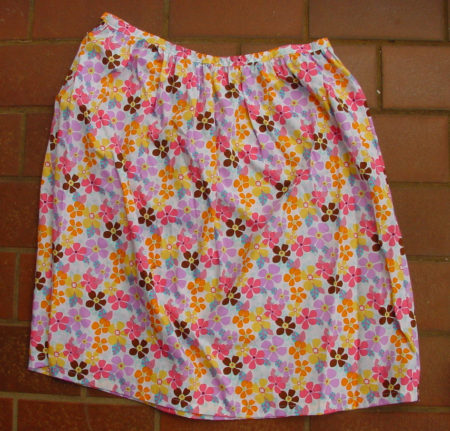
Two simple floral hipster skirts.
Drafted from instructions in Metric Pattern Cutting by Winifred Aldrich (4th edition).
Waistband: Hipster waistband, page 96
Skirt: Slightly gathered skirt block, page 85
Once again this fabric was from the $2/m bin at Spotlight.
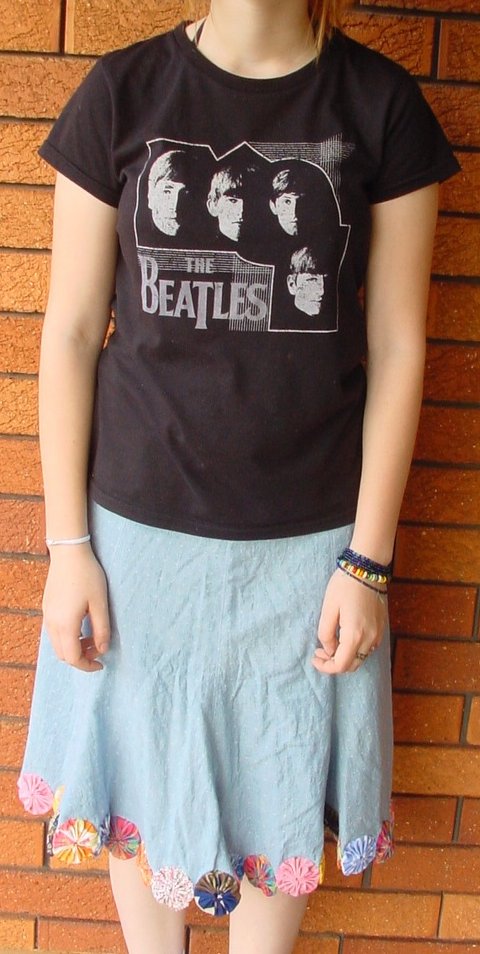
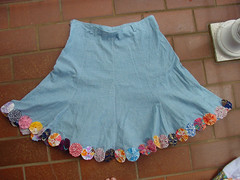
8 gore skirt with faced waistband.
I didn’t have enough fabric to make it as long as the blue skirt with suffolk puff trim (below) so I lowered the top to make it sit lower on the hips.
Pattern was traced from an existing skirt. I made small adjustments to the fit, added belt loops and lowered the top of the skirt.
Next time I would either slightly gather the trim or put little pleats where it meets a seam in the skirt.
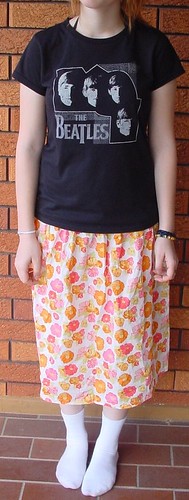
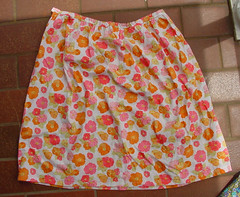
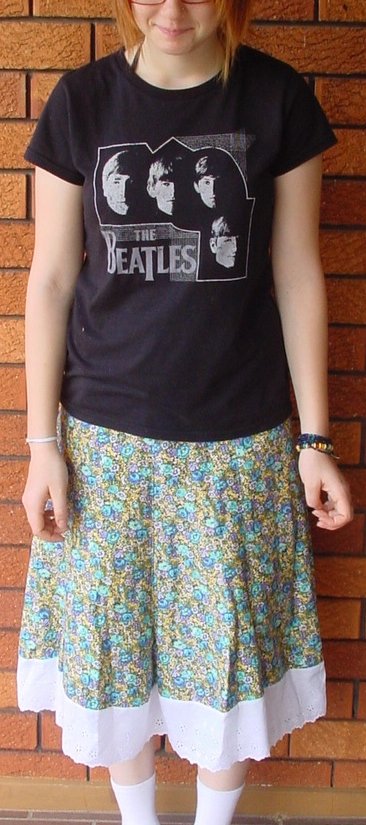
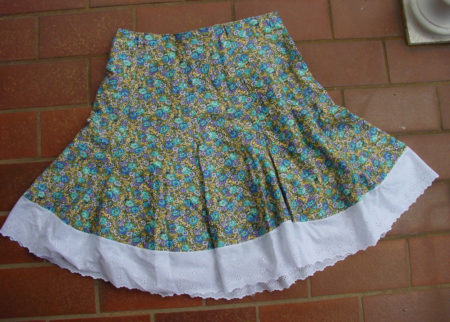
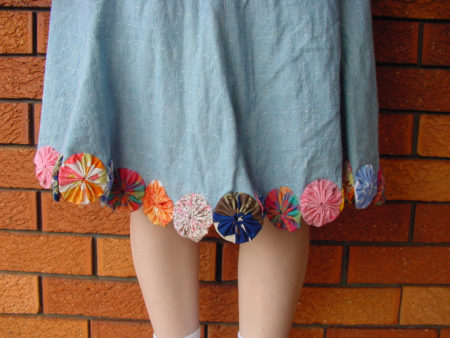
8 gore skirt with suffolk puff trim
This skirt was made with the same pattern as the previous skirt. The waist sits a little higher on the hips because I had more fabric.
The main fabric is a medium weight cotton, $5 from the op shop and the suffolk puffs are made from scraps.
The suffolk puff trim on the skirt led to “Mum can you make me a blanket with those too?”
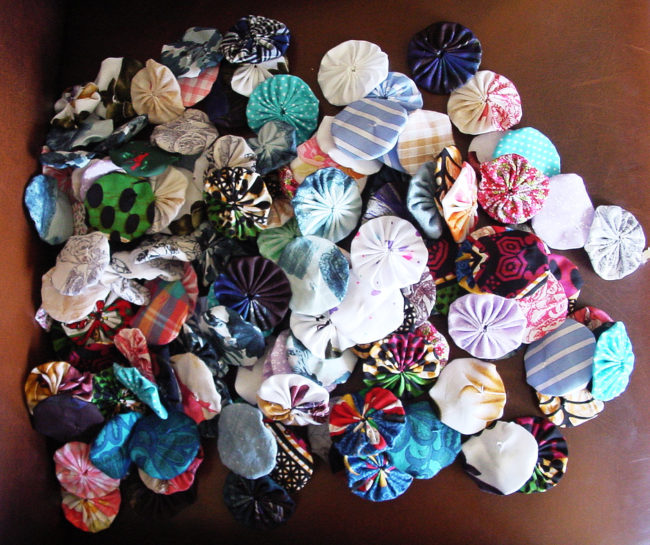
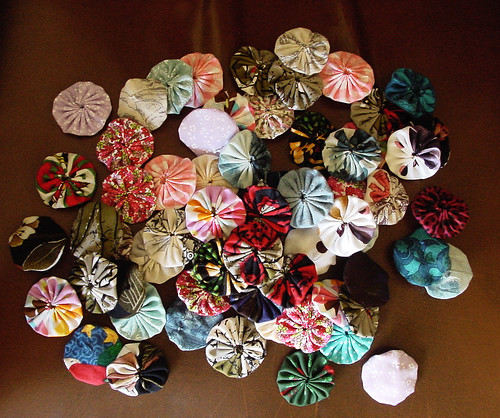
142 x 6cm suffolk puffs – it will take 900 to make a coverlet
Which led to me thinking I should use the smaller scraps to make myself one with 4.5cm suffolk puffs
62 x 4.5cm suffolk puffs – it will take 1,600 to make my coverlet. I made one before which you can see here
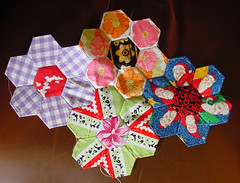
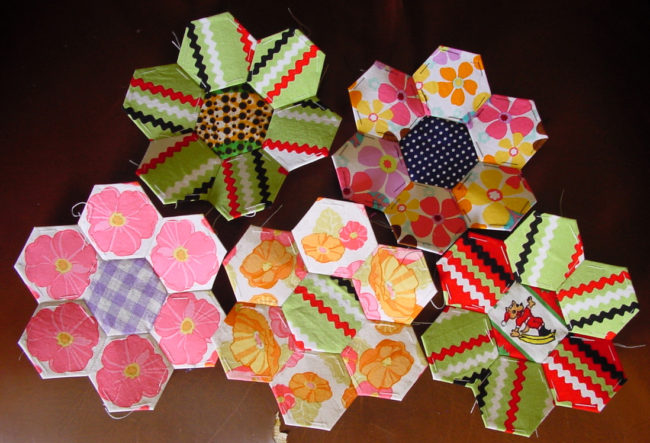
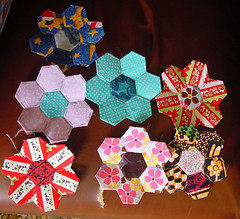
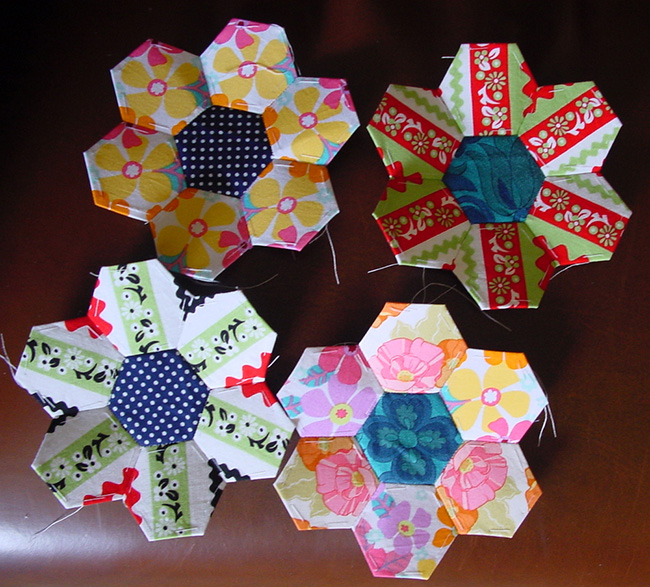
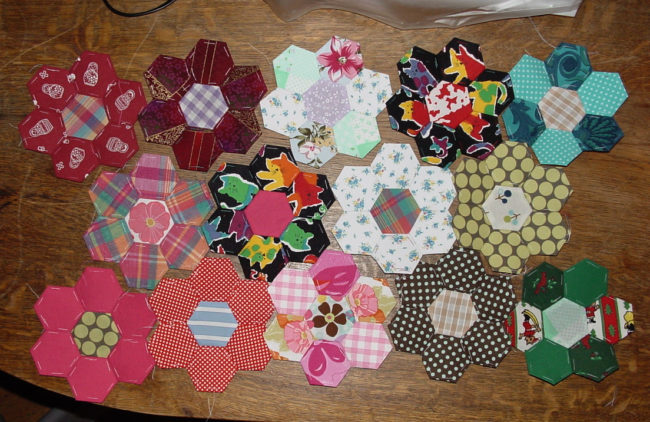
But even after making two different size suffolk puffs I still had some usable pieces of fabric left. I decided they would make a great english pieced quilt. My hexagons are one inch along each side and I’m using commercial die-cut templates because I didn’t think of printing the hexagons and cutting them out of cereal boxes until just now, lol.
Unlike Wendy, I have stitched through the paper when basting but that’s because this is the first time I’ve used the technique rather than disliking the technique she has used. I’m in no hurry to finish it so I don’t mind if I have to remove the basting before quilting.
Then I got side tracked by a big back of leftover fleecy fabric. It kept taunting me because even though I had made 19 baby bibs, 4 pairs of size 0 baby pants, 6 pairs of size 1 baby pants, two easter rabbits, one cosmonaut, one baby blanket and used some as the batting in three baby quilts, there was still a load left. So I cut out a load of 21cm squares and overlocked them into a fleecy quilt, 160cm high x 180cm wide for Winter TV watching.
I still have to tie-quilt it. I’m going to use a lime green number 5 perle cotton and have the tied ends on the back (I think). The thread is a few shades darker than the fabric. I’ve never made a tied quilt before so there’s another technique for my repertoire 😛
The backing is a 1970’s vintage sheet that was almost on it’s last legs. It was too cute to send to the rag bin so I thought I’d extend it’s life a bit. If it gets holes in it I can always patch it.
My butterfly and shamrock quick yo-yo makers arrived the other day but I haven’t had time to play with them yet. Unfortunately Charlie thinks they’re baby toys because of the brightly coloured plastic and he’s stopped napping due to some new teeth. I’ll make some samples as soon as he starts napping again and write a review.
Well that’s about it! I’m off to open some doors and hopefully get a breeze through the house. It’s supposed to be in the mid 30’s Celsius tomorrow. Yuck.
* Really. He does that a lot. I’d put the chairs somewhere else only that’s where I sew 😉
I know it’s been several months since I last posted. It’s amazing just how much time running around after a baby can take! It’s also amazing how much mess a newly crawling baby can make whilst roll/crawling around the living room with a teething rusk
but I digress…
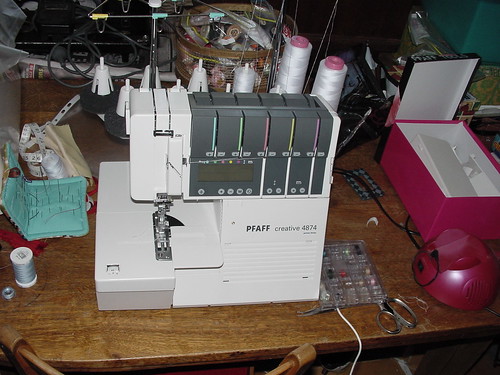
I have a new overlocker!
Isn’t it beautiful? It’s a Pfaff Creative Coverlock 4874. It’s a 10 thread, 3 needle overlocker. I decided I wanted an overlocker 10 years ago and I finally got around to getting one when I realised that drafting your own sewing patterns isn’t brain surgery 😛
I learnt to sew when I was in highschool but always hated using commercial patterns because they never fit properly and it seemed so fussy to have to alter every pattern every single time you wanted to make something, even when you’ve spent $17 on the pattern itself.
Years later I started buying fabrics from the local op shops and decided to have a go at drafting patterns that are a bit more complicated than elastic waisted skirts (ahem), and it all fell into place. My daughter has 4 new skirts, the baby will soon have 21 new pairs of day/night Summer/Winter pants and I have projects lined up until the end of the universe 🙂
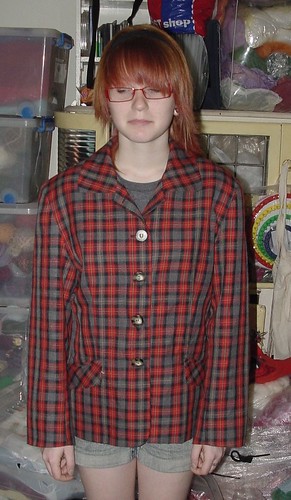
Here’s the next one’s before picture.
My daughter bought this jacket from the op shop. First I removed the sleeves and shoulder pads, and then pinned the sides in above the waist to make it a more fitted shape. I still have to sew the sides, after which I’ll refit the sleeves and add a gathered broderie anglaise style lace to the cuffs, replace the buttons and give it a good wash. Next time I’ll wash first, lol.
As for the overlocker, it’s incredibly easy to use. Easy to thread, easy to engage and disengage the upper looper and knife and super easy to understand. The only thing I would have liked to be different is to have better threading guides in the instruction book so I don’t have to go to the computer CD animation when I haven’t doe something right. It’s so easy to thread that I pull all the threads out when I want to change them instead of tying on the new thread and pulling it through 🙂
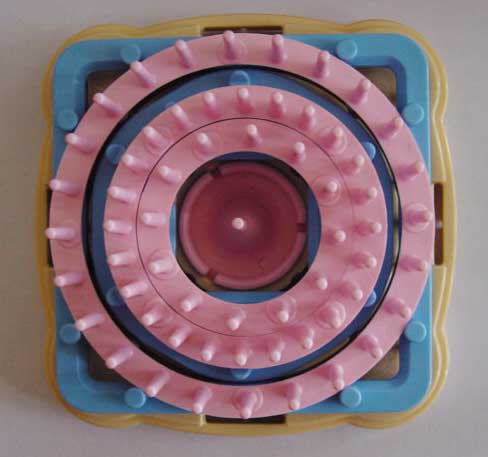
Finally I had some exciting news in my mail yesterday. Clover have re-released the Hana Ami Loom! It’s the Rolls-Royce of flower looms and I suggest everyone should go and buy one right now before they go out of production again!