Menu Close

Year: 2015

Upcycle a Man’s Shirt Into a Woman’s Blouse

If you’ve ever found a high quality man’s shirt while op shopping and wished it was a woman’s shirt, this article from 1936 will help! I’ve copied it here because I had to pull out all my vintage pattern drafting books to find the measurements for making the collar, since the illustration is a bit blurry. (Thankfully Mr Ross Hynes and the 1945 edition of the Home Dressmaker came to the rescue).

“The Shirt Off Father’s Back” from The Queenslander, December 31st 1936.

Home Sewing Hint By Ruth Wyeth Spears

Diagrams for upcycling a man's shirt into a woman's blouse, 1936

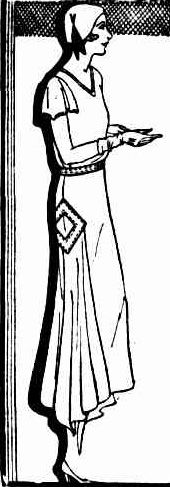
THERE have been a number of requests for ideas for using shirts that are worn out in the front at the neckline and that have frayed cuffs. Aprons are some times made from these. A clever mother we know also makes them into sun suits for a wee youngster. One of the most up-to-date ideas is for Mother and the girls to convert old shirts into tailored blouses.

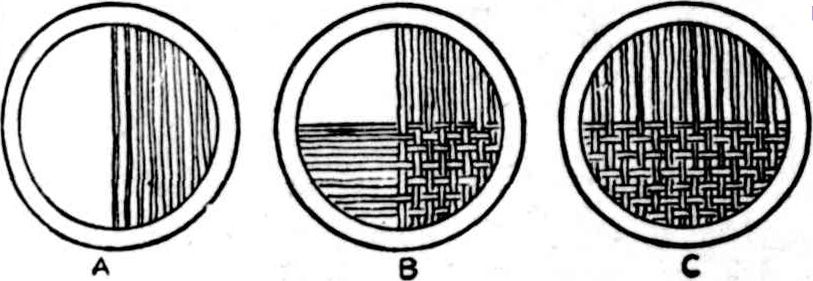
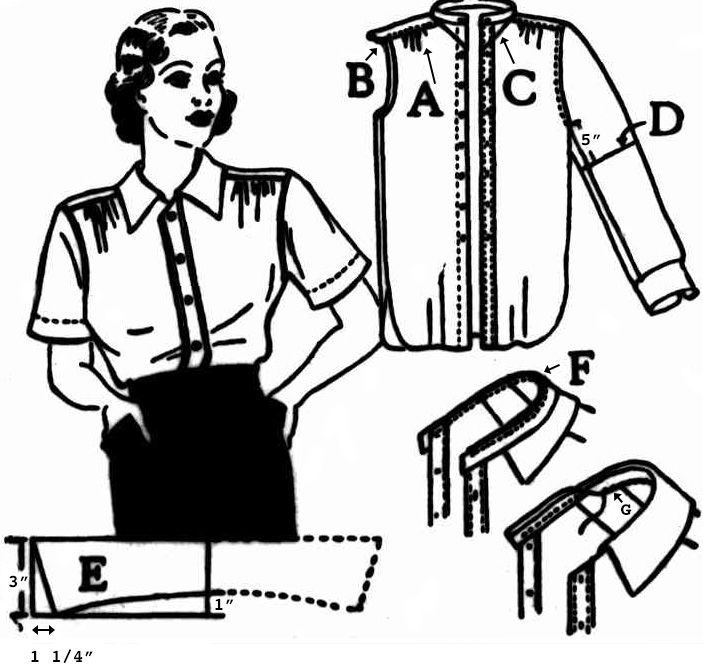
If Father is the broad-shouldered type, it is generally necessary to rip the yoke of the shirt both back and front and add more gathers, as shown here at A, to take up the shoulder width. The yoke is then trimmed off at the arm hole line, as at B, and the sleeve stitched back in place. The neck is cut in a V line, as at C, to eliminate the worn spots. Then the sleeves are cut off straight around on the thread of the goods 5 inches below the bottom of the armhole as at D. This allows for a 2-inch hem. The cut off pieces of the front of the sleeves are used for the blouse collar and the collar facing. Sometimes it is necessary to use the pieces from both sleeves for the outside of the collar with a piecing in the centre back, and then use plain white material for the facing.

If white shirts are being made over, a half yard of white cotton broadcloth will make entirely new collars for six shirts. To make a pattern for the collar cut a piece of paper 3 inches deep, and 1 inch longer than half the portion of the neck edge to which the collar is to be joined. Shape this paper according to the dimensions shown here in diagram E. The short edge of this pattern is placed on a fold of the goods in cutting. When the collar has been cut and faced, sew it to the right side of the neck edge, with a strip of bias tape, as shown at F. Turn the tape down over the seam and sew as at G.

signature

Embroidered Brooches from Curtain Rings

Today’s free pattern is for the classic vintage curtain ring brooch made popular in the 1930’s. These little brooches became iconic during World War Two, when women would make them from anything they had on hand, from oddments of embroidery thread to electrical wire, adding buttons, badges and felt for a wider range of styles.

From the Brisbane Courier, January 12th 1933

Embroidered curtain ring brooches from 1933

THESE dainty little brooches are easily made by any clever needle woman, and the only materials required are brass curtain rings about 1 3/8in. across, and a few skeins of stranded cotton in bright colours. First button-hole closely all over the ring, pushing the stitches close together so that it is well covered. Turn the button-stitch edging towards the inside of the ring so that the foundation filling can be worked into it.

Centre filling for embroidered curtain ring brooches

Beginning in the centre  of the ring, work straight close threads across, and when the half is done turn the ring and darn across as in B, then complete the work to the other edge. At first it will be possible to darn the threads, but as the work becomes tighter it will be necessary to push the needle in and out from front to back, &c.

Now work your design in any pleasing colours. Lazy daisy stitches are used for the chrysanthemum, the original of which had a foundation of jade green, with the flower in lemon with an orange centre. The rose-tree design had a black background with brown for the stem, and the roses were worked with four French knots in green as centres, and satin stitches in coral worked in two third lengths all round to form the flower. The other designs can be worked in a similar way, sometimes the whole six strands of the thread being used, and sometimes only three or four when required for stems, leaves, and fine work. When finished tidy the wrong side and sew firmly on a small gilt safety pin and the brooch is finished.

signature

Free Knitting Pattern – Pretty Check

Today’s featured knitting pattern is a pretty check stitch pattern from The Queensland Times, August 3rd 1936

I’m going to post today’s free pattern here because I’ve added a picture and updated it with a cast on count and by adding some stitches at the end so you’re not working a slip stitch on the edge. Click the link above to see the original pattern (no picture).

Check stitch from 1936

Here is a pretty check pattern in knitting for use on children’s clothes or a jumper for an adult. It can easily be adapted to any pattern it is desired to work. The six rows of the actual check pattern, arranged here for grey wool with a red check, are as follows-

Cast on any number of stitches that can be evenly divided by four, plus three extra

Row 1: Using red wool, knit plain to end of row.

Row 2: Purl to end of row.

Row 3: In grey wool, knit three, slip one, repeat to the last three stitches, knit three.

Row 4: Purl three, slip one (same stitch as was slipped in previous row), purl three, repeat to end of row.

Repeat rows 3 and 4 once. These six rows make the check pattern and are repeated as often as required. Finish having just worked row 2.

signature