Note: This tutorial was updated on April 25th, 2026 with additional information on compacting or tightening your pillow, to make it as firm as possible.

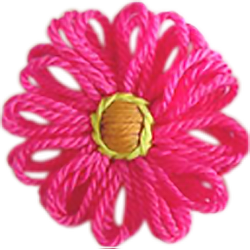
The pillow on the right is a copy of the Koppo Cushion from 1955.
In this tutorial I’ll show you how to make a reusable pillow with interchangeable designs.
Materials
This list looks quite large but you’ll probably have most of the things you need lying around the house already. Plus I talk a lot.
To make a Teneriffe lace pillow like the ones here you will need:
For the Pillow
- Download the pin plans and sewing pattern here. You’ll only need to print one or two pin plans and the sewing pattern on the last page. Make sure you print the pattern at “actual size” or 100%.
- A piece of calico or other tightly woven cotton for the inner pillow. This needs to be big enough to cut two circles from the pattern and a strip, 3″ x 19 ½” or 7.5cm x 49.7cm.
- A piece of outer fabric of similar size (you’ll only need to cut one circle)
- Stuffing of your choice. I have used bran in my pink pillow and crushed walnut shells in my orange and green pillow. Walnut shells are a lot heavier and more expensive so I suggest using bran if you don’t mind the wheaty smell. I used about a 500gm bag for my cushion, so a 1lb or 500gm bag will be plenty. Don’t use toy filling or scrap fabric to fill your cushion. I find toy filling is too bouncy and you’ll have trouble keeping your pins in place. Scrap fabric will be too dense and you won’t be able to get the pins in at all. NOTE: Years later I found out the traditional materials for stuffing your pique are either sawdust or straw, you can use that instead.
- A funnel for your stuffing. There’s no need to buy one, I made one out of a scrap piece of paper.
- A teaspoon, also for your stuffing. Bran and walnuts are food so grab one from the kitchen.
- A piece of scrap paper to catch the stuffing that escapes.
- Something to sew everything together with, either by hand or by machine.
- Pins.
- A medium sized safety pin.
- A pencil.
- Fabric scissors.
For the Top
Make either a paper top or a leather top. I find both work well. A leather top will last longer, but you can make many motifs from a paper template before needing to replace it, and you can draw on any extra lines you might need for your design before you cover it in plastic.
You’ll notice my paper top is slightly different from the ones in the download. I refined the templates after using mine for the first time, adding arrows and making it look less busy.
The Paper Top

- You’ll need those one or two pin plans printed out that I mentioned earlier.
- Enough clear sticky backed plastic to cover both sides of the pin plans. The kind you use to cover school books.
- A pin. Use a chunky, thick pin rather than a thin one meant for delicate fabrics.
- Some strong thread to sew the plans to the pillow. I used some crochet cotton and a nice sharp needle to suit.
- Paper scissors. Don’t use your fabric shears or I’ll come to your house and smack you.
The Leather Top

If you’d like to make a longer lasting top out of leather then you’ll need some different things for the top instead.
- One or two of the pin plans I’ve now mentioned twice before.
- A piece of leather big enough to cut the pin plans out of. I used some discarded samples from a furniture company. Try and pick something that you can cut with scissors, but is thick enough not to tear when you poke holes in it. Mine is about 1/16″ or 1.5mm to 2mm-ish thick. Don’t use anything black or you’ll never be able to find the holes.
- Washi tape or masking tape.
- A leather awl. Not the kind for sewing leather, just the kind for poking holes. I bought mine on ebay for under AUD$1.50. You can use a thick sewing needle instead but if you do, both your regrets and your blisters will be legion. Don’t ask me how I know.
- A water resistant pen that will write on leather and not smudge off. I used a Uni-Ball Insight.
- Scissors. Paper ones and ones that will cut the leather.
- Some strong thread to sew the plans to the pillow. I used some crochet cotton and a nice sharp needle to suit.
How to Make It!
The Paper Top

Roughly cut out one or two of the pin templates from the download.
Cover both sides with sticky backed plastic and trim to shape.

Poke the holes with a pin wherever a line touches the shape, plus the dots around the edge. Put it aside for later.
If the holes will be close together, such as the ones near the corner of the square and circle in the photo, only punch one of the holes.
The Leather Top

Cut out one or two of the pin templates from the download.
Stick one to your leather using the tape and poke all the holes with the leather awl wherever a line touches the shape, plus the dots around the edge. You can see in the photo that I tried using a pin. Don’t do that, it hurts.
If the holes will be close together, such as the ones near the corner of the square and circle in the photo, only punch one of the holes.

Cut out the circle from the leather. I had already cut out my paper circle template and covered it in plastic to make the paper top so I traced around it with a pen. If you’ve taped the paper firmly to the leather you can probably just cut it out without removing the paper pattern.

Using the water resistant pen, make a mark at one side of the pin design and another directly opposite.
This will be of help later when you are winding the web.
Making the Pillow
From your calico, cut two circles and a rectangular gusset measuring 3″ x 19 ½” or 7.5cm x 49.7cm.
From your outer fabric, cut one circle and a rectangle the same size.
Using a ½” or 12mm seam and 2mm stitches, sew the two short ends of the calico gusset together.

Mark the halfway point on the gusset with a pin.

Fold it to match the pin with the seam you just stitched and mark the quarter points with pins.

Do the same for one of the calico circles.


Matching the pins on the circle to those on the gusset, pin the circle to one side of the gusset strip. Ease the bits in between the pins to fit.

Sew them together with a ½” or 12mm seam. It’s easier to keep any tucks from getting stitched into the seam if you sew with the gusset on the top.

Now do the same for the other circle, leaving a 2″/5cm gap to turn it in the right way.
Mark the sewing line on the gusset and circle using a pencil. You’ll be glad you did this later.

Now fill your pillow using the funnel and either bran, crushed walnut shells, straw or sawdust (the latter two being traditional fillings). Put a piece of scrap paper underneath to catch any spills.
Keep filling it until no more will go through the funnel, then thump it up and down on your desk and spoon in some more. Thump it on your desk again. Glare menacingly at anyone who asks you what the heck you’re doing with all the thumping. Press the filling firmly down into every crevice with the back of your spoon. Put some more in. Thump, squish and fill until you can’t possibly fit in one more grain and you’re wondering how this can possibly work and if Sarah has gone completely off her nut for telling you to do this. Then add some more.
Sew the hole closed. Yes you can! It’s not going to explode, I promise.
Clean up all the filling you have spilled all over yourself, the floor and your computer keyboard.
Pat your pillow firmly all over the top, like a 3 year old with a very patient cat. This will help settle the shape.
Now take your outer fabric and sew it together with the right sides facing, just as you did for the inner pillow, but make the seam allowance a smidge smaller than the seam allowance on the inner cushion.
You’ll only be sewing it to one circle this time.
Turn it right way out, and put the inner calico cushion inside.
The next step is to tighten the cover to compact the filling even more.
Using a strong thread (or several strands of sewing thread), stitch from one side, across the cushion, to the other side and pull tight. Work your way all around the cushion in this manner. Work your all the way round once more, pulling the thread as tight as you can without breaking it. You may find the first round of stitches become loose, that’s ok.
Give it another solid patting for good measure. Plus it’s fun.
You’re almost done!

Take the template that you made, either paper or leather, and pin it to the top of your cushion using a few of the holes you already punched.
Using strong thread and a needle to suit, sew it to the cushion, making sure it’s stretched smoothly over the pillow.
If you’d like to make a pillow with two designs, you can sew another template on the bottom of your pillow. Make sure to roughly line up the dots that mark the opposite sides of the design with the template on the other side.
Tip: If you like to change templates a lot, use a plain piece of leather, with no design on the top. You can then make your templates out of card or paper and use the pins of the design to hold them in place.

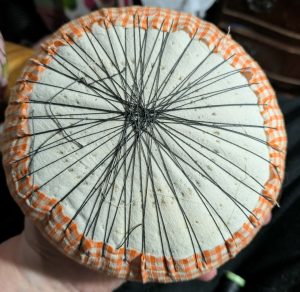
Put a safety pin in the gusset of your pillow, in line with one of the marks that you made. This is where you’ll anchor your thread when you wind the web.
You now have a lovely fabric brick that can be used for making teneriffe lace and for self defense.
Stick in some pins and make some lace!
Click on the photos to see a larger version.


