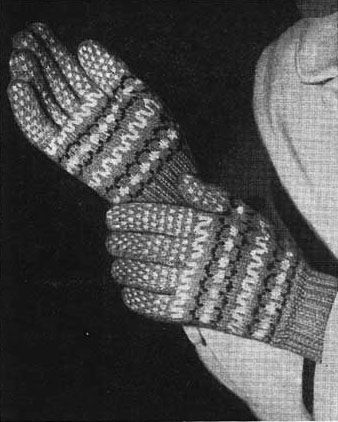
This vintage knitting pattern for “Fancy Free” lady’s gloves was first published in the early 1940’s. The design features a fair-isle lookalike colourwork pattern all the way to the fingertips. They are sized to fit adult women and are knit flat on 2 needles.
Note: This pattern uses old UK needle sizes and is knit with fingering weight wool.
Materials
1 1/4 ozs. of 4-ply Worsted Fingering Wool in Blue, 1/2 oz. of the same wool in Yellow and a small ball each in Wine, Clover, and Green. 1 pair No. 13 knitting needles.
Measurements
To fit size 6 1/4 to 6 3/4 hand.
Abbreviations
K. – knit
p. – purl
sts. – stitches
tog. – together
rep. – repeat
inc. – increase
dec. – decrease
beg. – beginning
rem. remains(ing)
cont. – continue
patt. – pattern
sl. – slip
p.s.s.o. – pass slipped stitch over
ins. – inches
m.1 – make 1 (by bringing or leaving the wool forward before a k. st. or winding the wool around the needle before a p. st.)
r.s.f. – right side facing
tbs. – through back of stitches
st.st. – stocking stitch (right side k. wrong side p.)
reverse st.st. – right side p. wrong side k.
R. H. – right hand
L. H. – left hand
moss st. – moss stitch (k.1 p.1 alternatively on an uneven number of stitches)
M. – main shade
L. light shade
D. – dark shade
A. – angora
Y. – yellow
d.c. – double crochet
Pattern
R. H. GLOVE
Using Blue wool cast on 50 sts. and work in k. 1, p. 1 rib for 2 1/2 ins., inc. into every 5th st. on last row (60 sts.).
Work 6 rows in st.st.
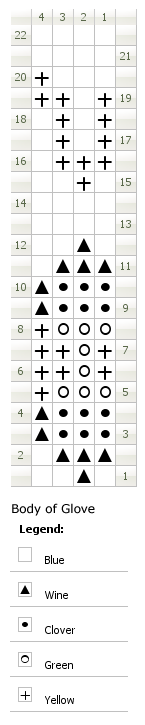
Now commence Fair Isle patt., which is worked throughout in st.st.
Work from the accompanying chart, using the different coloured wools as shown in the diagram. Each square represents 1 st., and the 4 sts. and 22 rows shown in the chart form one complete patt. to be repeated the necessary number of times across row. NOTE: Read all k. rows from right to left of the chart and all p. rows from left to right.
Thus the 4 rows will read as follows:—
1st row: K. * 1 blue, 1 wine, 2 blue; rep. from * to end.
2nd row: P. * 1 blue, 3 wine; rep. from * to end.
3rd row: K. break off blue, join in clover, * 3 clover, 1 wine; rep. from * to end.
4th row: P. * 1 wine, 3 clover; rep from * to end.
Cont. in this way until the 22 rows of chart have been completed. Commence again at the 1st row and work to the 8th row inclusive. Now cast on 4 sts. at the end (left hand edge) of this last row and cont. in fair isle across all sts. until the 20th row of the 2nd patt. has been completed.
THE FINGERS: All worked in the following patt:—
1st row: K. in blue.
2nd row: P. in blue.
3rd row: Join in yellow wool, * slip 1 blue, k. 1 yellow; rep. from * to end.
4th row: * P. 1 yellow, slip 1 blue; rep. from * to end.
5th row: K. in blue.
6th row: P. in blue.
7th row: * K. 1 yellow, slip 1 blue; rep from * to end.
8th row: * Slip 1 blue, p. 1 yellow; rep from * to end.
FIRST FINGER: Next row: Work the first 9 sts. in the finger patt., cast on 4 sts., thread all but the last 9 sts. on to a piece of wool, work the last 9 sts. (22 sts.).
Cont. in finger patt. on these 22 sts. for 2 1/2 ins. (or length required), ending with a 4th or an 8th patt. row.
Shape the top by working tog. every 2nd and 3rd st. on the next 2 rows. Thread wool through rem. sts. and fasten off securely.
SECOND FINGER: Slip 8 sts. from the wool nearest the left hand side of the work on to a needle (the needle pointing from left to right).
Rejoin wool at the needle-point, cast on 4 sts., k. 12, pick up 4 sts. from the base of the 1st finger, k. 8 from the other end of wool (24 sts.).
Work on these 24 sts. in finger patt. for 2 3/4 ins. (or length required).
Shape top as for 1st finger and fasten off securely.
THIRD FINGER: Take 7 sts. from wool (in same manner as for 2nd finger), cast on 4 sts., k. 11, pick up 4 sts. from base of 2nd finger, k. 7 from other end of wool (22 sts.). Cont. in finger patt. on these 22 sts. for 2 1/2 ins. (or length required). Finish off as for 1st finger.
FOURTH FINGER: Work the rem. sts. from wool, pick up 4 sts. from base of 3rd finger and work across all sts. in finger patt. for 2 ins. (or length required). Shape top and finish off as for 1st finger.
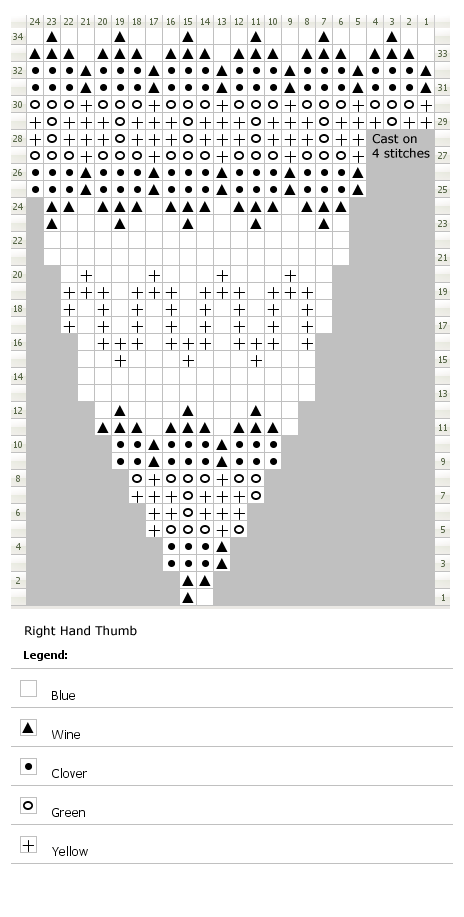
THE THUMB: Cast on 2 sts. and work from the chart for the thumb, inc. at each end as shown until there are 24 sts. on needle.
Complete the chart then cont. in finger patt. until the thumb measures 2 ins. (or length required) from where the 4 sts. were cast on.
Shape top as for fingers and sew down seam.
To Make Up
Sew thumb into position very carefully. Join all seams neatly. Press glove, omitting the ribbing.
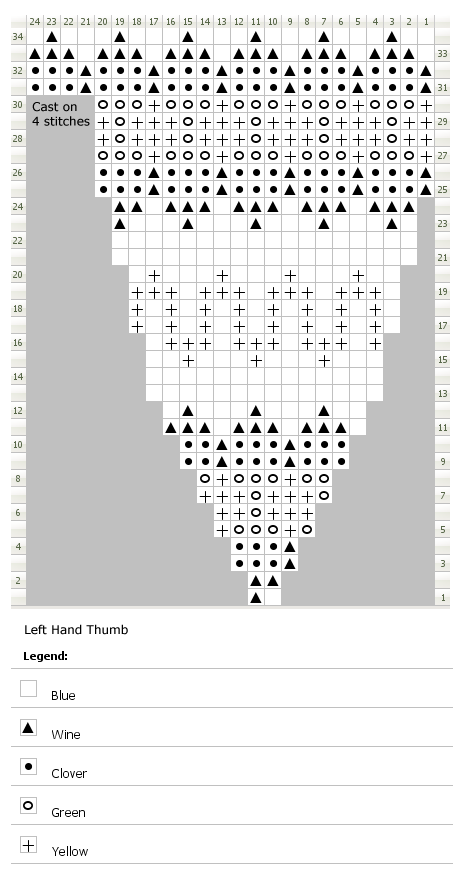
L. H. GLOVE
Work to correspond with R. H. Casting on the 4 sts. at the opposite edge of work (right hand edge) after the 8th row of the 2nd patt. has been completed.
Also cast on the 4 sts. for the thumb and fingers at opposite ends from those cast on for R. H.
Charts