
from “The Ladies’ Guide to Elegant Lace Patterns, Etc.”
The original pattern:
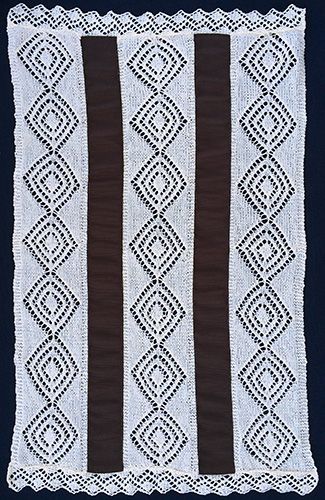
A very pretty tidy is made by taking some wide insertion pattern, and knitting 3 strips from
shoe-thread or fine twine, placing ribbon of any color between the strips,
and edging the tidy top and bottom with some narrow edge.
Pattern
For my sample tidy I used two lengths of 5 cm/2″ wide grosgrain ribbon and knit three strips of Tortoise Insertion using size 10 perle thread on 2.5mm needles. Each strip was 12 cm/4¾” wide and 64 cm/25¼” long after blocking. If possible, try to find a ribbon that will not fray easily and is of a similar weight to your knitting. Avoid slinky satin ribbons if you don’t have a lot of experience working with them as they are very difficult to hem.
I edged the ends of my tidy with two strips of Diamond Edging.
My finished tidy measures 40 cm/16″ wide and 66 cm/26″ long due to the amount taken up by seams and the knitting relaxing a little after blocking.
Materials
Size 10 perle cotton and 2.25mm needles. The amount of yarn will depend on the size of your finished tidy/table runner.
Coloured ribbon in a width of your choice (the width will depend on the desired finished width of your tidy and the width of your knitted insertions). I chose a 5 cm/2″ wide polyester grosgrain ribbon (cotton would have been nicer but all I could find was polyester).
Sewing thread to match your ribbon.
Method
Choose one of the wide insertion patterns and knit three strips of your desired length. Rose Leaf Insertion or Tortoise Insertion would be particularly nice for this project.
Cut two pieces of ribbon 4 cm or 2″ longer than your insertions and make a 1 cm or ½” double hem on each end by folding over 1 cm or ½ of an inch, then fold again to encase the raw edge and stitch. If you’re working with a ribbon that will easily fray, or is a heavy weight, cut it longer and make wider hems so it will won’t fray or make a weird lump.
Tuck the last column of stitches of the insertion under the side of the ribbon and pin. Sew with a neat back stitch as close as possible to the edge of the ribbon. Repeat, sewing the insertions to the ribbon in the following order: insertion, ribbon, insertion, ribbon, insertion.
Knit two lengths of one of the narrow edgings and sew to the short ends of your tidy. Sew to the ends of the ribbon first, using the same technique as for the insertions, then use a neat mattress stitch wherever the knitted edging is sewn to the knitted insertion.
The original publication of this pattern is in the public domain. However, this modernised version and photographs are copyright Sarah Bradberry, August 18th 2014. All rights reserved.