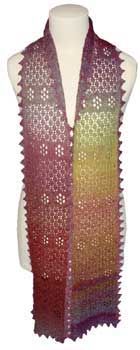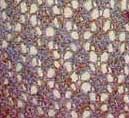
Click the image for a larger view
Size
180cm long by 15cm wide (including edging).
Centre measures 12.5cm wide excluding the pointed edging.
Materials
Yarn
Handspun yarn: 75gm of handspun fine merino, 2 ply, 33wpi, approx 600m per 100gm.
I used Fibreworks rainbow dyed merino roving in colour “lorikeet” and spun it myself . (Golden yellow, deep red, turquoise and all the greens, browns, purples etc that those colours make when they mix)
To spin a colour-change yarn such as this, take a rainbow dyed roving and pre draft it without splitting it lengthwise. Spin your single and wind it off the bobbin into a centre-pull ball. Take each end of the centre-pull ball and ply your single upon itself.
Commercial yarn: For a single colour scarf you could use Bendigo Mills 2 ply wool.
Needles: 1 pair of 3mm needles
3mm circular needle for picking up sts to work edging
Tension
26sts to 10cm over garter st on 3mm needles
Abbreviations/Chart Key
![]() = K – Knit
= K – Knit
![]() = Yo – Yarn over
= Yo – Yarn over
![]() = K2tog – Knit 2 together
= K2tog – Knit 2 together
![]() = K2tog tbl
= K2tog tbl
![]() = Slip 1 stitch purlways
= Slip 1 stitch purlways
![]() = Sl2tog, k1, psso – Slip 2 stitches together knitways, knit 1, pass the 2 slipped stitches over the stitch just knit
= Sl2tog, k1, psso – Slip 2 stitches together knitways, knit 1, pass the 2 slipped stitches over the stitch just knit
Pattern
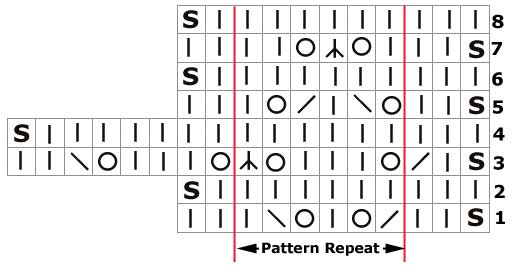
Diamond Lace (chart A)

1st row: Sl 1, k2, *k2tog, yo, k1, yo, k2tog tbl, k1; repeat from * 5 times more, k2
2nd and every alternate row: Sl 1, k to end
3rd row: Sl 1, k1, k2tog, *yo, k3, yo, sl2tog, k1, psso; rep from * 4 times more, yo, k3, yo, k2tog tbl, k2
5th row: Sl 1, k2, *yo, k2tog tbl, k1, k2tog, yo, k1; rep from * 5 times more, k2
7th row: Sl 1, k2, *k1, yo, sl2tog, k1, psso, yo, k2; rep from * 5 times more, k2
8th row: Sl 1, k to end
Rows 1 – 8 form the diamond pattern.
Diamond Lace Chart A

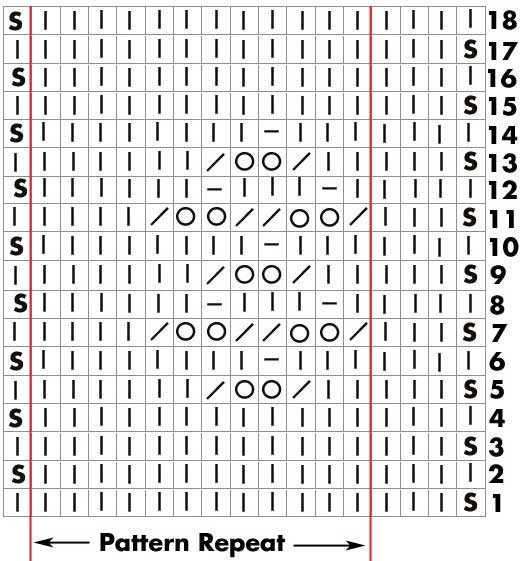
Flower Lace (chart B)

Rows 1-4: Sl 1, k to end
5th row: Sl 1, k3, *k2, k2tog, (yo) twice, k2tog, k6; rep from * twice more, k1
6th row: Sl 1, *k8, p1, k3; rep from * twice more, k4
7th row: Sl 1, k3, *[k2tog, (yo) twice, k2tog] twice, k4; rep from * twice more, k1
8th row: Sl 1, *k6, p1, k3, p1, k1; rep from * twice more, k4
9th row: Sl 1, k3, *k2, k2tog, (yo) twice, k2tog, k6; rep from * twice more, k1
10th row: Sl 1, *k8, p1, k3; rep from * twice more, k4
11th row: Sl 1, k3, *[k2tog, (yo) twice, k2tog] twice, k4; rep from * twice more, k1
12th row: Sl 1, *k6, p1, k3, p1, k1; rep from * twice more, k4
13th row: Sl 1, k3, *k2, k2tog, (yo) twice, k2tog, k6; rep from * twice more, k1
14th row: Sl 1, *k8, p1, k3; rep from * twice more, k4
Rows 15-18: Sl 1, k to end
Rows 1-18 form the flower lace pattern
Chart B

Using 3mm needles and a provisional cast on, cast on 41sts and knit 4 rows.
Work 4 repeats of diamond lace, followed by 1 repeat of flower lace.
Continue working 4 repeats of diamond lace and 1 of flower lace until you have knit 15 sections of each lace pattern
Work 4 repeats of diamond lace
k4 rows. Do not cast off.
Begin Edging

First you will need to pick up all the stitches that the edging will be worked onto.
K20, k2tog, k19, place marker (to mark the corner), pick up 393sts along the long side of your scarf (pick up 1 st in each slipped st along the edge), place marker, undo the provisional cast on and knit the 40sts, place a marker, pick up 393 sts along the 2nd long side.
Now you will begin knitting the points along the top 40sts.
K1, turn
*k1, turn
k2, turn
k2, turn
k3, turn
k3, turn
k4, turn
k4, turn
k5, turn
k5, turn
Cast off 5.**
Repeat from * to ** 7 more times. You will now have finished the points along the top short edge of your scarf.
Note: If turning your work whilst knitting the tiny points drives you batty, you can use the “knitting backwards” method of knitting your work without turning it. I found it to be a much faster and more enjoyable way of working the edging.
As you can see, each point uses a total of 5 stitches. Since you had to pick up 393sts along the long edge, you will need to decrease 3sts along this edge whilst working the edging.
First, repeat the instructions from * to ** 10 times to make 10 regular points down the side of your scarf.
Next, work a “decrease point” as follows:
k1, turn
k2, turn
k2, turn
k3, turn
k3, turn
k3, k2tog, turn
k4, turn
k5, turn
k5, turn
Cast off 5.
Knit 27 regular points, one decrease point, 28 regular points, one decrease point, then finish off the long edge with 10 regular points.
Work 8 regular points along the bottom short side, then work the edging along the remaining long side as you did for the first long side, (10 regular points, 1 decrease point, 27 regular points, 1 decrease point, 28 regular points, 1 decrease point, 10 regular points). Cut your yarn and fasten off.
Finishing
Wash your scarf, spin out the excess water, then pin it out to block it whilst drying.
I don’t have a special blocking board so I pinned my scarf by the points to a quilt laid out across my dining table, then put weights on the quilt to keep the scarf stretched while it dried. You need to keep your scarf stretched out while it dries to open up the lace knitting, which makes it a lot more attractive.
Darn in any loose ends.
Copyright Sarah Bradberry. All rights reserved.
