
by Mrs. A. W. Thornton
from Needlecraft Magazine, September 1924
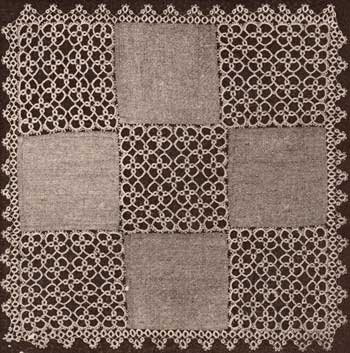
The squares of allover pattern, may be made as large or small as desired, the squares of linen or scrim plainly hemmed or hemstitched, corresponding in size.
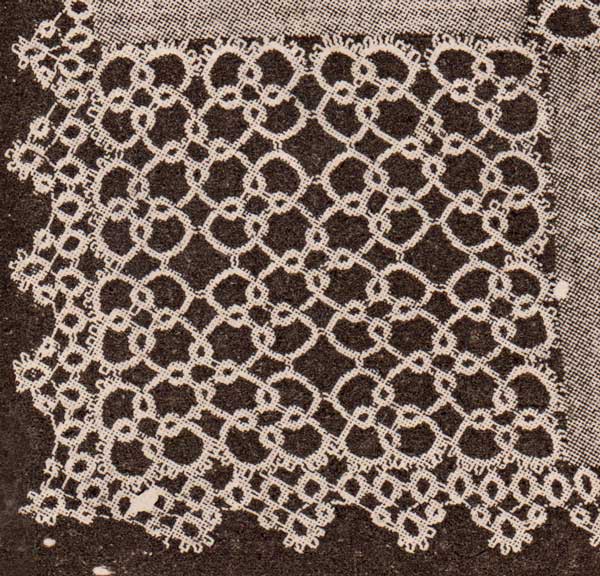
A luncheon-set may be easily arranged from the same design, as may a bedspread, pillow-top, table-cover, and other articles. And the allover tatting may be used for yokes, collars, insertions, or any desired purpose. It is very simple.
Make a ring of 5 double knots, picot, 2 double knots, picot, 5 double knots, close;
a chain of (2 double knots, picot) 9 times, 2 double knots (this is the corner chain);
* a ring, joining by 1st picot to last picot of preceding ring;
a chain of 1 double knot, (picot, 2 double knots) 6 times, picot, 5 double knots;
a ring, joining as before to preceding ring, * making a group of 3 rings (the rings are made in the same way throughout);
(chain of 5 double knots; a ring) twice;
chain of 5 double knots, join to last picot of preceding long chain, (2 double knots, picot) 6 times, 1 double knot;
repeat from * to *;
a chain of 5 double knots, picot, 8 double knots, picot, 5 double knots;
a ring, joining by 1st picot to last picot of preceding ring, and by last picot to 1st picot of 1st ring of this group of 3, making 4 rings in the group;
chain of 5 double knots;
a ring, joining by 1st picot to last picot of single ring (the 4th ring made);
chain of 5 double knots;
a ring; *
chain of 5 double knots, join to last picot of last long chain, 8 double knots picot, 5 double knots;
a ring, joining by 1st picot to last picot of preceding ring,
(chain of 5 double knots; a ring) twice; the 1st of these 2 rings forming 1 of the group of 4 at center of square,
repeat from 4th * to 5th * (counting all *);
chain of 5 double knots, join to last picot of preceding long chain, 8 double knots, join to 1st picot of 5th long chain made, 5 double knots;
a ring, joining by 1st picot to last picot of preceding ring;
chain of 5 double knots, join to last picot of 4th long chain (edge-chain), (2 double knots, picot) 6 times, 1 double knot;
repeat from 1st to 3d *
a ring, joined to preceding ring;
corner chain, as before;
a ring, joined to preceding.
This completes one side of the square, forming a point.
To continue the square, repeat from 1st *, joining the rings throughout as directed, and you will have a triangle, very pretty for corners;
work the two remaining sides in the same way, the rings forming groups of 4 throughout.
After having completed the first side, the work proceeds almost without thought, as the joining is the same all through, the rings all alike and the edge, corner and inside chains the same.
Five squares are required for the centerpiece illustrated, set with four linen squares in “nine-patch” fashion.
Finish with a tatted edge, as follows:
A ring of 4 double knots, (picot, 4 double knots) 3 times, close;
turn, leave a little space of thread, about one eighth inch, make a small ring of 4 double knots, picot, 4 double knots, close;
again, leaving same space of thread , make a 3d ring like 1st, joining by 1st picot to last picot of 1st ring;
leaving same space of thread, make a 4th ring of 4 double knots, join to picot of 2d or small ring, (2 double knots, picot) 4 times, 4 double knots, close;
leaving same space of thread, make a ring like 1st, joining by 1st picot to last picot of 3d ring;
again make a small ring, always leaving same space of thread, joining by middle picot to last picot of 4th ring;
a ring, like 1st, joining to 5th ring as before, and continue the pattern from 2d ring.
The edging is joined to the centerpiece by middle picots of 1st, 3d and 5th rings, and this may be done as the work progresses, or by means of needle and self-color thread, as preferred.
Beginning at one corner, join 1st ring to 1st picot of corner chain, 2d ring to 4th, 3d ring to 5th, 1st ring of next pattern to 6th and 2d ring to 8th picot of same corner chain;
join next ring to 3d free picot of next chain of square, next to 3d free picot of next chain, next to 5th free picot of
same chain, and continue in this way, joining so that the edging lies perfectly flat and does not draw, continuing along the side of the linen square.
In fine thread this pattern, a favorite because it uses but one thread, is very dainty for handkerchiefs or any desired trimming.
Copyright Sarah Bradberry, June 30th 2013. All rights reserved.