
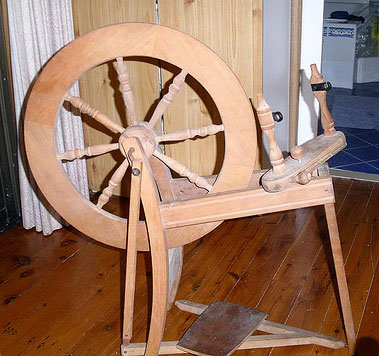
A wheel before repairs

After
The Traditional is a very popular wheel for new spinners. They have been made for many years which means second hand wheels are easy to find at affordable prices and with just a few dollars and a spare hour or two (sometimes less) they can be reconditioned to work almost like new.
For this tutorial I’m going to assume that you have purchased a wheel with no missing parts, and one that has a well balanced wheel with no loose joints. (If you do have parts missing on your wheel, they can be purchased from Ashford Handicrafts but you should take the cost of these replacement parts into consideration when deciding what you are willing to pay for the wheel).
You will need:
An Ashford maintenance kit
Wax for lubricating the flyer bearings (if needed)
A pair of scissors (to cut the brake band to length)
A screwdriver to fit the screws on your wheel
A couple of soft cloths or clean rags
Furniture wax or polish (or wood oil if the wood is very dry)
If your wheel has any rust you will also need some wet and dry paper and a few drops of olive oil
Clean your wheel
Depending on the age and condition of your wheel there are a few different ways to clean it. First of all you’ll want to remove any dust or dirt with a soft cloth. If the wood is particularly dry apply some wood oil or furniture wax using the method suggested on the packaging. If you have used a wood oil such as O’Cedar furniture oil you’ll need to leave it at least several hours to soak in thoroughly before buffing with a clean cloth.
Any rust on your wheel can usually be removed by sanding with some wet and dry paper. Once all of the rust has been removed, clean off any dust very thoroughly and then wipe the clean metal with a tiny amount of olive oil on a rag. If your flyer has a lot of rust on it the dust from inside can be removed with some pipe cleaners or a thin piece of rag fed through with your orifice hook after sanding.
Tighten the screws
Check and tighten all of the screws on your wheel, except those under the mother of all that hold the upright posts (we’ll cover those later in the troubleshooting section).
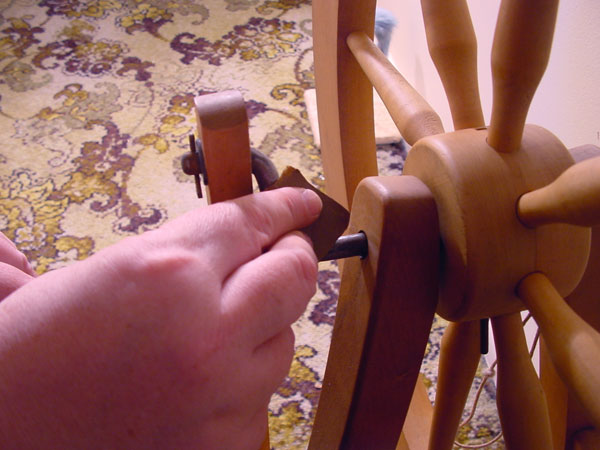
Replace the hooks
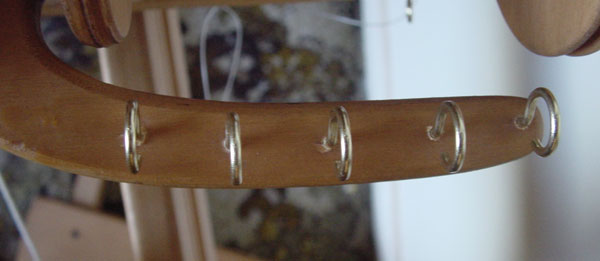
If your flyer has rusty or discoloured hooks they can be replaced very easily. Remove the flyer from the wheel and untwist the hooks in an anti-clockwise direction to remove them. You will probably be able to do this by hand but a pair of pliers may help if loosening them is difficult. Screw the new hooks in place but do not tighten them too far as this may split the wood.
Remove the old brake band and replace the hook and eye on the mother of all in the same way.
Lubricate your wheel
Oiling your wheel is one of the most important steps. Place drops of oil either side of the wheel, making sure it goes onto the metal rod (the crank) that goes through the middle of the wheel and the bearings that the crank passes through.
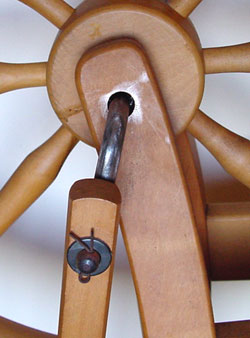
Oil the con rod bearing, the treadle pins and the treadle hinge pins on double treadle wheels.
Wax the flyer bearings.
Replace the bobbin brake with 2 springs
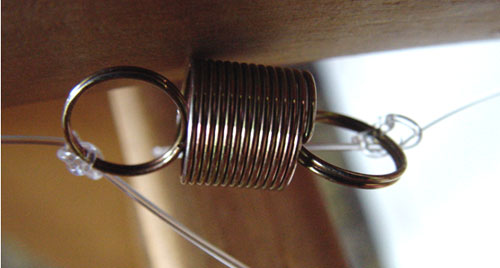
In your maintenance kit you will find two springs and a length of nylon line to replace your old brake band. Use the instructions in the kit to replace the old brake band.
Replace the conrod joint (if necessary)
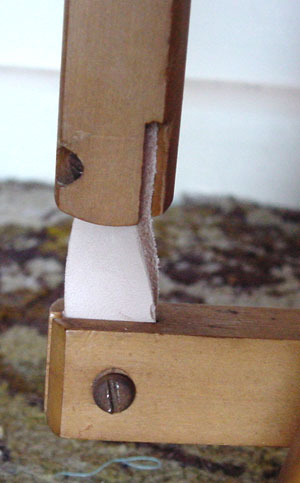
If the piece of leather that joins the conrod to your treadle is stiff and brittle or extremely worn, replace it with the new one from your maintenance kit. To do this, unscrew the leather at both ends, fit the new piece in its place, line up the holes in the leather with the holes in the wood and replace the screws.
If your wheel is a newer style it will use the plastic tube as the conrod joint and you will find a hole drilled into the end of the conrod to fit it.
Replace the drive band (if necessary)
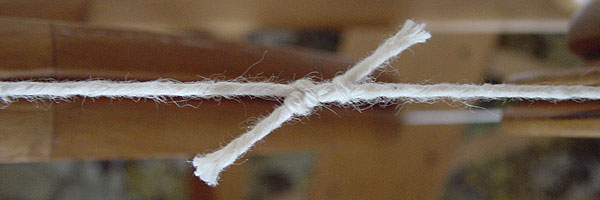
If your drive band is worn or brittle you will need to replace it.
Troubleshooting a few common problems
My drive band keeps coming off
Align the wheel with the groove in the flyer.
Lift the mother of all and loosen the screws which attach the base plate to the wheel. Fold the mother of all down again, line up the groove in the flyer with the groove in the wheel by moving the base plate slightly in the appropriate direction, then tighten the screws.
My flyer gets jammed
Make sure the upright posts on the mother of all are parallel to each other and at 90 degrees to the flyer by loosening the screws which hold the posts in place and turning the posts until they are in the correct position. Make sure the posts are in the correct position and tighten the screws.
My wheel makes a horrible clunking sound when I treadle.
Your wheel may benefit from the addition of a “Clunky Wheel Kit” which can be purchased from Ashford dealers.
Date your wheel for fun!
The Ashford website has a fun and informative timeline for Traditional wheels at https://www.ashford.co.nz/images/download_pdfs/info_sheet/traditional_timeline.pdf which will help you discover just how old your wheel is.
If you are still having problems with your wheel check the help and advice FAQs at https://www.ashford.co.nz/support/faq
Text Copyright Sarah Bradberry, July 15th 2008. First two images Copyright Jeanette Curran 2008, remaining images are copyright Sarah Bradberry 2008. All rights reserved.