
The “daisy wheel” is a small gadget procurable at leading stores. It is so simple to operate that children from about
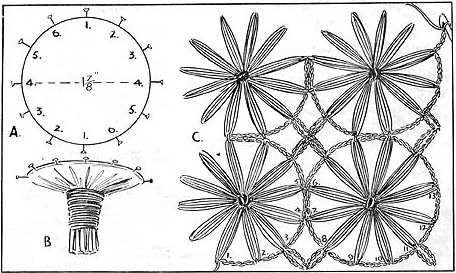
ten years of age will enjoy making the daisies in readiness for Mother, or big Sister, to join together. We also show a diagram for making a wheel from a circle of cardboard, one and seven-eights of an inch in diameter.
(Diagram A). If desired, a cork about that size may be used. Pad the cardboard with a thin layer of cotton wool and cover with strong material, or white kid (part of an old glove will do).
Insert twelve strong pins at regular intervals round the circle, as diagram A shows. Finish underneath as diagram B, drawing the material over firmly and evenly, then binding with strong thread.
The wheels may be worked into numerous fascinating garments such as frocks for tiny folk, dressing jackets and gowns for children and adults (using Madame Weigel’s patterns as a guide for shaping). Then there are Afghans, Bedspreads, Pram Covers, Tea Cosies, etc., using various plies in wool to suit the article. If desired oddments of wool (each daisy requires about 33 inches) may be used, but the wool should be of same ply to avoid an uneven surface.
Take the wheel in the left hand (right side towards you). Place wool on right side of wheel and hold it in position with
thumb. Pass wool over one of the pins, then over pin directly opposite, crossing the wool in the centre and still holding under thumb. Now pass to next pin and also its opposite pin. Repeat winding in this manner until the wheel is full. Break wool off about 6 inches from centre, thread into a wool needle and sew over the centre securely to hold the petals in position. A very pretty effect is obtained by sewing over the centre of the wheel in contrasting color, before removing the loops.
If the home-made wheel is used, the pins will have to be removed to release each daisy, then replaced.
To Join the Daisies: (for a 9 x 9 square). (See Chart)
Using 2-ply wool and No. 5 hook, slip stitch to the first petal i.e petal marked 1, at lower left-hand corner of Chart, 6 ch., s.s. to 2nd petal, 6 ch, s.s. to 3rd ch., 7 ch., and form picot by s.s. into same petal, 6 ch., s.s. to 4th petal, 6 ch., s.s. to 5th petal; now join to 2nd daisy with s.s. (in Chart, this is the 6th petal), 6 ch., s.s. to 7th petal, then s.s. to 4th petal in 1st daisy at same time, 6 ch., s.s. to 8th petal, 3 ch., s.s. into centre of picot on 3rd petal, 3 ch., s.s. to 8th petal (thus forming another picot), 6 ch., s.s. to 9th petal, 6 ch., s.s. to 10th petal, 6 ch., s.s. to 11th petal, 7 ch., s.s. to 11th petal to form a picot, 6 ch., s.s. to 12th petal, 6 ch., s.s. to 13th petal.
Join in 3rd daisy and repeat from 6th petal to 13th petal, until 9 daisies are joined.
Now work chain and picot across the four loose petals at top of each daisy in the row, making a picot in 1st and 4th, with 6 ch. between each petal as before.
These instructions are in the public domain. This digital version is © Sarah Bradberry 2002. Kindly transcribed for Knitting-and.com by bgwinters