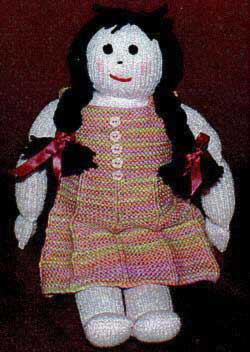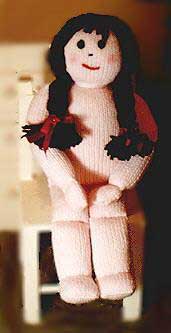

This doll was originally my gift to the knitlist in 1995. I finally got around to making the prototype this year and have added patterns for a pair of knickers and a dress. This page contains the instructions for making the doll out of any yarn, plus a version for beginner knitters which produces exactly the same doll, but with st and rows already worked out for 8 ply (dk) yarn. Also included are the pattern for a pair of knickers and the dress shown in the second picture.
All-Yarns Recipe for Hand, Frame or Machine Knit
This doll is made up of five tubes, one for the body and head and one for
each of the limbs. You can knit the pieces flat if you prefer.
Measurements
Height = 42cm/ 16.5in
Materials
- For the doll I used a 100gm ball of Patons 8 ply (light worsted) Magnum 100% courtelle in pale pink. 310m per 100gm.
- Scrap of black yarn for features.
- Soft red coloured pencil for shading cheeks.
- Approx 50gm hair coloured yarn for wig.
- 1 pr 3mm needles.
- Soft toy filling (approx 200gm, your mileage may vary)
Abbreviations
K2 tog: Knit 2 together
WS: Wrong side
rem: remaining
Method
First, make a gauge swatch in your preferred yarn and needles 2 sizes smaller than those you would use to knit a wearable garment (This is to eliminate any possibility of the toy filling from ‘leaking’ through the stitches).
Body
Using your swatch gauge as a guide, cast on enough sts to create a tube of 20cm diameter, making sure you have a number divisible by 4.
Join sts, marking the beginning of the round, and knit until piece measures 16cm, mark this round with a coloured thread and continue knitting until tube measures 24cm.
Following round: K2 tog to end, break off yarn and thread through rem sts, pull tightly to close end of tube and secure firmly on WS. This gathered end of the tube forms the top of the head. The gather will be covered with a yarn wig later on.
Legs (make 2 alike)
Divide the number of sts cast on for the body by 2 and use this as the number of sts to cast on for the leg. (Knit the legs in the round as you did for the body).
Knit until work measures 9.5cm, mark with a coloured thread.
Keep working until tube measures 18cm, mark with a second coloured thread.
Work a further 3cm. Break off yarn leaving a long thread.
Put the sts onto 2 needles and lay the tube flat. Graft the sts together (If you prefer you can cast these sts off and sew the ends together) This graft (or seam) is the ‘toe end’ of the foot. (As you will see when making the doll up at the end)
Arms (make 2 alike)
Cast on the correct number of sts to make a tube of 8cm diameter, making sure you have an even number of sts. Join sts and mark beg of round.
Knit until work measures 8cm, mark with a coloured thread for the elbow.
Knit a further 8cm (16cm total) and mark each end of the row for wrist.
Work a further 2.5cm and graft ends tog as you did for the feet. This grafted end of the tube is the ‘hand end’.
Making Up
This sounds labour intensive when reading, but isn’t in reality. HONEST!
Using a soft toy filling, fill the body tube quite firmly, but not enough to make the tube hard. If you are going to make the dress and knickers I have provided patterns for you will have to make the chest measurement approx 30.5cm.
Make sure to leave the last 1cm of the body unfilled.
Pin the front of the tube to the back (so as to make a flat seam) and baste across the bottom of the body, 1 inch from the cast on edge. This will help keep the legs nice and floppy when you sew them in later.
Take a piece of thread, the same as you used to knit the body, and gather the neck at the round where you marked with a coloured thread. Gather as tightly as you need to make a firm neck that will keep the head upstanding.
Lay this piece aside for now.
Taking one of the legs, fill the tube up to the first coloured marker (at the 3cm mark) At this point squash the tube flat and sew straight across the tube at this row. This will form the foot.
Continue stuffing the leg lightly, and repeat this ‘jointing’ method at the second marker to form the knee.
Lightly stuff the remainder of the leg, leaving the last 1cm as you did for the body. Fold feet forward slightly and st to hold in ‘foot’ position.
Repeat for the second leg and pin the cast on edge of the legs ‘inside’ the body just underneath the basting. Sew straight across the body with a firm back stitch, sandwiching the cast off ends of the legs inside the body. Remove the basting that you put across the bottom of the body and coax the filling into place by squashing it about a bit until it’s the correct shape.
Fill the arms in the same way, making joints at the marked rows.
When you get to the end of the tube squash it flat as if making a joint and sew the end of the tube closed. Sew the arms at the sides of the body just below the neck. if you wish, sew a line down the front of each hand for thumb. You should now have a bald floppy dolly with no face.
Wig
For a Girl
First, decide how long you want the wig to be. Do this by measuring from the gather at the top of the head down the back of the doll to the point you want the hair to reach. You may want to embroider the face on the doll first to help determine this.
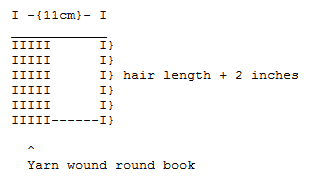
Take a book, the width of which is roughly 2 inches more than the length you want the hair to be. The best thing to use here is a hard-cover novel if you can find one the right size. (I used ‘Knitting in America’)
Wind the yarn you have chosen for the hair round & round the book neatly until you have covered the length determined by your measurement (mine was 11cm). Wind back over the first layer to make a nice thick head of hair. Repeat if desired.

Sew through the yarn down the spine of the book with a small neat backstitch, making sure to catch all the yarn in the stitches.
Cut the yarn on the opposite edge of the book so that you end up with lots of long strands of yarn sewn together down the middle. Using the stitched line as the part in the hair sew it to the head of the doll.
For a fringe (bangs) you can trim the front, or if you prefer you can embroider them underneath before sewing on the wig.
Style the hair as you wish. If making pigtails, make sure you catch down a suitable amount of the hair near the ears (if she had any), so as to avoid a ‘mohawk’.
Boy’s Wig
Make wig as for girl’s hair, but wind around a ruler instead of a book and slip the loops off the ruler instead of cutting.
Make several of these and, starting at the gather on top of the head, sew down in an outward spiral. This should create a thick curly head of hair suitable for a boy doll. Keep going until you have covered the head.
Both Dolls:
Embroider face as shown in the image. Using the side of a freshly sharpened red pencil lightly shade the cheeks as shown.
Variations
Clown:
Work feet, hands and face in white. Work arms, legs and body in brightly coloured stripes. Sew 3 pom-poms down the front as big ‘buttons’ and bells or pom-poms on the toes. Make boy’s wig in bright orange. Sew lace frill around the neck. Make a large yellow daisy from felt and sew to body in a ‘lapel’ type position.
Ballerina and Fairy:
Work feet and body in white, head, arms and legs in pink. Sew ribbon ‘laces’ above feet (as ballet shoes) and tie in a decorative bow. Braid hair into a bun, stick small felt flowers in the hair as a floral tiara.
Tutu:
Take a long rectangle of tulle, join short ends and gather the top to fit doll. Sew on small star shaped sequins and add a ‘wand’ for a fairy. (There’s a use for those ‘sat upon’ wooden knitting needles!)
Beginner’s Version
This version is knit flat with simple k2tog decreases only. I think any beginner knitter can make it without any confusion.
Knit the pieces following these instructions, then make up as for the ‘any yarn’ version above.
Materials
- 100gm ball of Patons 8 ply (dk) Magnum 100% courtelle.
- Scrap of black yarn for features.Soft red coloured pencil for shading cheeks.
- Approx 50gm hair coloured yarn for wig.
- 1 pr 3mm needles.
- Soft toy filling (approx 200gm, your mileage may vary)
Tension
26st and 35rows to 10cm/ 4in over st st.
Body
Using 3mm needles cast on 52 sts and work in st st for 16cm
Mark with a coloured thread at each end of the last row for neck.
Continue working until piece measure 24cm
Next row: K1, K2tog to last st, K1, break off yarn and thread through rem sts, pull tightly and fasten off. This gather will be covered by a yarn wig later on.
Join long edge of piece together using matress st and put to one side.
Legs (make 2)
Cast on 26sts and work 9.5cm st st. Mark each end of the next row with a coloured thread for knee.
Keep working until piece measures 18cm, mark with a second coloured thread for ankle.
Work a further 3cm st st, cast off. Fold in half lengthways and join long edges together with a neat matress st. Join cast off edges together with a neat overstitch. Put aside for later.
Arms (make 2)
Cast on 22sts and work in sts for 8c, mark each end of row for elbow.
Work a further 8cm st st (16cm total) and mark with a coloured thread for wrist.
Work 2.5cm st st and cast off.
Sew long edges together to form tube with a neat mattress st. Join Cast off edge together with a neat overstitch.
Finish as for ‘all yarns recipe’
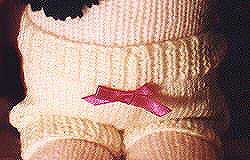
Bliss’s Knickers

Materials
- 25 grams Cleckheaton 4 ply Baby Soft Wool (approx 96m/ 105yd per ball. I used less than half)
- Small ribbon bow
- 1 pair of each 3mm and 3.25mm needles
Abbreviations
K1, P1 rib = every row: K2, (P1, K1) to end.
Method
Make 2 pieces.
Using 3mm needles cast on 40sts and work 10 rows K1, P1 rib.
Change to 3.25mm needles and work 26 rows st st.
Mark each end of last row with a coloured thread.
Change back to 3mm needles and work 10 rows K1, P1 rib. Cast off in rib.
Making Up
Join pieces together down sides from cast on edge to coloured thread.
Fold seams to centre front and back and join the leg seams to form 2 separate leg openings.
Sew bow to centre front.
Bliss’s Dress
Materials
- 2 balls 8 ply yarn (dk) (approx 80m per ball)
- 1 pair 4mm needles
- 3 or 5 small buttons
Tension
22sts and 30 rows to 10cm (4ins) worked over st st on 4mm needles.
Method
Beginning at bottom of skirt:
Using 4mm needles cast on 101sts
1st row: K to end
2nd row: K6, (P1, K10) to last 7 sts, P1, K6
Rep these rows 10 times in all (total 20 rows)
1st decrease row: K4, K2tog, (K9, K2tog) to last 9 sts, K2tog, K7
2nd row: K6, (P1, K9) to last 6 sts, P1, K5
3rd row: K
Rep last 2 rows 8 times more, repeat 2nd row once (40 rows from beginning)
Next decrease row: K3, (K2tog, K8) rep to last 9sts, K2tog, K7
2nd row: K6, (P1, K8) rep to last 5 sts, P1, K4
3rd row: K
Rep last 2 rows 8 times more, rep 2nd row once
Next decrease row: K2, K2tog, (K7, K2tog) rep to last 7 sts, K7
2nd row: K6, P1, (K7, P1) rep to last 3sts, K3 (74sts)
K24 rows
Shape for neck
K15, cast off 8sts, K28, cast off 8sts, K15
K 6 rows on these last 15sts
Next row: Cast off 9sts, K to end. K 6 rows on these 6 sts, cast off.
Rejoin yarn to centre sts with WS facing. K 6 rows.
Next row: K6, cast off 16, K6
Work 9 rows on these last 6 sts, cast off.
Rejoin yarn to other 6 sts and work to match side just worked.
Rejoin yarn to rem sts with WS facing. K 7 rows.
Cast off 9 sts, K6. K 5 rows on these last 6 sts. Cast off.
Making Up
Put dress on doll and join back seam. Sew 3 or 5 small buttons down centre front of bodice.
Sew in all loose ends.
Doll patterns Copyright © Sarah Bradberry October 1995. Doll’s clothes patterns and images Copyright © Sarah Bradberry July 1997. All rights reserved.
