
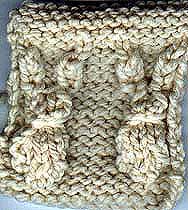
Left: Undecorated Bunny Bobbles
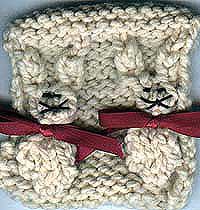
Right: Decorated Bunny Bobbles
When I saw the stitch called ‘rabbit ears’ in Barbara Walker’s Charted Knitting Designs, I immediately wondered what happened to the rest of the bunny? So I designed this little fellow for a bit of fun. You can leave him plain, add a small pompom for a tail or decorate with a ribbon and a little embroidery for the front of the rabbit
Abbreviations
- K = Knit
- P = Purl
- st-st = stocking st
- SSK = Slip Slip Knit, Slip 1 st knitways, slip another, return both sts to the LH needle in their new twisted position, then knit the 2 stitches together
- K2tog = Knit 2 together
- LT = Left Twist: Purl into the back of the 2nd st on the left hand needle then knit the first st, slipping both sts off the needle
- RT = Right Twist: K into the front of the 2nd st on the LH needle, purl the first st, slipping both off the needle.
- P3tog = Purl 3 together
Technique
Cast on a number of stitches divisible by 8
Work 8 rows reverse st-st
*1st row: P3 [(K1, P1, K1) into next st] twice, turn
P6, turn
K2 [(K1, P1) into next st] twice, turn
P4, turn
SSK, K2tog, K2, turn
P6, turn
SSK, K2, K2tog, turn
P4, turn
SSK, K2tog, P3,
Repeat from * across row. This forms the bunny’s body, turn
Next row: Knit
Next row: **(bunny’s head) P3, [(K1, P1) into next st] twice, turn
P4, turn
SSK, K2tog, P3
Repeat from ** to end of row
Next row: K3, P2, K3, repeat to end of row
Next row: (ears) P2, RT, LT, P2, repeat to end of row
Next row: K2, P1, K2, P1, K2, repeat to end of row
Next row: P2, (K1, P1, K1) into next st, P2, (K1, P1, K1) into next st, P2, repeat to end of row
Next row: K2, P3tog, K2, P3tog, K2, repeat to end of row
Next row: P1, RT, P2, LT, P1, repeat to end of row
Next row: K1, P1, K4, P1, K1, repeat to end of row
Work 2 rows reverse st-st
Decorate the bunnies with ribbon around the necks and embroider the faces as shown if you wish, or sew a small pompom on for the tail if you prefer bunny bottoms 🙂 You can also leave them plain if you prefer.
Copyright © 1997 Sarah Bradberry