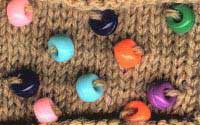

It’s very simple to knit lightweight beads and buttons into your work. There are many techniques but this is the one that I like best. You’re guaranteed that your button or bead will stay on the front of the work and there are no fancy tricks to remember.
Note: It’s best to keep any heavy work at the top of your design so it won’t stretch when you wear it and so you won’t be sitting on any uncomfortable beads when you sit down.
If you are following a chart when knitting in beads it is important to thread the beads on your yarn starting at the top left-hand corner of the chart. You’ll be threading the last bead you knit on first. It is also important to remember not to thread too many beads onto your yarn at one time or the yarn will become fuzzy and worn looking, it’s better to have to cut and rejoin the yarn than to have worn-out looking yarn!
Method
Knit to the stitch before you want to place your bead.
Bring the yarn and the bead to the front of your work, slip the next stitch purlways,
bring your yarn to the back of your work, leaving the bead at the front and knit the next stitch.
You’ve done it! You now have a nicely placed bead at the front of your knitting and it will never slip through to the back when you’re not looking! You can also use this method to knit in shank buttons as in the second example above. These must be very lightweight or they will pull your work out of shape. I also highly recommend knitting a sample swatch first because it can be tricky figuring out which way up to thread the buttons. You wouldn’t want to do all that threading and then find out you’d put all the buttons on upside down!
Copyright © 1997 Sarah Bradberry
