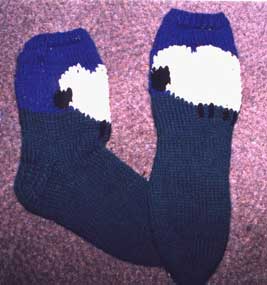
Materials
U.S. #6 (4mm/UK8) straight needles and the same in dpns
I used 1 ball pingouin Fleur de Laine col:034 for the blue,
1 ball of Woolease col: 180 forest Heather green,
1 ball of Woolease col: 099 Fisherman
Small amount of black yarn (Chenille is great for this!)
Reinforcing thread (I use thin mending wool)
Gauge
(on blue) 8 rows = 1″ and 5sts = 1″ on #6 needles
Abbreviations
SSK = slip1 as if to knit, slip 1 as if to purl, slip both sts onto left
needle K2tog in back of st
Method
With blue, using straight needles cast on 44 sts.
Work K1, P1 ribbing for 4 rows.
Continuing in blue, work stockinette (st st) for 9 rows.
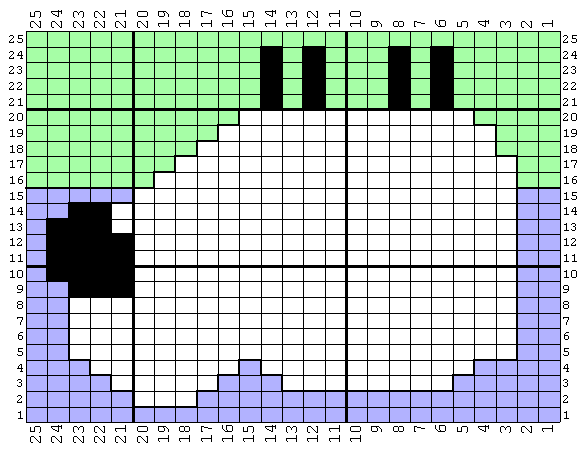
Now to the sheep graph!

Working in intarsia, joining and cutting off yarn as needed, P9 blue, work chart (25 sts), P10 blue.
Make sure that your sheep graph is the right way up. You are working from the head/back of sheep down to the legs!
Continue working the graph, and change from blue to green on row number 15 of the graph.
When all the graph rows have been worked continue in green only for 6 rows.
Heel Flap and Heel
Change to DPNS.
Knit 1 row and place 10 sts onto first needle, 24 sts onto 2nd (front) needle, and 10 sts onto the 3rd needle.
The 2 needles with 10sts each are the back needles.
On needle number 3, K the 10 sts from needle number 1
You now have 20 sts on one back needle.
Work on these 20 sts only thus:
Purl 1 row.
Tie on reinforcing thread (your socks will last longer!) and carrying the extra strand along as you knit
Row 1: K1, sl1, to last stitch K1.
Row 2: Purl.
Repeat these 2 rows until 12 heel flap rows have been worked.
Heel
Keeping extra strand attached, Slip 1 , K12, SSK, turn,
* slip 1, P7, P2tog, turn,
slip 1 , k7 , SSK, turn.
Repeat from * until 8 stitches remain. Cut off extra strand.
Gussets
Knit across 8 back sts.
Pick up and K 10 sts from first side, then knit across 24 sts on needle number 2, then with needle number 3 pick up and K 10 sts from side to heel, on this same needle K4 of the sts from the back needle.
You should now have: 14-24-14sts
Starting at center back work 7 rounds thus:
Round 1: needle number 1 – K to last 3 sts, K2tog, K1,
needle number 2 – K across all sts,
needle number 3 – K1 , SSK, K to end.
Round 2: K all sts.
Finish on a 1st round.
You now have 10-24-10.
Knit all rounds until 1.5″ less than foot length. ( I take a US 7, UK5 . I knit 26 rounds to fit my foot)
Toe
Tie on extra strand again.
Slip 1 st from each end of needle number 2 on to needle number 1 & needle number 3 thus: 11-22-11.
Working the following 2 decreasing rounds until 20 sts remain:
Round 1: needle number 1 – K to last 4 sts, K2tog, K2, needle number 2 – K2, SSK , K to last 4 sts, K2tog, K2, needle number 3 – K2, SSK, K to end.
Round 2: K all sts.
When all rounds have been worked and 20 sts remain on needle number 3 k the sts from needle number 1 so you have your stitches placed thus on 2 needles: 10-10.
Bind off (cast off) using 3 needle method.
Holding the needles parallel insert 3rd needle knit wise into the first st of each needle. There will be one st on the right needle.
Repeat , there will now be 2 sts on the needle.
Pass the right st over the left st and off of the needle.
Repeat these steps until all sts are bound (cast) off.
Making Up
With small amount of blue, sew an eye on the sheep’s face.
Turn sock inside out. Sew in all ends and trim off.
Sew a flat seam at the back of the sock.
Press gently with steam iron and damp cloth.
Ok. That was easy wasn’t it? Now make the other one!
Some suggestions. You could use a lighter green and add some flowers for a spring sheep.
You could add texture or chenille on the ‘fleece’.
You could use a darker blue and some white to make a snow scene sock.
You could make a brown or black sheep
You could add a hat, or a bell, or a bow to sheep.
You could knit the sheep so they face each other.
The ideas are endless……….
This pattern is Copyright © Joanne Hinmon 1998. All rights reserved. E-mail: [email protected]. Image Copyright Ilze ([email protected]) 2001
