
by Emily-Jane
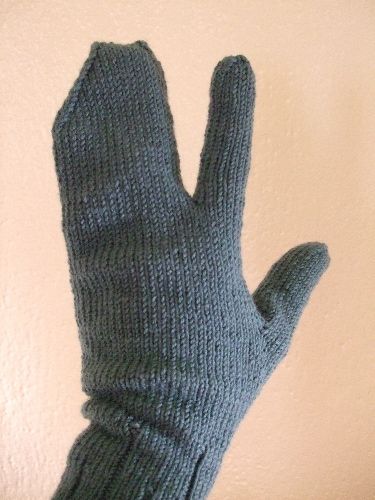
When I was a teenager, my mother knit a fabulous pair of gloves-crossed-with-mittens from a 1940s-era pattern book. The pattern was called “cigarette mittens” or maybe “smoking mittens.” My mother’s finished creation was extremely glamorous, of soft dark pink mohair with silver beads and fluffy white angora cuffs. The model in the pattern photograph looked like a movie star, with arched eyebrows, dark lipstick, and perfectly coiffed hair. She was posed in a dramatic style with one hand out to the side, a cigarette gracefully between her fingers and smoke drifting lazily upward. The mittens were not mittens, because they had a separate index finger knitted in. But they weren’t gloves either — the third, fourth, and fifth fingers were knitted together, like a mitten.
I later saw similar patterns in World War II knitting-for-the-armed-forces instructions, only this time they were called “shooting mittens,” and looked warm and utilitarian with simple ribbing at the cuffs and no decoration. They were intended for enlisted men to wear on the rifle range and on the battlefield.
Unfortunately, I don’t have access to either of these patterns now. So, the Soft Mit-Gloves below are my own version of this practical, but stylish garment. I learned to knit from my mother, and she encouraged me to draft my own patterns pretty much from the start. My second instructor in pattern drafting (after my mother) was Mary Thomas’s Knitting Book, which is a great book that every knitter should read! Ms. Thomas’ instructions for knitting gloves provided the basis for my pattern, though with different pattern details and adapted to my own hand size. If you want to knit mit-gloves in a different size than the pattern below, I recommend consulting Mary Thomas for guidance.
You’ll see that the measurements for the finished mit-gloves are slightly smaller than the measurements of the hands intended to wear them. Sloppy, loose mit-gloves are cumbersome and sometimes even ridiculous-looking, so I have designed this pattern to fit somewhat snugly. The cuff, in particular, is quite snug, to keep out nasty cold breezes. (Also, my experience has shown that most handmade mittens and gloves, even when densely knit, do tend to stretch out a bit as they age.) Make sure, however, not to knit your mit-gloves too tightly! Tight mit-gloves will constrict the wearer’s circulation and her poor hands will feel pinched and cold.
I hope you enjoy the pattern. Please be aware, though, that I wrote and edited it on my own, and it is the first time I have shared a pattern in this way. It has not been test-knit!
Instructions
The Soft Mit-Gloves are knit in the round in stockinette stitch. They begin with a Continental or long tail cast-on. The cuffs are knit first in k3, p1 rib, and then in k7, p1 rib, and then increases are made for the thumb gusset. The hand stitches are kept aside while you work the thumb, and then when the thumb is finished they are picked up again and knit up to the beginning of the index finger. The index finger is worked while the stitches for the other fingers are kept aside, and then finally the “mit” part of the garment is worked to the ends of the fingers, and finished with a Kitchener Stitch.
Size: To fit a large woman’s hand, approximately an 8.5 U.S. glove size.
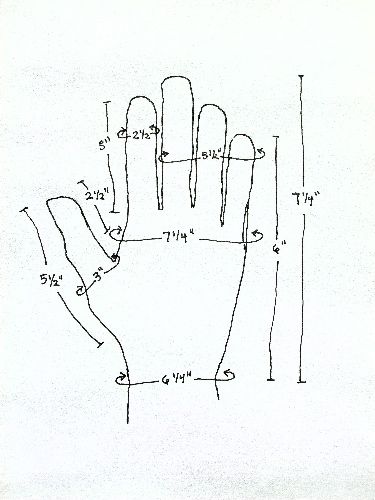
Measurements of person:
wrist circumference: 6.25″
knuckles circumference: 7.25″
length of thumb, outside: 5.5″
length of thumb, inside: 2.5″
circumference of thumb, at base: 3″
length of hand, wrist to end of little finger: 6″
length of hand, wrist to end of middle finger: 7.25″
circumference of index finger: 2.5″
circumference of other fingers: 5.5″
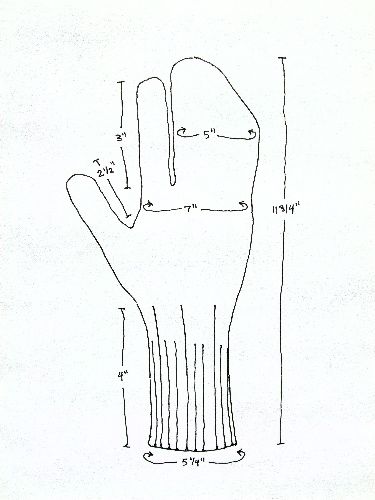
Measurements of mit-glove (all measurements taken flat, doubled where necessary):
wrist circumference: 5.25″
knuckles circumference: 7″
length of thumb, outside: 5.25″
length of thumb, inside: 2.5″
circumference of thumb, at base: 3″
length of mit-glove, cuff to end of middle finger: 11.75 ”
circumference of index finger: 2.25″
circumference of other fingers: 5″
Gauge: 4″ = 30 st / 42 rows in stockinette st., using U.S. size 1 (2.25 mm) needles
Yarn: Debbie Bliss Baby Cashmerino – Teal (203), or other fingering or sport weight yarn that you can knit to gauge. I like to make mit-gloves at a fairly tight gauge, as this helps keep the wind out!
Tools: Four or five each of U.S. sizes 000 (1.5 mm), 0 (2 mm), and 1 (2.25 mm) double-pointed needles, or corresponding sizes you need to get gauge; tapestry or yarn needle. Optional: stitch holders.
Abbreviations
k = knit
p = purl
R = round
st. = stitch
m1 = increase one stitch before next stitch on left-hand needle
k2tog = decrease one by knitting the next two stitches on the left-hand needle together (this makes a right-leaning decrease)
s1k1psso = decrease one by slipping the first stitch on the left hand needle to the right hand needle, knitting the next stitch as usual, and passing the slipped stitch over the knitted stitch (this makes a left-leaning decrease)
Instructions
CUFF:
Using size 1 needles, cast on 48 st using Continental or long tail method. Transfer st. to size 0 needles and, being careful not to twist the st., join to form a round. Place a marker at the beginning of the round.
Work in a k3, p1 ribbing until work is 2″ long.
Change to size 000 needles, work k3, p1 ribbing for another 1″ (work now is 3″ long).
Change to size 0 needles, work k7, p1 ribbing for 1″ (work is now 4″ long).
Change to size 1 needles, k to end of round.
THUMB GUSSET:
R1 – M1, k to end.
R2 – K.
R3 – K.
R4 – M1, k1, M1, k to end.
R5 – K.
R6 – K.
R7 – M1, k3, M1, k to end.
R8-22 – Repeat these last three rounds five more times, adding two k st. between increases in each successive increase round. You now have completed eight increase rounds, and you have 63 st.
R23 – K.
THUMB:
R1 – K17, cast on 11 using overhand loop method, place marker for the beginning of the round, and join these 28 st. into a round, leaving the other 46 st. aside (you can put them on a stitch holder while you knit the thumb, or transfer them to another set of needles).
R2 – K.
R3 – K.
R4 – K25, k2tog, k1. (27 st.)
R5 – K18, s1k1psso, k7. (26 st.)
R6 – K23, k2tog, k1. (25 st.)
R7 – K18, s1k1psso, k5. (24 st.)
R8 – K21, k2tog, k1. (23 st.)
R9 – K18, s1k1psso, k3. (22 st.)
R10-24 – K.
R25 – K4, k2tog, k3, k2tog, k4, k2tog, k3, k2tog. (18 st.)
R26 – K.
R27 – K3, k2tog, k2, k2tog, k3, k2tog, k2, k2tog. (14 st.)
R28 – K.
R29 – K2, k2tog, k1, k2tog, k2, k2tog, k1, k2tog. (10 st.)
Join these stitches together by drawing the thread through them all in a heart of blossom closure.
PALM & BACK OF HAND:
R1 – Pick up 15 st. from the st. you cast on to make thumb (the 11 cast-on st., plus 2 st. at each side of the cast on st.), then k. the 46 st. you left aside when you began the thumb, then place marker for the beginning of the round. (61 st.) NOTE: Make sure that your marker is in the right place; you’re about to do some decreases to shape the hand, and they should mirror the increases you made for the increases at the beginning of the thumb section. In the finished mit-glove, both the thumb increases and the matching palm decreases should lie in the valley between the thumb and the index finger, thus forming another gusset.
R2 – K.
R3 – K2, s1k1psso, k57. (60 st.)
R4 – K10, k2tog, k48. (59 st.)
R5 – K2, s1k1psso, k55. (58 st.)
R6 – K8, k2tog, k48. (57 st.)
R7 – K2, s1k1psso, k53. (56 st.)
R8 – K6, k2tog, k48. (55 st.)
R9 – K2, s1k1psso, k51. (54 st.)
R10 – K4, k2tog, k48. (53 st.)
R11 – K2, s1k1psso, k49. (52 st.)
Now move your beginning of round marker 2 st. to the left (for left-hand mit-glove), or 2 st. to the right (for right-hand mit-glove).
R12-24 – K (or k. until work reaches the join between index and middle finger).
INDEX FINGER:
R1 – Move the last 8 st. from the last round onto a new needle, then k8, cast on 3 st. using overhand loop method, place marker for the beginning of the round, and join these 19 st. into a round, leaving the other 36 st. aside (you can put them on a stitch holder while you knit the finger, or transfer them to another set of needles).
R2 – K.
R3 – K.
R4 – K15, s1k1psso, k2. (18 st.)
R5 – K17, k2tog (moving marker over to the left to accommodate your decrease). (17 st.)
R6-29 – K.
R30 – K3, k2tog, k2, k2tog, k2, k2tog, k2, k2tog. (13 st.)
R31 – K.
R32 – K2, k2tog, k1, k2tog, k1, k2tog, k1, k2tog. (9 st.)
Join these stitches together by drawing the thread through them all in a heart of blossom closure.
OTHER FINGERS:
R1 – Pick up 5 st. from the st. you cast on to make finger (the 3 cast-on st., plus 1 st. at each side of the cast on st.), then k. the 36 st. you left aside when you began the finger, then place marker for the beginning of the round. (41 st.)
R2 – K.
R3 – S1k1psso, k39. (40 st.)
R4 – K2, k2tog, k36. (39 st.)
R5 – S1k1psso, k37. (38 st.) Move beginning of round marker one st. to the left.
R6-20 – K.
R21 – K16, k2tog, k2, s1k1psso, k16. (36 st.)
R22 – K.
R23 – K15, k2tog, k2, s1k1psso, k15. (34 st.)
R24 – K.
R25 – K14, k2tog, k2, s1k1psso, k14. (32 st.)
R26 – K.
R27 – K13, k2tog, k2, s1k1psso, k13. (30 st.)
R28 – K.
R29 – K12, k2tog, k2, s1k1psso, k12. (28 st.)
R30 – K.
R31 – K11, k2tog, k2, s1k1psso, k11. (26 st.)
R32 – K23, k2tog, k1. (25 st.)
R33 – K1, s1k1psso, k8, k2tog, k2, s1k1psso, k10. (22 st.)
R34 – K21, k2tog, k1. (21 st.)
R35 – K1, s1k1psso, k6, k2tog, s1k1psso, k8. (18 st.)
Join with Kitchener Stitch.
FINISHING:
Weave in ends.
External Links
Find Mary Thomas’s Knitting Book in a library.
Take a look at Soft Mit Gloves on Ravelry.