
Note: This pattern uses old UK size needles and yarns. You will probably need to substitute modern yarns that knit to the correct gauge.
Sizes
(A) LADY’S
(B) GIRL’S
(C) CHILD’S and
(D) TODDLER’S MITTENS
Materials
(A) PATONS TOTEM Knitting Wool
(B) PATONS BLUEBELL Crepe
(C) PATONS BEEHIVE Fingering, 4-ply “Patonised” Shrink Resist Finish
(D) PATONS BEEHIVE Fingering, 3-ply “Patonised” Shrink Resist Finish
or yarns to fit gauge
Quantities:
A-2 ozs
B-2 ozs
C-1 oz
D-1 oz
A Small Quantity of Contrasting Colours for Embroidery.
Knitting Needles:
A -1 pair each Nos. 10 and 8
B -1 pair each Nos. ll and
9 C -1 pair NO. 12
D -1 pair No. l3
Measurements
A – To fit size 6-6 1/2hand
B – 8 to 10 years of age
C – 5 to 7 years of age
D – 1 1/2 years to 2 1/2 of age
Tension
It is absolutely necessary to work at a tension to produce
A – 6 stitches to the inch
B – 7 stitches to the inch
C – 8 1/2 stitches to the inch
D – 9 1/2 stitches to the inch
and
A – 18 rows to 2 inches.
B – 19 rows to 2 inches.
C – 22 rows to 2 inches.
D – 26 rows to 2 inches.
Check your tension before knitting
Pattern
The Right Mitt
** Using A-#10, B-#11, C-#12, D-#13 Needles cast on 40 stitches.
1st row: K2, *P1, k1, repeat from * to end of row.
Repeat 1st row nineteen times.
Proceed as follows (A using #8, B #9 Needles):
1st row: Knit.
2nd row: K 1, purl to last st, K1.
Repeat 1st and 2nd rows seven times for length desired **.
The Thumb
* 1st row: K27, turn, cast on 4 sts.
2nd row: K1, P10, turn, cast on 3 sts.
*** 3rd row: K14.
4th row: K1, P12, K1.
Repeat 3rd and 4th rows seven times (or length desired).
Next Row: (K2tog) seven times.
Break off wool, run end through remaining sts, draw up and fasten off securely.
Sew up Thumb seam.
With right side of work facing, join in wool and knit up 7 sts at base of Thumb and knit plain across remaining sts (thus working all 40 sts on to one needle).
1st row: K1, P38, K1.
2nd row: Knit plain.
Repeat 1st and 2nd rows ten times, then 1st row once (or length desired).
Proceed as follows:
1st row: (K2tog, K16, K2 tog)twice.
2nd and alternate rows: K1, purl to last st, K1.
3rd row: (K2tog, K14, K2tog) twice.
5th row: (K2tog, K12, K2tog) twice.
7th row: (K2tog, K10, K2tog) twice.
9th row: (K2tog, K8, K2tog) twice.
11th row: (K2tog, K6, K2tog) twice.
13th row: (K2tog, K4, K2tog) twice.
Divide remaining sts evenly on two needles. Break off wool and graft these sts.
The Left Mitt
Work as given from ** to **for Right Mitt.
Proceed as follows:
The Thumb
1st row: K20, turn, cast on 3 sts.
2nd row: K1, P9, turn, cast on 4 sts. ***
Work as given from *** to *** for Right Mitt.
Note: Work centre decreasings at finger shaping (slip 1, K1, psso) twice instead of (K2tog) twice as given in Right Mitt.
To Make Up Mitts
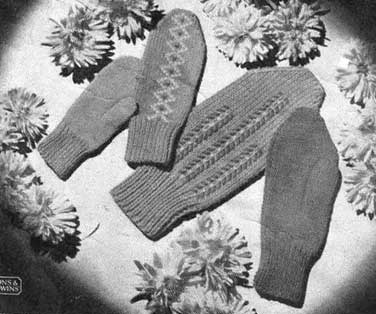
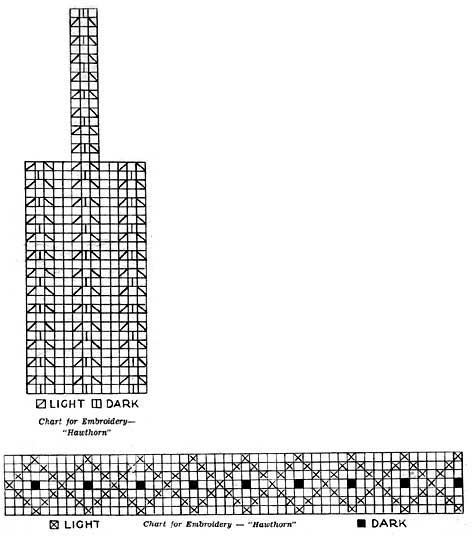
With a slightly damp cloth and warm iron, press lightly. Using contrasting colours, embroider as desired, using one of illustrated charts below. Sew up side seams.
The original version of this pattern is in the public domain, however, this updated digital version is copyrighted Sarah Bradberry 2006.