
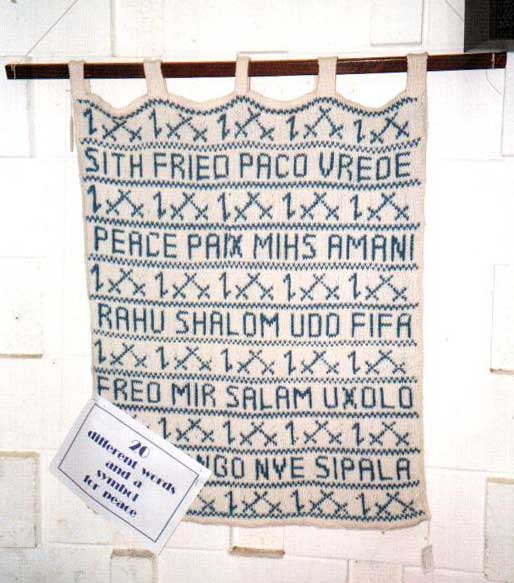
This photo shows what the centre of the Peace Blanket will look like.
This is knitted in the round with a steek which is then cut and the stitches picked up right around for the border.
I made mine in blue and white – the colours for peace – but it could be made from left overs! The symbol used between the words is the Blissymbol for “peace”. It is made up of the symbol for “opposite” (half arrows going
in different directions) and the symbol for “war” (crossed swords) i.e. meaning “peace – the opposite of war”. The symbol is repeated right across the line between each row of words.
(Blissymbols are an international written language designed by Charles Bliss, an Austrian Jew who spent some time in the Dachau and Buchenwald concentration camps before escaping and going to the Hongkew sector of Shanghai where he became fascinated by the apparent “universality” of the characters used to write Chinese languages. His symbols are now used around the world, especially among the community of people who need an alternative means of communication because they are unable to speak.)
There are also words for peace in 28 different languages or language groups
Each letter is 9 units high. There are two stitches between each letter and five stitches between each word. An additional 8 words are charted out for a larger blanket.
READ THE CHARTS FROM THE BOTTOM UP WHEN KNITTING.
Languages from the top down on the charts:
Line 1
(a) Danish, Norwegian, Swedish
(b) Russian, Bulgarian, Byelorussian, Serbo-Croat, Slovene
(c) Arabic
(d) Xhosa
Line 2
(a) Galician, Spanish
(b) Maori
(c) Ntomba
(d) Hawaiian
Line 3
(a) Estonian
(b) Hebrew
(c) Igbo
(d) Fon
Line 4
(a) English
(b) French
(c) Kusaiean (Micronesia)
(d) Swahili
Line 5
(a) Gaelic
(b) German
(c) Esperanto
(d) Afrikaans/Dutch
Line 6
(a) Persian
(b) Gikuyu
(c) Japanese
(d) Italian
Line 7
(a) Basque
(b) Scots Gaelic
(c) Pashto
(d) Turkish
Line 8
(a) Kurdish
(b) Mapandungan
(c) Latvian
(d) Navajo
Line 9
(a) Bengali, Gujarati, Hindi, Telugu
(b) Wintu
(c) Egyptian
(d) Tibetan
Personalise it by substituting your own language. You can change/substitute the order of the rows of words if you so wish.
Materials
Any yarn which knits to a tension of 20sts to 4″ or 10 cms (approx) will give you a blanket of approximately 32 ins or 81 cms by 42 ins or 107 cms. This is a nice size for a cot or a lap!
You will need approximately 1000 metres (1200 yards) for the background (white) and 400 metres (480 yards) for the words and symbols (blue).
You can make it bigger by adding another word and symbol on each row and another row of words and symbols but remember you will need MORE yarn! (You will then need approximately 1300 metres (1500 yards) of the background and 450 metres (520 yards) of the contrast.)
There is an additional chart if you want to do this (chart 10)
One 80cm 5mm circular needle for the main part
One 100cm 5mm circular for the border is easier – or even longer if you can find one!
(Note from Sarah: I get this gauge with 4.5mm needles)
Gauge: 20sts 10cm
SET UP AS FOLLOWS: Cast on 148 stitches using main colour, being careful not to twist them join into a round.
Knit two rounds plain and place a marker between the 4th and 5th stitches and the 144th and 145th stitches. The eight stitches in between will be your steek. Work your steek in alternating sts of blue and white to anchor your yarn.
Charts do not show the stitches used for the steek.
Now begin the main part of the blanket.
Work chart 1
Work chart 2
Work chart 1
Work chart 3
Work chart 1
Work chart 4
Work chart 1
Work chart 5
Work chart 1
Work chart 6
Work chart 1
Work chart 7
Work chart 1
Work chart 8
Work chart 1
Work chart 9
Work chart 1
If you would like to make your blanket larger, work chart 10, the another repeat of chart 1
Knit one round in main colour.
Now do the BORDER.
Machine the steek and cut it. Trim it back to two stitches on either side. Knit 1 stitch. Place a marker for the corner. Knit across the top in main colour, place marker and knit one stitch (corner stitch), place marker. Pick up an uneven number of stitches along one side then place a marker for the corner. Knit 1 stitch (corner stitch) place marker. Pick up 141 stitches along bottom from the invisible cast on (increase 1 stitch in centre). Place marker Knit 1 stitch (corner stitch) place marker. Then pick up an uneven number of stitches along the other side. Place marker and continue in the round.
First and second rounds knit white, increasing either side of corner stitches
Third round: Knit the corner stitches in your main colour (white) and then increase 1 blue on either side. Knit 1 white, 1 blue on each round between markers.
Fourth round: Increase either side of corner stitches with blue and then knit 1 white 1 blue.
Fifth and sixth rounds as first and second border rounds.
(Pattern is the same as rows one to six of the body of the blanket)
Repeat rounds 3 – 6 (10 rounds in all)
Purl one row with no shaping for fold line.
Knit another 10 rounds making corresponding decreases at corners. (This will give you a firm hemmed border.) Bind/cast off, block and hem the border, sew in ends and line if desired.


Copyright Kathryn Gunn 2001. E-mail: [email protected] (please ask Kathryn if you have questions about working steeks).