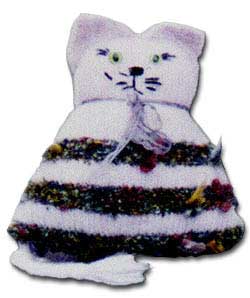
This toy cat can be made with any yarn on needles 1mm, (2 sizes) smaller than those usually used for your yarn.
This pattern is also simple enough to be frame or machine knit without altering the pattern.
As you can possibly see, this cat has been well played with and needs his whiskers mended…
Materials
Yarn of your choice in two contrasting colours. The amount depends on your chosen yarn thickness but a general guide is that you will need 50gm of any yarn thinner than bulky and 100gm of yarn if you use bulky.
Needles 2 sizes (approx 1mm) smaller than those you would normally use for your choice of yarn.
2 safety “cat” eyes in an appropriate size. I used 9mm eyes and bulky (Australian 12 ply) yarn.
Toy filling.
Back
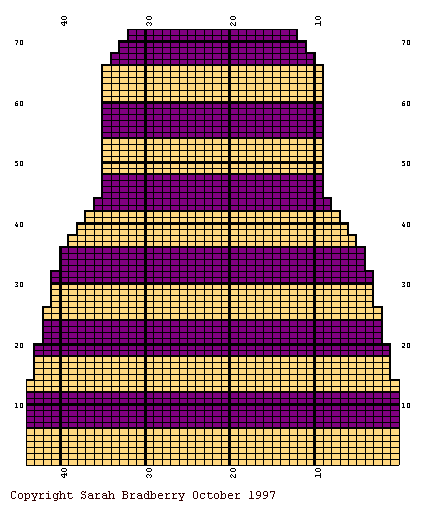
Work the back in st st following the written directions, or the charts below.

Front
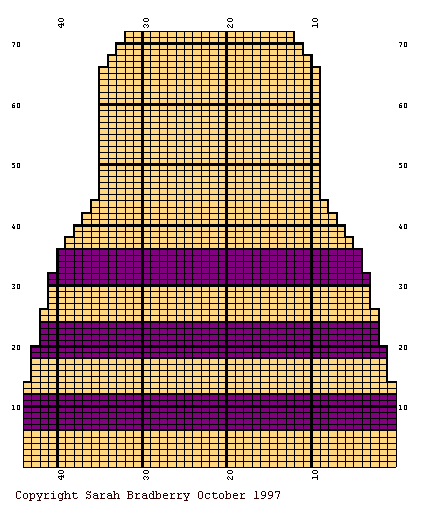
Work the front in st st following the chart below.

Back (in words):
Cast on 44sts.
Knitting stripes of 6 rows each, work as follows:
Work 14 rows st st.
Decrease 1 st at each end of the next row, then every 5th row, 3 times.
Work 3 rows st st
Decrease 1 st at each end of the next row. *
Decrease 1 st at each end of every alternate row, 5 times.
Work 21 rows st st
Shape top of head: Decrease 1 st at each end of the next row, then every following alternate row twice.
Work 1 row, cast off.
Front (in words):
Make as for back but stop knitting stripes at the * and continue in a single colour.
Ears: Make 2
Cast on 16sts and, working in garter st, dec 1 st at each end of every alternate row until 2 sts remain. Knit 2 together, fasten off.
Tail:
Measure the width of your front piece at the cast on edge. This is the length of your tail.
You can either make the tail by taking 24 strands of yarn and making a simple plait or by casting on 4sts and working i-cord for the appropriate length.
Finishing
Sew in all loose ends.
Take the front piece of your cat and fasten on the eyes.
Using a neat st join the front and back, leaving a hole at the base big enough for turning and stuffing. Turn right side out and stuff, sew hole closed.
Sew ears to top of head along the seam line.
Sew tail to the middle of the cat at the back, near the bottom
Embroider face following the sketch above.
Finish off with a bow around the neck if you wish.
Variations:
I made the prototype cat with lilac mohair and a fancy bouclé yarn with large tufts of coloured fleece for the stripes.
Make your cat with 2 plain coloured, non-textured yarns and embroider flowers or patterns on the stripes.
Make several with baby yarn and string them together as a pram mobile.
Sew decorative ribbons or strips of fabric across the stripes before sewing the body pieces together.
This pattern and all images on this page are Copyright © Sarah Bradberry October 1997. All rights reserved.
