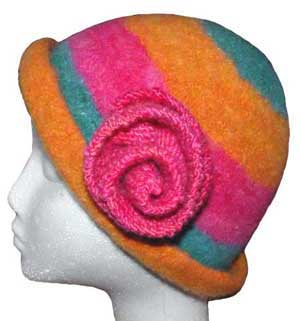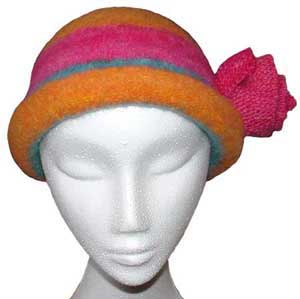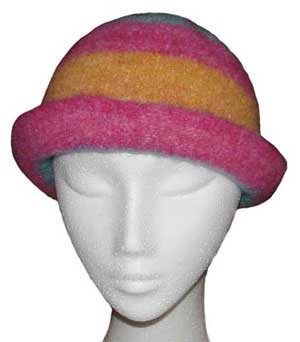

This hat is knit on large needles, then shrunk in the washing machine for a felted look.
I liked the Sweet 16 Hat so much that I decided to give it a whole new look. A rounded top and big vintage style rose give it a soft, feminine styling.
Size
Since this hat is shrunk after knitting, the same instructions can be used to make a hat to fit 45.5cm to 55cm head circumference.
Materials
Yarn:
The sample hats were made with self striping, handspun, merino wool single. 8 ply equivalent.
Commercial substitutes include 3 x 50gm balls of Holiday brand 8 ply, 100% wool at 95m per 50gm ball, an equal amount of Jo Sharp dk Classic Wool, or Wendy Dennis handpainted 8 ply.
You can use any 8 ply wool that will felt, but if you want to use a bleached white or extremely dark colour test a swatch first, even if you know that your brand of wool will felt. Bleaching and very dark dyes can affect some wool’s ability to felt. I have tested both color “natural” and “black” in Jo Sharp’s dk Classic Wool and they both felted beautifully.
Needles:
Size 5mm 40-60cm long circular needle and a set of 5mm double pointed needles.
For the flower you will also need a pair of 4mm needles.
You will also need:
- a couple of tablespoons of laundry detergent
- access to a washing machine (preferably top loading)
- something to block your hat on that is the same circumference as you want your finished hat to be.
You don’t need to invest in an expensive hat block. You can use many different things, a pudding bowl, a ball, anything that is the right size, fairly firm, and can be left damp.
I blocked my hat on the polystyrene wig stand shown in the photographs at the top of this pattern.
Tension
19.5sts to 10cm on 5mm needles
Abbreviations
m1 = make one stitch by putting your needle under the bar that lies between stitches, twist it (to avoid making a hole), and knit it.
K2tog = knit 2 together
Pattern
Using the circular needle, cast on 152 stitches. Join for knitting in the round and knit 1 round.
2nd round: (K19, m1) 8 times (160sts)
K 4 rounds
7th round: (K8, k2tog) 16 times (144sts)
K 4 rounds
12th round: (K7, k2tog) 16 times (128sts)
Knit 44 rounds
Shape the top as follows:
Knit 2 rounds
(K14, k2tog) eight times (120sts)
Knit 2 rounds
(K18, k2tog) six times (114sts)
Knit 1 round
(K17, k2tog) six times (108sts)
Knit 1 round
(K16, k2tog) six times (102sts)
Knit 1 round
(K15, k2tog) six times (96sts)
Knit 1 round
(K14, k2tog) six times (90sts)
Knit 1 round
(K13, k2tog) six times (84sts)
Knit 1 round
(K12, k2tog) six times (78sts)
Knit 1 round
(K11, k2tog) six times (72sts)
Knit 1 round
(K10, k2tog) six times (66sts)
(K9, k2tog) six times (60sts)
(K8, k2tog) six times (54sts)
(K7, k2tog) six times (48sts)
(K6, k2tog) six times (42sts)
(K5, k2tog) six times (36sts)
(K4, k2tog) six times (30sts)
(K3, k2tog) six times (24sts)
(K2, k2tog) six times (18sts)
(K1, k2tog) six times (12sts)
K2tog six times. (6sts)
Cut your yarn, thread it through the remaining stitches and pull tight.
You’ll now have a giant, floppy, vaguely hat shaped object. Don’t panic! That’s the way it’s supposed to look.
Finishing and Felting

Darn in your loose ends on the wrong side by loosely threading them under the back of every second st for 5 or 6 stitches.
Felting Your Hat
There are three things that you need for successful felting of knitted items. Heat, agitation and an alkaline environment. That might sound very complicated, but it isn’t really! What it means is this: hot water, a washing machine with a low water setting or an old pair of jeans (or other non-fluffy item that won’t bleed dye in the wash), and laundry soap or detergent (the kind without fancy softeners). If you’ve used a single ply or fluffy yarn you’ll also need an old pillowcase or lingerie bag to stop loose fuzz getting into the workings of your washing machine.
Take your hat and put it inside the pillow case or lingerie bag (if needed).
Fill your washing machine with just enough hot water to cover your hat. If you can’t change the level of water in your washing machine, add an old pair of jeans for extra agitation.
Put your hat in and let it soak for 10 – 30 minutes. This will give time for all the fibres to soak up plenty of water. Now start the machine. Stop the machine and check your hat after 10 minutes. If it hasn’t shrunk enough, keep checking every 5 – 10 minutes until it’s the desired size (measure it or try it on!).
Rinse out the soap in water the same temperature as your wash water, or if it’s still a little bit too big, rinse it under cold water. The shock of the change in temperature will shrink it a bit more.
Empty your washing machine, spin the excess water out of your hat (don’t leave it spinning for too long or you’ll make creases that you won’t be able to get out).
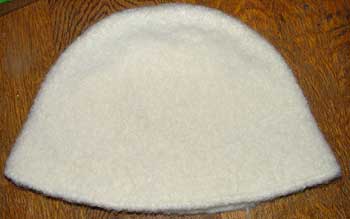
You’ll now have something that looks like this


Blocking
While it’s still wet, pull your bell-shaped piece of knitting down over your block until the top of the hat is stretched out smooth. Turn up the brim and adjust it until it’s even all the way round.
Leave your hat on the block to dry.
When you block your hat quite a magical transformation takes place. The felting process shrinks all the stitches in size, and blocking pushes them back into the shape that you knit.
The Flower:
Using 4mm needles cast on 11sts and knit every row for 42cm. Cast off.
Using a spare piece of yarn, gather one of the long edges and roll the strip of knitting up along the gathered edge, stitching together as you go. Sew to hat.
Copyright Sarah Bradberry. All rights reserved.
