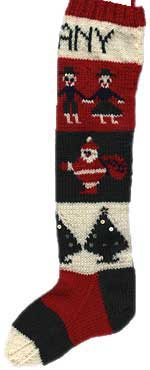
Also known as a personalized Christmas stocking for my American visitors 😉
Pattern
Size
20 inches (51cm) from top of stocking to heel.
8½ inches (21½cm) from toe to heel.
Materials
4oz knitting worsted in each of red, white, and green. Small amount of blue.
3.75mm straight needles (or needles to obtain gauge)
1 set of 3.75mm needles
15 – 18 small round sequins, 3 star shaped sequins (if desired).
Sample was knit with dk yarn and 4mm needles.
Gauge
22sts and 30 rows to 10cm worked over st st
Notes:
When changing from one colour to another twist the yarns around each other once on wrong side to prevent making a hole. Be careful not to draw yarn up too tightly when carrying yarn across several stitches. Wind yarn onto bobbins to keep yarn from tangling. (Note: Additional notes by Marilyn Muller are in italics)
Pattern
Starting at the top cuff and using red yarn, cast on 64sts and work K2, P2 ribbing for 8 rows. Use 60sts if the recipients name is short & do not decrease until after working chart of children.
Change to white yarn.
Date and Name: Chart a
Work 4 rows st st in white.
Make up the name (and date, if desired) from the alphabet charts below and centre them in the 64sts. Make sure you work with your chart upside down! If name has a Y with a T or an L before it (eg: Sally) do not leave 1 blank st between the letters or the Y will look like it’s standing off by itself.
Start knitting from your name chart working the letters and numbers in green, and the background in white. Continue working in straight stocking stitch until you have completed the chart, break off green. Work 4 rows in white, decreasing 1 st at each end of last row. Break off white and attach red.
Alphabet and number chart a:
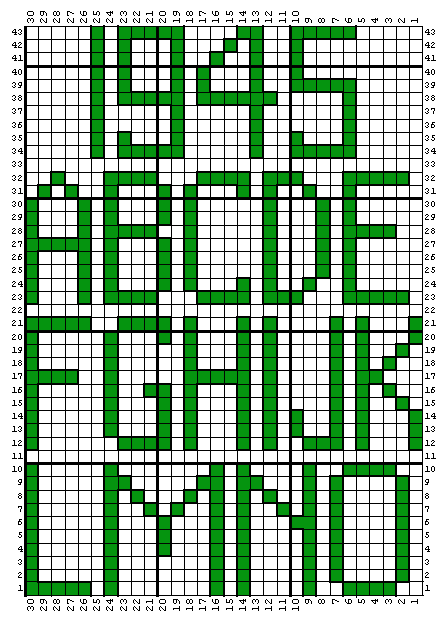
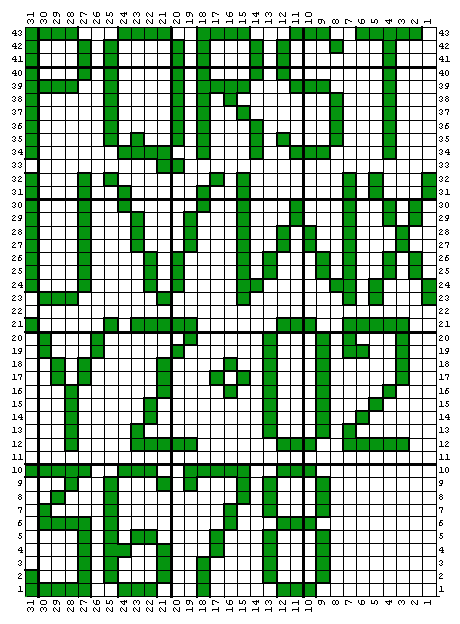
Children: Chart b
With red, work 4 rows st st, decreasing 1 st at each end of the last row (60sts)
Next row: Knit row 1 of the chart as follows: K9 red, *K3 green for top of hat, K10 red, rep from * to last 9 sts, K9 red.
Work following chart, beginning on row 2. After figures are completed, work 4 rows st st in red, decreasing 1 st at each end of the 1st row. Break off red and attach green.
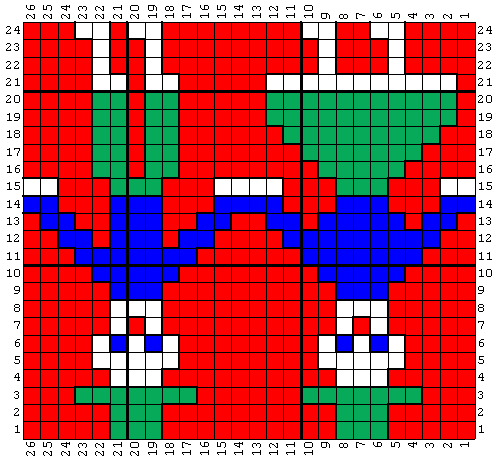
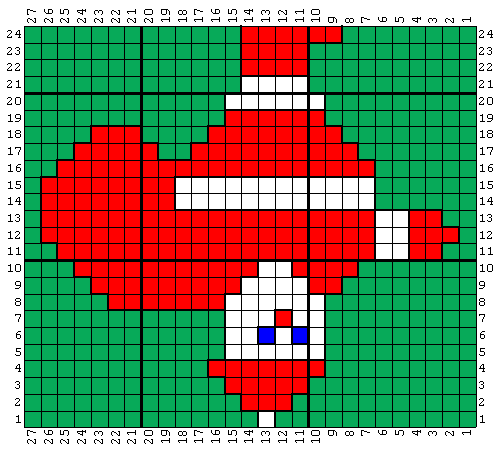
Santa: Chart c
With green, work 4 rows st st, decreasing 1 st at each end of the last row (56sts)
Next row: Knit row 1 of the chart as follows: K13 green, attach white and knit 1 for pompom on top of hat, k26 green,
k1 white, k15 green. Work following chart, beginning on row 2. After Santas are completed, work 4 rows st st in green, decreasing 1 st at each end of the 1st row. Break off green and attach white.
Christmas Trees: Chart d
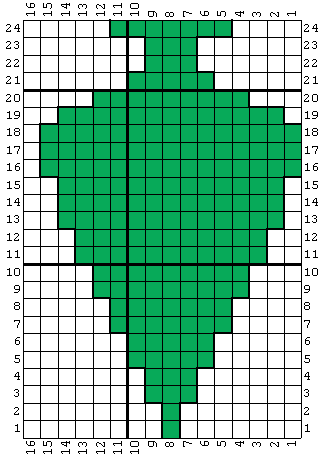
With white, work 4 rows st st, decreasing 1 st at each end of the 1st row (52sts)
Next row: Knit row 1 of the chart as follows: K9 white, *K1 green, K15 white, repeat from * once more, K1 green, K10
white. Work following chart, beginning on row 2. After trees are completed, work 4 rows st st in white, decreasing 1 st at each end of the 1st row. (50sts remain) Break off white, leaving a long tail of yarn. Block and sew 5 sequins to each tree.
Begin heel
With double pointed needles work as follows (this makes much more sense while you’re actually doing it, than it does when you’re just reading it!): Using the white tail knit first 12 sts onto one needle for half of the heel. Break off white. Slip next 13sts onto the 2nd needle for one instep needle. Slip next 13sts onto third needle for 2nd instep needle. Slip the last 12sts onto a fourth needle for the 2nd half of the heel. Now, slip the last 12sts onto the 1st needle (24sts are now on the heel needle). With WS facing, attach green and work 22 rows of st st over the heel needles only, remembering to slip the 1st st of every row.
Turn heel
Next row: Slip 1, P15, P2tog, turn
Slip 1, K8, K2tog, turn
Slip 1, P9, P2tog, turn
Continue in this manner, always working 1 more st on each row before decreasing, until all sts are worked (16sts remain).
Break off green and attach red.
Gusset
Knit the first 8 sts of the heel needle, slip these 8sts onto a spare needle and knit the remaining 8 heel sts. Pick up and knit 12sts along the left side of the heel. With the 2nd needle knit across the 26 instep sts. With the 3rd needle pick up and knit 12sts along the other side of the heel and knit the last 8sts onto this needle. You now have stitches
on the needles as follows:
1st heel needle: 20sts
Instep needle: 26sts
2nd heel needle: 20sts
Now, slip the first 2 sts of the instep needle onto the first heel needle and slip the last 2 sts from the instep needle to the 2nd heel needle. You will now have 22sts on each needle.
Work around on all 3 needles in red, shaping as follows:
1st round: Knit to within 3sts of the end of the 1st needle, K2tog, K1. Knit across 2nd needle, then K1, SSK, knit to end of round.
2nd round: As 1st round
3rd round: knit
Repeat these 3 rounds until 11sts remain on each of the two heel needles.
Foot
Continue knitting in st st without shaping until the red section of the foot (from the beginning of the gusset) measures 2½ inches. Break off red and attach green, then work for a further 2 inches straight.
Shape toes
Break off green and attach white and shape toe as follows:
1st round: Knit to end
2nd round: Knit to within 3sts from the end of the 1st needle, K2tog, K1. On 2nd needle. K1, SSK, Knit to within 3sts of the end of the needle, K2tog, k1. On 3rd needle K1, SSK, knit to end. Repeat these 2 rounds until 12sts remain. Bind off, fold, and sew, keeping decreases at the sides of the toe.
Making Up
Weave in all loose ends of yarn on the wrong side of the stocking. Fasten the carried threads down so they won’t snag. Sew back seam with matching colours. Attach a double strand of red at the top of the seam and use it to crochet a loop of 25 chains. Fasten down the end of the loop and darn in the end of the thread. Alternatively you can crochet the two sides together with red up the back seam & make a loop for hanging.
This pattern is in the public domain. Digital version of this pattern and image are Copyright © Sarah Bradberry January 2000. All rights reserved.
