
I wanted to decorate this little box to match my upholstered sewing box and since it’s shape dictated that it could not be upholstered I decided to go for a textured paint finish and just keep the main colour the same. I think it turned out well! Here’s how I did it.
Materials
- Your choice of box. Mine is a 6 inch square craft wood pedestal-style box.
- Acrylic sealing medium
- Acrylic paint , I used the following colours of Jo Sonja Artist’s Gouache:
- Titanium White, Antique white, sealer (pure acrylic medium), mixed 1:1:2
- Black
- Colony Blue
- Texture paste
- Gloss varnish
- PVA Glue
- Manilla card, large enough to fit in the bottom of your box
- Piece of fine weave fabric, big enough to cover the card
- Paint brush
- Natural sponge or sponge brush
- Palette knife
- Masking tape
- Scissors
- Palette or saucer suitable for mixing paint
Method
Remove any dust that may be adhering to your box. I found there was a lot on mine and I had to do it several times to get rid of it all.
Give your box a coat of sealer and leave it to dry thoroughly.
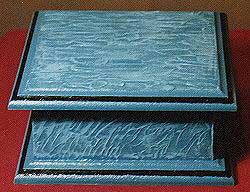
Using your palette knife apply the texture paste to the sides and top of your box. If your box has an overhanging lid, such as a hat box, make sure to mark where the lid comes to on the sides of your box and DO NOT put texture paste above this line. Leave to dry thoroughly.
Give the outside of your box a coat of your chosen colour, mine is Colony Blue painted straight from the tube. I also painted the top edge of the box and the overhanging edge of the lid Colony Blue. Let dry thoroughly.
Next mix your chosen colour with white until you have a shade that you like. Use this to paint the inside of the box and lid, making sure to reserve some of this colour for the sponging.
Load your sea sponge or sponge brush with a little of the lighter colour paint and wipe most of it off onto a piece of scrap paper. Rub the sponge gently and evenly over the textured surface of your box, you want to put paint mostly on the raised ridges of the texture. Don’t worry if you accidentally put too much colour on as you can rub it back with a piece of scrap fabric to the desired effect, or wash it off with water and start again. Let dry.
Next we will put the stripes on the edges of the box. Using your masking tape mark the lines around the edges of the lid and base of your box. The width of these lines will depend on the size of your box, as a general rule, the larger the box the thicker the line, or the more lines you can paint one above the other. My lines are approx 6mm (1/5 inch) in width.
Paint carefully between the tape and remove the masking tape before the paint dries. Leave to dry. If you are decorating something such as a hat box you can glue on a fabric trim instead if you wish.
Give the whole box a coat or two of gloss varnish following the manufacturer’s instructions.
Next cut the piece of card to fit inside the base of your box with 3mm (1 /10th inch) to spare around each edge. Cut your fabric to fit over the card with a couple of inches overhang on each edge. Paint the card with PVA glue on one side and stick down the fabric, don’t worry if the glue shows through. Fold over the edges and stick into the bottom of the box using PVA glue. Give the fabric covered card a coat of PVA glue and let dry.
Copyright © Sarah Bradberry 1997