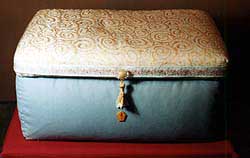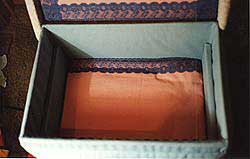

This sewing box was the very first box I ever upholstered several years ago after seeing a demonstration at Australia’s Stitches and Crafts Show at Caulfield Racecourse. I suggest starting with a hat box, or a simple cube.
Materials
- One wooden, papier maché, or sturdy cardboard box.
- PVA glue
- Non stretch fabric, (amount will depend on the size of your box)
- Sewing thread to match your fabric
- Polyester batting, optional. (Thickness will depend on your preference)
- Manilla cardboard, large enough to cover the base and inner lid.
- Various braid, beads, sequins etc for decoration.
- Tailor’s chalk
- For a sewing box such as the one shown above you will also need acrylic paint for the tray insert.
Method
There are many ways of upholstering boxes, depending on their shape and your personal preference. I’ll outline one basic way of upholstering a padded box and list some variations at the end of each section. If you don’t want to pad your box, skip the sections that explain how to add the padding and go straight to the instructions for covering the box with fabric.
Sealing
First you will need to seal the entire surface of your box, inside and out, with watered down PVA glue. A solution of 1:1 is good. Set it aside to dry for at least a couple of hours. Check to see if it needs a second coat. When you seal the box surface in this manner it means that you can use less glue to stick on the wadding as it won’t soak into the surface, preventing hard spots that can spoil the finish.
Padding: (square and cylindrical boxes)
Next we’ll be attaching the padding to the outside of the box. Whether or not you decide to pad your box is up to you. If you have a box with a very loose lid (about 1/2 inch of overhang on each side), or a lid that sits on top of your box without coming down the sides at all, you can put your padding all the way to the top of the box. If not, put the lid on and mark a line around your box approximately 1/2 inch below the lid. This is where your padding will have to end in order for the lid to fit when finished. Cut a single piece of wadding to fit around the sides of your box and, starting at one corner, glue it to the box on all sides (not the bottom) using a very small amount of watered down glue. It is very important that the glue does not come through the wadding or you will have hard spots on your box. Set it aside to dry thoroughly.
When it’s dry take a needle and thread and neatly tack the wadding together along the side where the edges of the wadding meet (the edge you started gluing at).
Pad the entire outside of the lid in a similar manner, making sure that you pad the sides if your lid has an overhang like the one in the picture above.
Now Comes the Fabric!
For a square box:

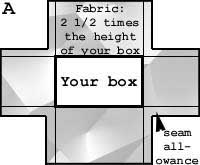
Place the base of your box in the centre of your fabric and fold the fabric up the side of the box. Using tailor’s chalk (or something similar), mark the excess of fabric at each corner and cut it out, leaving approximately 1/2 inch seam allowance. (See Diagram A).
If you want your box lined with the same fabric as the outside (as I did in my sewing box), cut the fabric 2 1/2 times the height of your box at each side (as shown in the diagram at right). If you want to line your box with a different fabric then you only need to leave a few inches (2 – 4 1/2 inches, depending on the size of your box and the thickness of your padding) to fold over the top.
Snip into the inner corners of the seam allowances. Working on one side at a time, pull the fabric up the sides of your box, folding the seam allowances under as you go and pin into place. Check that you aren’t pulling the fabric too tight if you have a snug fitting lid as you won’t be able to get it on afterwards. Pin all sides and adjust the fit until you’re
satisfied that the fabric isn’t puckered anywhere. Sew into place using an invisible stitch. (A small ladder stitch is good for this).
If you’re lining the box with the same fabric, fold the excess over the top and to the inside. Fold under the seams and, using a mixture of 1:1 PVA and water glue the fabric down the sides of the box, using a pin or knitting needle to ease the fabric neatly into the corners.
Trim the excess fabric at the inside base of the box so that it can be glued flat without being a double thickness anywhere. It doesn’t matter what it looks like as it will be completely covered later on. If you’re upholstering a sewing box, cover the blocks that hold the tray up and glue them in place.
Cover your lid in the same manner, bringing the fabric all the way down the inner walls of the lid and partially across the base Remember to check that the lid fits on your box before you sew and glue everything into place.
For a cylindrical box:
Cylindrical boxes are covered in a similar manner, except that you cover the base separately.
Measure the circumference of your box and cut a rectangle of fabric 1 inch longer than the circumference, and 6 inches longer than the height of your box. This does not have to be precise as we will fit the fabric to the box as we go along.
Wrap the rectangle of fabric around your box so that you have 3 inches of fabric protruding on the top and bottom (this will be folded over and hidden later). Fold under the seam allowance that runs from the top of the box to the bottom, and pin in place. Adjust the fit of the fabric and sew in place with an invisible ladder stitch when you’re happy with the fit.
Snip triangles out of the excess fabric at the top and bottom of the box so that the fabric will lie flat when it is folded over. Beginning with the base, fold the excess fabric over and glue down, making sure that it lies flat. Do the same for the excess fabric at the top of the box.
To cover the base of the box, cut a circle of manilla cardboard (or something similar) slightly smaller than the base of your box. Cut a circle of fabric 2 inches larger that the cardboard all the way round and stick the cardboard circle to the wrong side of the fabric with a small amount of 1:1 PVA glue and water. Snip the excess fabric and fold over as you did when you covered the edges of the box. Glue the fabric covered circle to the base of the box.
To cover the lid, glue a circle of wadding to the top, then pad the sides as you did with the box. With a needle and thread, sew the top wadding to the sides, this will give you a neat finish when you apply the fabric.
Next we’ll cover the lid with fabric.
First, cut a circle of fabric about 2 inches larger than the top of your lid all the way round. This doesn’t have to be perfectly accurate as you can trim any excess when you attach the fabric around the sides of your lid. Pin this piece lightly to the top of your lid (if you haven’t padded your box you can stick it down with a 1:1 solution of PVA glue and water), bring the excess down the sides and pin in place. Snip triangles out of the excess anywhere that it puckers. Don’t worry if the edges of your lid look messy at this point as you’ll be covering them in a minute. (If you haven’t padded your lid you can stick the excess fabric down and cover with a wide braid or ribbon, making sure that it covers the edges of your lid completely. Cover the join with a large ribbon rose, or other decoration).
Next, cut a strip of fabric to go around the edge of your lid. This should be approximately 3 inches wider than the height of your lid, and one inch longer than the circumference. Fold over 1/2 inch seam allowance on one long edge and iron in place.
Next, wrap this piece around the circumference of your lid with the folded seam allowance at the top of the lid, fold under the short ends and sew together using an invisible stitch.
Sew the circle of fabric that you pinned to the top of the lid, to the fabric around the circumference of the lid with a neat invisible stitch. Pull the fabric tight as you go, making sure that it doesn’t pucker.
Next, turn your lid upside down. Clip the excess fabric, fold it over the edge of the lid and stick in place.
Covering the inside of your box:
The next step is to cover the inside edges of your box and lid. You might decide to paint the inside of your box and cover the raw edges of the fabric with a decorative ribbon or braid, or you might like to cover it with fabric as follows:
Cut a strip of very lightweight fabric the height of your box’s inner walls and 2 1/2 times the circumference. Sew the short ends together. Gather at the top and the bottom until it fits the walls of your box neatly. Apply full strength PVA glue to the top and bottom of your fabric and glue to the inside walls of your box. Cover the top of the gathered fabric by gluing on some braid.
To cover the inner base of your box cut a circle of manilla cardboard slightly smaller and glue wadding to one side (you can leave out the wadding if you don’t want a padded base). Cut a circle of fabric slightly larger and fold over the edges to the wrong side of the cardboard, clipping and gluing the excess down as you go. Glue into the base of your box.

If you didn’t pad the base of your box you can cover the lower edge of the inside walls with braid or ribbon to hide the gathered fabric.
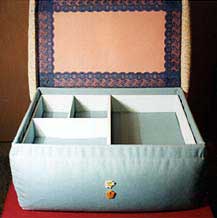
If you’re covering a sewing box paint the tray insert, then cut cardboard to fit the base of each section of the tray and cover in fabric as for the base of the box, omitting any padding. Glue into the base of each section as shown in the image on the right.
Covering the inside of your lid and finishing off!
To cover the inside of your lid cover the inside exactly as you did for the inner base, omitting any padding. Cover the inner edges of a round lid with ribbon or braid to hide any raw fabric edges.
Now add braid, cord, ribbon roses, or any decoration of your choice to the outside of your box and you’re finished!
Copyright © Sarah Bradberry August 1999
