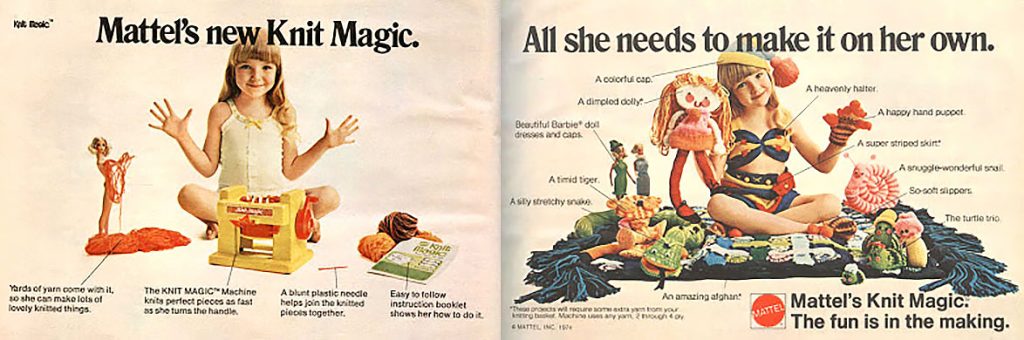
Menu Close

Making Granny Circles

The finished granny circle

Meet the Granny Circle

This lovely knitted shape is what your knitting machine makes. It can either be finished off like a puffy knitted drink coaster, or in the shape of a tube.

First set your machine up on a flat surface at a comfortable height
with the handle to your right. Left handers will need to reverse all
directions, but try your first circle following these instructions
directly until you’re familiar with what the machine does, then you
can easily turn it around and reverse everything.

diagram 1

First

Take the end of your yarn and drop it through the hollow middle of
the machine until the end touches the table.

diagram 2

Second

Position the coloured starting needle just to
the left of the yarn guide by turning the handle. Feed the yarn under
the hook at the front of the coloured needle.

diagram 3

Third

Turn the handle slowly and feed the yarn behind
the next needle to the left as it pops up, in front of the needle
after that and so on, turning the handle away from you (clockwise).
Continue weaving the thread in front of one needle (under the hook)
and then behind the next until you finish behind the last needle before
the coloured start needle.

diagram 4

Fourth

Stop with the coloured start needle in the same position you started
(to the left of the yarn guide), and your thread behind the last needle.

diagram 5

Fifth

Lift up the zigzag tension arm, feed the yarn through the yarn guide
and slide into the top of the tension arm.

diagram 6a

Sixth

Pull yarn to your left and slide into the second slot, behind the
second zig zag. Then pull to the right, through the third slot and
over the third zig zag, left again, into the fourth slot behind the
fourth zig zag.

diagram 6b

You should finish with yarn coming from behind the last needle, through
the yarn guide, woven in and out of the tension arm, and held in place
by nipples on the second and last zig zag. Now the tension arm should
sit up by itself.

diagram 7

Seventh

Feed out plenty of spare yarn, so that it’s not too tight going through
the machine. Watch the coloured needle and, turning the handle away
from you in a clockwise motion, count each time the coloured needle
comes around. Each time it passes the yarn guide it is counted as
one row. Count twelve rows. Stop with the coloured needle one space
to the right of the yarn guide.

diagram 8

Eighth

Unwind your yarn from the tension arm and yarn guide. Cut off, leaving
a tail of about 20-25cm (8-10 inches). Thread a large blunt needle
with the tail of yarn.

Hold the needle up over the centre hollow of the machine and turn
the handle of the machine until the coloured needle is ΒΌ
of the way round, level with the handle. You will notice the needles
are bobbing down near the handle, the coloured one will have disappeared
down the hole.

The coloured needle will let go of the yarn and you will hear a
soft click as it lets go. You are going to pick the threads up as
this happens, working all the way round.

diagram 9

Ninth

Gently pick the loops of yarn (stitches) off the prongs with your
needle and thread and pull the needle and thread through the loop
as the knitting needle lets go.
Turn the handle slowly to move to the next needle and continue until
you have worked off all the stitches.

diagram 10

Tenth

Hold the needle end of the yarn in one hand and the loose ending the
other and pull. The stitches will gather, the ends close, and you
will have a cucumber shaped sock tube with a tail at both ends.

diagram11.jpg

Eleventh

To prevent the stitches undoing, thread the needle through any two
stitches on each side of the centre hole and make a loop.

diagram 12

Twelfth

Feed the needle through the loop, making a knot.

diagram 13

Thirteenth

Hold both ends of the tube. Pull to tighten the knitting. Now you
have a granny tube which can be used as is for projects, or made longer
by working more rows. This tube turns into the granny circle in the
next step.

diagram 14

Fourteenth

Push both ends of the tube together until you have a puffy beret shape.
Match up the holes at both ends, push the threaded needle through
and make another locking stitch (any two stitches on either side of
the hole). Now you have a complete granny circle with two tails like
a jellyfish. Leave the tail strands unless the pattern you are following
says otherwise.

Parts of a Granny Circle

Congratulations
on your first granny circle! If you spend a moment taking a good look
at it, comparing it to this diagram, joining them together will be
much easier.

Notice how the stitches come out from the centre, like spokes from
a wheel. Count them. There should be 32.

Observe how many threads form the rings, getting smaller and smaller
towards the centre.

The spokes are stitches, the rings are threads. Now when a pattern
talks of stitches and threads you’ll know what they mean.


Text and images are derived from the Harben House manual, unknown date,
no copyright stated. All reasonable lengths to find the copyrighted owner
and gain official permission were exhausted. Edited text and images copyright
Sarah Bradberry 1999.