
Pattern
Knit 25 rows on Mattel knitter, using white worsted weight yarn.
Now divide the 16 sts up so 5 are designated an ear, 3 for the top of
the head, 5 more for another ear and the last 3 for the top of the head,
back.
I left them on the machine and reversed the handle to knit the ear. You
must knit past the last ear st about 3 hooks until the st on your last
ear needle flips over the base peg on the right near the handle. It appears
that 3 more sts have knit past the yarn guide, but they will undo when
you
reverse the handle. Same applies to going the other direction. Knit 7
rows like this, then move the end st on each side to the next hook in,
leaving 3 sts. (This took a little work with a yarn needle and a tiny
crochet hook.)
Knit 2 more rows, then draw up the 3 sts, leaving a long tail to sew
the ear with. In the mean time you will discover the rest of the sts have
probably fallen off the pegs. Run a piece of scrap yarn through 3 sts
on either side of the ear to hold the head sts and replace the other 5
sts onto the machine and join another yarn piece to repeat making another
ear as above.
Leave an even longer tail on this ear when you finish it, as it will
be used to graft the top of the head closed.
You could also do the ears by hand on maybe a #7 needle (American size).
It would probably be faster than messing with reversing the knitter for
a few sts, but then I never did things the easy way. By gum, if I’m doing
it on the knitter, then I’ll DO it on the knitter! 😎
Finishing:
Seam the ears shut down to the top of the head. I had a starting tail
to knot with on the second ear at its base, then used the long ending
tail to graft the front and back head sts together across the top of the
head. At the end of the graft, there was another tail end from sewing
the first ear
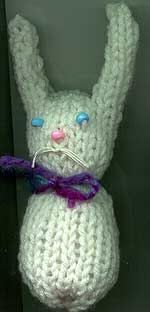
seam to knot this end to. Turn the bunny right side out. I sewed small
pony beads on with yarn, 2 blue for eyes and a pink nose. The ears didn’t
need stuffing. I stuffed my bunny with used fabric softener sheets I save.
I tied a contrasting yarn bow under the neck to make the head, then stuffed
the body and drew up the bottom and tied it closed. He could also make
a nice beanbag and would sit up on his own if some heavy stuff were put
inside to weight him, like aquarium gravel in a piece of nylon stocking.
His body is also the right size to put a plastic egg inside for the body
and maybe a
small styrofoam ball for the head if he is only a decoration, because
then he won’t be washable.
I think we can turn him into a cat if the ears are only 3 rows long.
Decrease them 2 sts each row to a point. Knot some thread whiskers under
the bead nose.
Put a pompom tail on the bunny and a 3 st I-cord tail for a cat. It needs
to attach about 5 rows from the bottom edge.
Image and pattern Copyright Ann Yotter, all rights reserved.