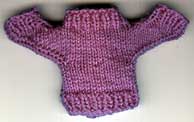
Note from Sarah: This sweater is shaped specially to fit Ty Beanie Dogs and Cats with ingenious shaping making the stitch design on the sleeves and extra room around the back to suit the shape of the toy. I knit the sample to gauge using 3.25mm needles and DK yarn but I didn’t have a cat or doggy Beanie to put it on 😛
The pattern is also available sized for Tiny Beanie Babies: Click here for the smaller pattern.
Abbreviations
dpn#1 = 1st double pointed needle
dpn#2 = 2nd double pointed needle
dpn#3 = 3rd double pointed needle
SSK = Slip the first stitch onto the RH needle knitwise, (this will twist the stitch), repeat on the second loop. Slip both stitches back to the LH needles in their new twisted state and knit them together.
inc = Increase by knitting into the back, then the front of the nextst
Materials
1 set #2 (2.5mm) dpns
1 sewing needle
3ply Baby yarn
Gauge
6 sts = 1″ (6 sts = 25mm)
8 rows = 1″ (8 rows = 25mm)
Pattern
Cast on 44sts over 3 needles (14, 15, 15)
Rnds 1-4: (K1, P1) repeat to end
Rnds 5-14: Knit
Shape for Sleeves:
Rnd 15: dpn#1 = inc, K11, inc, K1 [16sts on needle]
dpn#2 = inc, K14 [16sts]
dpn#3 = K13, inc, K1 [16sts]
Rnd 16: dpn#1 = inc, K13, inc, K1 [18sts]
dpn#2 = inc, K15 [17sts]
dpn#3 = K14, inc, K1 [17sts]
Rnd 17: dpn#1 = inc, K15, inc, K1 [20sts]
dpn#2 = inc, K16 [18sts]
dpn#3 = K15, inc, K1 [18sts]
Rnd 18: dpn#1 = inc, K17, inc, K1 [22sts]
dpn#2 = inc, K17 [19sts]
dpn#3 = K16, inc, K1 [19sts]
Rnd 19: dpn#1 = inc, K19, inc, K1 [24sts]
dpn#2 = inc, K18 [20sts]
dpn#3 = K17, inc, K1 [20sts]
Rnd 20: dpn#1 = inc, K21, inc, K1 [26sts]
dpn#2 = inc, K19 [21sts]
dpn#3 = K18, inc, K1 [21sts]
Rnd 21: dpn#1 = inc, K23, inc, K1 [28sts]
dpn#2 = inc, K20 [22sts]
dpn#3 = K19, incs, K1 [22sts]
Rnd 22: dpn#1 = inc, K25, inc, K1 [30sts]
dpn#2 = inc, K21 [23sts]
dpn#3 = K20, inc, K1 [23sts]
Rnd 23: dpn#1 = inc, K27, inc, K1 [32sts]
dpn#2 = inc, K22 [24sts]
dpn#3 = K19, inc, inc, K1 [25sts]
Neck:
Rnd 24: dpn #1 = inc, K29, inc, K1 [34sts]
dpn#2 = inc, K23 [25sts]
dpn#3 = K15, slip the remaining 10sts onto a needle holder (I use a doubled piece of yarn because it’s flexible) [15sts on needle 3]
Rnd 25: Slip next 10 sts onto needle holder and work as follows:
dpn#1 = K14, slip remaining 10sts onto a needle holder [14sts]
dpn#2 = Slip 1st 10 sts onto a needle holder, K2, SSK, K7, K2tog, K2 [13sts]
dpn#3 = K1, SSK, K9, K2tog, K1 [13sts]
Optional rnd 25 for those tiny beanie babies that have smaller necks.
dpn#1 = K2, SSK, K6, K2tog, K2 [12sts]
dpn#2 = K2, SSK, K7, K2tog, K2 [13sts]
dpn#3 = K1, SSK, K9, K2tog, K1 [13sts]
If you use optional row 25, remember to adjust the sts count.
Rnd 26: dpn#1 = K1, P1 ribbing across [14sts]
dpn#2 = K1, P1, SSK, (P1, K1) twice, P1, K2tog, P1, K1 [11sts]
dpn#3 = P1, SSK, (P1, K1) 3 times, P1, K2tog, P1 [11sts]
Rnds 27 and 28: Work all sts in K1, P1 ribbing
Bind off neatly in rib.
Sleeves:
Beginning where the sleeve is attached to the body put the 20 sleeve sts
onto 3 needles, rejoin yarn and work thus:
Rnds 1,2, and 3: K1, K2tog, K5, inc, K1, inc, K6, K2tog, K1 [20sts]
Rnd 4: K1, K2tog, K14, K2tog, K1 [18sts]
Rnds 5, 6, and 7: (K1, P1) 9 times [18sts]
Bind off neatly in rib. Work second sleeve to match.
Making Up
Sew in all loose threads neatly.
Copyright © Rick Farish. All rights reserved. Used with permission.
