
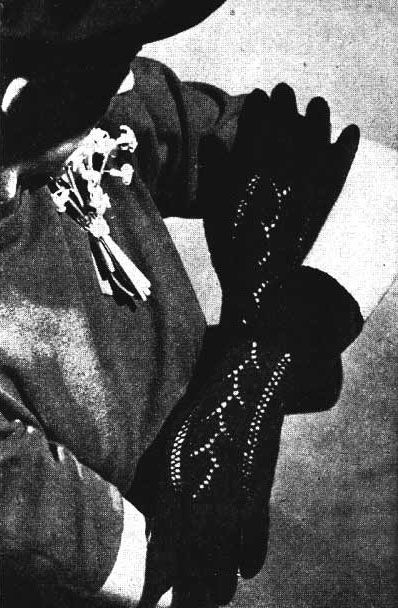
The Lacy Gloves knitting pattern is a vintage pattern from the 1940’s. It features a lace knit pattern of leaves and fagoting on the back of each glove and is sized to fit adult women. These gloves are knit on 2 needles.
This pattern uses old UK needle sizes and fingering weight yarn.
Pattern
These gloves, knitted on two needles, were featured in The Australian Women’s Weedkly, October, 1942. Reprints have failed to satisfy repeated demand, so here you are…
Materials
2 oz. Paton’s super-fingering 3-ply US Size 1 straight needles (old UK No. 13)
Tension and Measurements
Worked at a tension of 10 stitches to the inch in width on the plain knitting, these gloves will fit a hand taking size 6 in skin gloves.
This is a small size for a change, but No. 12 needles will make the next size larger, or stitches may be increased after the wristlet and these extra stitches divided equally between the back of the hand and the palm. On the back, the extra stitches must be knitted plain at each side of the pattern so as to avoid interfering with the center leaf panel.
Abbreviations
K – knit
P – purl
yo – yarn over
skp – slip 1 stitch, knit 1 stitch, pass slipped stitch over knitted stitch
kfb – knit through the front and the back of the same stitch (increases one)
To Work the Left-Hand Glove
Begin at the wrist. Cast on 50 stitches. Work 36 rows of k1-p1 rib.
Now, begin the pattern as follows:
Row 1 (RS): k26, skp, yo, k2, k2tog, k2, yo, k1, yo, k5, (skp) twice, yo, k6.
Row 2 (WS): p4, p2tog, yo, p14, p2tog, yo, p2, which finishes the pattern, then p26.
Row 3: k26, skp, yo, k2, k2tog, k1, yo, k3, yo, k4, (skp) twice, yo, k6.
Row 4: As Row 2.
Row 5: k26, skp, yo, k2, k2tog, yo, k5, yo, k3, (skp) twice, yo, k6.
Row 6: As Row 2.
Row 7: K20, kfb (to begin the thumb gusset), k2, kfb (for second line of gusset), k2, skp, yo, k2, k2tog, k5, yo, k1, yo, k2, (skp) twice, yo, k6.
Row 8: p4, p2tog, yo, p14, p2tog, yo, p30.
Row 9: k28, skp, yo, k2, k2tog, k4, yo, k3, yo, k1, (skp) twice, yo, k6.
Row 10: As Row 8.
Row 11: k20, kfb, k4, kfb, k2, skp, yo, k2, k2tog, k3, yo, k5, yo, (skp) twice, yo, k6.
Row 12: p4, p2tog, yo, p14, p2tog, yo, p32.
These twelve rows form the lace pattern, so repeat them twice more, but on every 3rd, 7th, and 11th pattern row, increase two stitches on the thumb gusset, working two stitches more in stockinette stitch between the increases after every increase row and allowing for these extra stitches in subsequent rows (66 stitches). The first row of the second pattern will begin with k30 for the stockinette stitch because four gusset increases have been made, and it is a good plan for beginners to add the number of stitches increased after every increase row and put that number down on paper. It will then be easy to remember to knit the right number at the beginning of the right-side rows and to purl the corresponding number at the end of the wrong-side rows. All increase rows will begin with k20 as on the 7th row of the first pattern because the extra stitches are counted between the two increase points.
The Thumb
k40, turn, p17, turn and cast on 4 stitches. Work 32 in stockinette stitch on these 21 stitches or for length required.
To Shape the Top
(k2tog, k1) to the end of the row, turn and purl to the end. Turn and k2tog to the end. Break yarn, leaving a long end, and thread this through the remaining stitches. Draw together and leave enough to sew up the thumb seam.
The Hand Continued
Holding the world with the right-side facing, pick up and knit 5 stitches from the base ofd the thumb with the niddle holidng 23 plain stitches, then work the remaining 26 stitches from the back of the hand, keeping 20 stitches in lace pattern. (54 stitches)
Work 17 rows more in pattern as at the beginning, but omit the thumb gusset increases and work 30 stitches in stockinette stitch at the beginning of the ride-side rows. (More rows may be worked here for a longer hand.)
Now set the stitches in position for the fingers as follows:
The First Finger (Pointer)
Holding the work with the right side facing, knit 34, turn, cast on 3 stitches, turn and p19 for this finger, leaving 18 stitches for the front of the hand and 20 stitches on the back.
Work 32 rows more on these 19 stitches, or for length required, then shape the top and finish as for the thumb.
The Second Finger (Middle)
With the right side facing, puck up and knit 4 stitches from the base of the first finger, knit 7 stitches from the back of the hand, cast on 3 stitches, turn and p19.
Work 36 rows or for length required on these 19 stitches, then finish the top as for the thumb.
The Third Finger (Ring)
Pick up and knit 4 stitches from the base of the second finger, k6 from the back of the hand, cast on 3 stitches, turn, and p19.
Work as for the first finger.
The Fourth Finger (Pinky)
Pick up and knit 3 stitches from the base of the third finger, k14, turn and p17.
Work 26 rows on these 17 stitches, then finish the top as before.
The Right-Hand Glove
Work the ribbing as for the first glove, then reverse the position of the pattern by working the rows backwards until the thumb gusset is finished, when there will be 66 stitches.
To divide the stitches for the thumb: k4, pattern 20, k19, turn, p17, turn, cast on 4 stitches (21 stitches). Now work the thumb as given for the left-hand glove.
To continue the hand, hold the world with the right-side facing and on to the working needle with 26 pattern stitches pick up and knit 5 stitches from the cast-on edge at the base of the thumb, then k23 across the front of the hand (54 stitches).
Work 17 rows more, keeping 30 stitches in stockinette stitch at the end of the right-side rows.
The First Finger (Pointer)
Work 36 stitches, turn and p16, cast on 3 stitches, turn, leaving 18 stitches for the front of the hand and 20 on the back.
Work on these 19 stitches as for the first finger of the left hand.
Now work the other fingers as for the left hand, but hold the work with the wrong side facing when beginning each finger so that the knit and purl rows will be reversed.
To Make Up the Gloves
Darn in all ends and press the gloves with a hot iron over a damp cloth and a thick blanket underneath.
Join the finger and thumb seams, then join the seam down the side of the hand. Turn inside out and press the seam on the wrong side.