Menu Close

Month: May 2014

Rainbow Loom Experiments – Adding Charms , Button Closures and and Loomey Time Watches

Rainbow loom bracelets with added bits and pieces

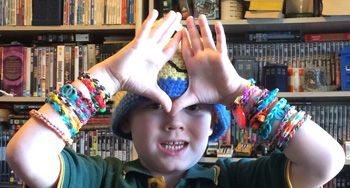
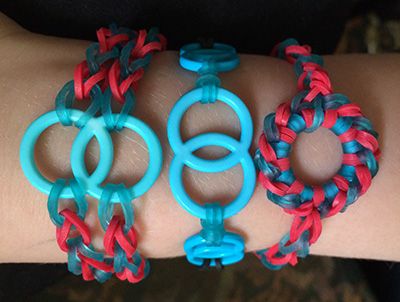
My son Charlie is only 5 years old, so coming up with Rainbow Loom projects that are not repetitive, and he can make by himself can be challenging but I think we have found a solution. My craft junk box 🙂

Beads on rainbow loom bands

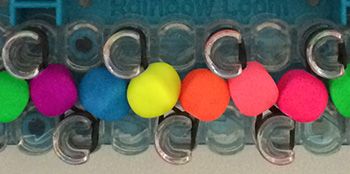
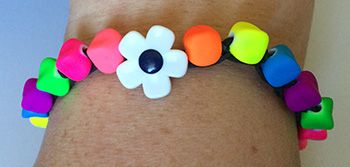
Any bead with a hole large enough for a rubber band to pass through immediately becomes a great addition for a bracelet.

How to add beads to a rainbow loom bracelet

They can be placed anywhere on the loom and are permanently attached after the bands are hooked. I take no credit for this idea, Charlie came up with it all by himself!

A rainbow loom bracelet with beads

The finished bracelets have beads sitting around the outside edge.

Beaded bands on a rainbow loom

You can also place the brands straight onto the loom as if they were just rubber bands and hook them up as you normally would.

Beaded rainbow loom bracelet with a button closure

I would use beads that are a bit smaller than these though. I bought these from Rainbow Fun and even though they are great looking beads, we haven’t been able to make a bracelet that didn’t either have the beads spaced too far apart, or bunched up too close together.

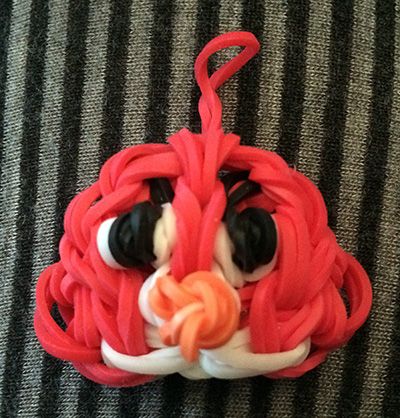
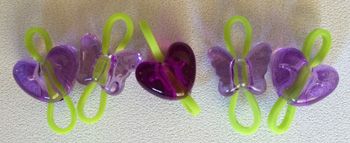
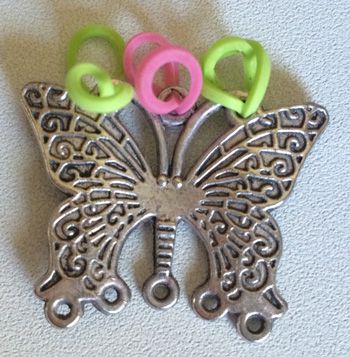
These little experiments made me wonder how would I go about adding large bracelet charms like my butterfly shown below. I knew it was possible because of the Loomey Time watches so I checked out their website, where you can find a good selection of videos on adding bands to Loomey Time watches, with bands in lots of different styles.

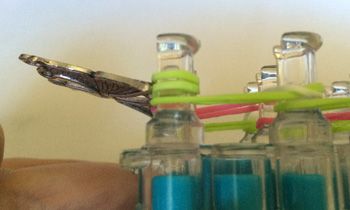
So, using all this information, here’s what I came up with. Step 1: Thread bands through the holes in your charm.

How to add a centre charm to a rainbow loom bracelet 1

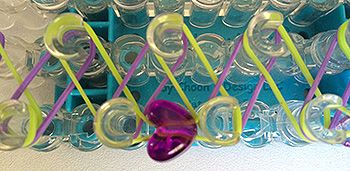
Step 2: Put your bands on your loom, leaving the end of the design open.

How to add a centre charm to a rainbow loom bracelet 2

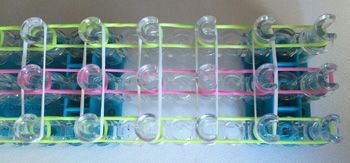
Step 3: Put the bands you threaded through the charm onto the end of the loom.

How to add a centre charm to a rainbow loom bracelet 3

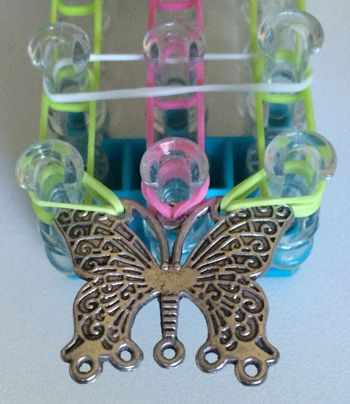
Here’s a view from the side.

How to add a centre charm to a rainbow loom bracelet 4

Now, beginning at the end where you have placed the charm, hook your design. I made a triple single bracelet but there are many different designs that will work with this method.

Here is the first half of my bracelet. I used the full length of the loom to make an adult sized bracelet but you can start placing your bands halfway up the loom for a kid size one.

How to add a centre charm to a rainbow loom bracelet 5

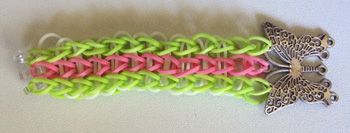
Repeat for the other side. Then make some more! The second bracelet below is a starburst bracelet, like the one I’ve shown before.

How to add a centre charm to a rainbow loom bracelet 6

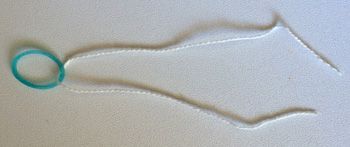
This technique can also be used to add button closures on a bracelet instead of c-clips.

How to add a button closure to a rainbow loom bracelet 1

It’s easier to thread bands through a button using an old embroidery threading trick for thick threads. Take a thread that will easily go through the holes of your button doubled. Use a thicker thread like perle 8 or 10 rather than sewing thread as that might cut your bands. Thread your band onto your piece of cotton.

How to add a button closure to a rainbow loom bracelet 2

Thread the cotton through one hole of your button

How to add a button closure to a rainbow loom bracelet 3

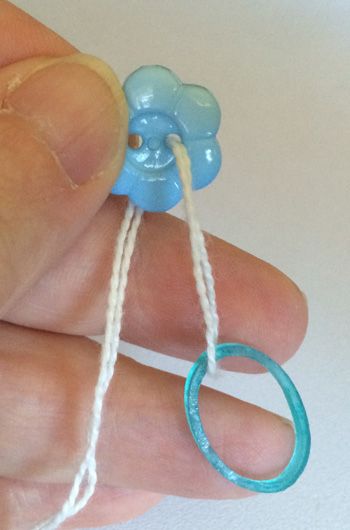
and pull the band halfway through.

How to add a button closure to a rainbow loom bracelet 4

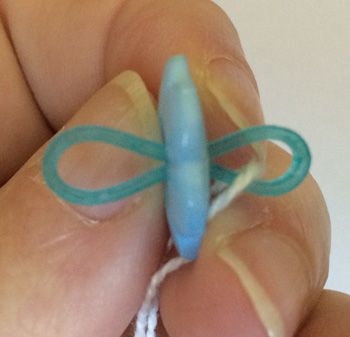
Thread the same band through the other hole in your button. If your button has four holes, use two rubber bands, one for each pair of holes.

How to add a button closure to a rainbow loom bracelet 5

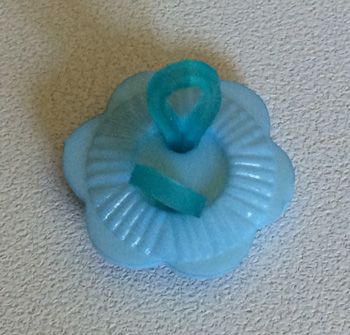
Put your bands on your loom, then the button last of all, just as I did for the butterfly bracelet. When you’ve finished hooking your bracelet, put the button through the last band that you hooked to secure it and you have a rainbow loom bracelet with a decorative button closure!

How to add a button closure to a rainbow loom bracelet 6

Charlie would like to know what you think of his collection so far? He actually has more bracelets than this but his arms weren’t long enough to get them all on 😉

Some of Charlie's collection of rainbow loom bracelets

signature

Rainbow Loom Mini Baskets Video Tutorial

Rainbow loom Easter basket

Charlie’s latest request for a rainbow loom project was for me to make him a basket. There are a lot of videos on making baskets and bags andit took me quite a lot of video watching to find what I consider to be the best one.

Craft Life have once again come through with a very cute project and high quality video. Click here for Craft Life’s rainbow loom basket tutorial.

Now, I need to buy another loom and find an equally good video on making a bag because he wants something flat and larger, lol (no, I do not indulge my children that much! He’s saved up for his own loom and as soon as the local shop gets one in I’ll be borrowing it).

signature

8 Ways to Weave in Your Ends – Knitting Tutorials

I’ve been a knitter of sorts for almost 40 years and can confidently say that if I can imagine it, I can knit it. However there’s one thing that I’ve never been 100% sure about: darning in my ends. My darns are always secure and neat but after hearing a judge at a knitting competition say that that best knitters darn in their ends so you can’t even find them, my confidence in my technique flew right out the window (along with any desire to enter any more knitting competitions).

The Purl Bee has set me straight with her tutorial on eight different ways to darn in your ends when knitting. I was doing it properly all along!

Weaving in Your Ends – Knitting Tutorials: Finishing Techniques – Knitting Crochet Sewing Embroidery Crafts Patterns and Ideas!.

The Purl Bee is a great blog, not just for this article. So even if you know how to darn in your ends when you knit, check it out anyway. You’ll be glad you did!

signature

Rainbow Loom Starburst Bracelet

Rainbow loom starburst bracelets

The starburst bracelet is probably the first complicated looking bracelet that most people try when learning to use a Rainbow Loom so I decided to give it a go and make Charlie a couple of them. He’s only five years old, so anything more complicated than a triple single is usually up to me.

I used the following video to learn to make my bracelets and would add the following tips:

  1. When adding the bands for the starburst patterns, push the way down on the pegs as you go
  2. Keep them in order. It will make hooking the bands so much easier.
  3. Use a contrasting colour for the capping bands on the starbursts at least the first time you make the pattern. It will help you keep track of where the capping band lies as you work.

Despite it’s complicated look, I found this design is very easy to work and memorise and it’s already become a favourite of Charlie’s and mine.

I hope you’re enjoying my series of Rainbow Loom posts and that it’s saving you a lot of time having to go through youtube videos to find the best ones! Don’t forget to sign up to be notified of future blog posts if you’re interested in more. Next time I’ll be posting a photo tutorial of my own as well as some videos on adding large charms, Loomey Time watches and button closures.

signature

Rainbow Loom Angry Birds (Red)

Rainbow loom Red Angry Bird

Charlie is a big Angry Birds fan, so I thought I’d have a go at he insisted I make him a Red Angry Bird charmon the rainbow loom. I think it turned out quite well, even though I didn’t have the right coloured bands for his belly.

I would rate this as a challenging project. Because of the amount of bands on some of the pegs, you have to pay very close attention to picking up the correct ones when moving them with the hook. You’ll also need good quality rubber bands as they are under a lot of strain during certain parts of the construction.

I used the following video by DIYMommy to make my bird. It’s very thorough but a little bit fast to keep up with. Judicious use of the pause button will solve that problem, though.

Anyone who has been following my rainbow Looming adventures so far may be wondering why I skipped straight from beginner projects to advanced ones. I’ve found that my past experience with French knitting and crochet have really helped me get a grasp of the Rainbow Loom in no time flat.

Now I’m off to search through the stash for a pony bead because my 20 year old daughter has put in a request for an Iron Man charm…

signature